USING THE VIDEO CONTROL FUNCTIONS
USING THE VIDEO CONTROL FUNCTIONS
Touch the LCD screen to control video functions. Supports video cross fader functions and video channel switch functions.
VIDEO SOLO MODE
HI
FADER AV
SYNC
CROSS FADER
ASSIGN
Cross fader lever (A/B)
OPERATING THE VIDEO CROSS FADER
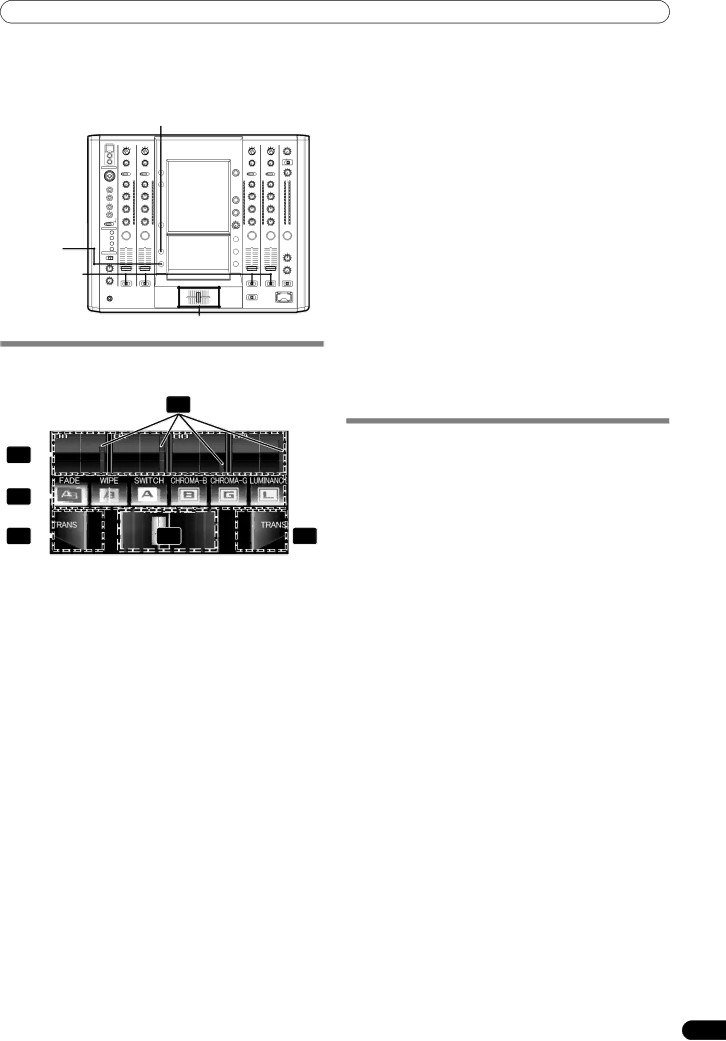
The video cross fader is used to manipulate video images.
|
|
|
| 2 |
|
| 1 |
|
|
|
|
|
|
|
|
| |
| 3 |
|
|
|
|
|
|
|
|
| |
| 5 |
|
| 4 | 5 |
|
|
| |||
|
|
|
|
| |
1 | Channel | Monitors videos from each input channel | |||
| monitor | (1 through 4). |
| ||
|
|
|
| Touch the channel monitor to output the | |
|
|
|
| video of each channel. |
|
|
|
|
|
|
|
2 | Video level | Indicates video output level. |
| ||
|
|
|
| Appears red when FADER AV SYNC is | |
|
|
|
| ON, and appears green when FADER AV | |
|
|
|
| SYNC is OFF. |
|
|
|
|
|
| |
3 | Video mix effect | Use to select type of video change when | |||
| button | video cross fader is operated. |
| ||
|
|
|
|
|
|
4 | Video Cross | Video cross fader. |
| ||
| fader |
|
| ||
|
|
|
|
| |
5 | Transfomer | Outputs video of touched side, regardless | |||
| button [TRANS] | of position of video cross fader. |
| ||
|
|
|
|
|
|
1Using the CROSS FADER ASSIGN switch, choose either Channel A or Channel B of the cross fader
•When assigned to Channel [A], the border of the channel preview monitor appears blue; when assigned to Channel [B], the border of the channel preview monitor appears red. When assigned to [THRU], the border appears gray.
•When JPEG is assigned, the [JPEG] indicator will appear at the upper left of the channel monitor.
2Touch a video mix effect button to choose a video mix effect.
•The selected button will appear white, and the icon will move as an animation.
•For each effect refer to P. 16.
3Operate the video cross fader.
•The video will change as video mix effects are being applied.
•When FADER AV SYNC is set to ON, the video cross fader section’s [AV SYNC] indicator will appear, and the video cross fader will operate in synchronization with the cross fader. Touching the video cross fader allows you to manipulate the video while you are touching it. Release to return to the same position as the cross fader.
•When FADER AV SYNC is set to OFF, the video cross fader section’s [AV SYNC] indicator goes out, and the sound and video are controlled independently. The sound is controlled by the cross fader, and the video by the video cross fader.
•When the [TRANS] button is touched, the video
corresponding to the touched side will be output regardless of the position of the video cross fader.
•When all cross fader assigns are set to [THRU], the video cross fader and [TRANS] button will appear gray, and if assigned, the buttons will function as video cross fader, [TRANS] buttons, with [A] side appearing blue and [B] side appearing red.
OPERATING THE VIDEO CHANNEL SWITCH
The channel monitor functions as a switch to turn that channel’s video ON/OFF.
1Touch the channel monitor.
•The touched video output will alternate ON/OFF.
•When FADER AV SYNC is set to ON, the video level will be displayed in red. If the video level is not dispayed (channel fader is [0]), touch the channel to output that channel’s video. Or alternately, when the video level is displayed, touching the channel monitor will cause that channel’s video to turn off during the duration the screen is touched.
•When FADER AV SYNC is set to OFF, the video level is
displayed in green. The channel monitor can be touched to alternate that video output ON/OFF.
15
En