Multiquip WM63H5, WM63H8 manual Belt Slip Lever Start/Stop Position

Page 23

start-up

6.Place the belt slip lever (Figure 19) in the START/STOP (disengaged) position.

START/STOP

STOP

DRUM LATCH PIN

POSITION

BELT SLIP

LEVER

Figure 19. Belt Slip Lever

(Start/Stop Position)

CAUTION

Make certain the drum lock pin (Figure 20

and Figure 21) is placed to the RIGHT (when

viewing the mixer from the towpole end) of the drum stop block which is welded to the front side of the drum. Also make sure lock pin is fully

engaged (locked).This will prevent the drum from tipping.

LOCK

PIN

FRONT

POST

DRUM

Figure 20. Drum Lock Pin (Side-View)

BLOCK

TOW OR LOCKED

POSITION

Figure 21. Drum Lock Pin (Right Position)

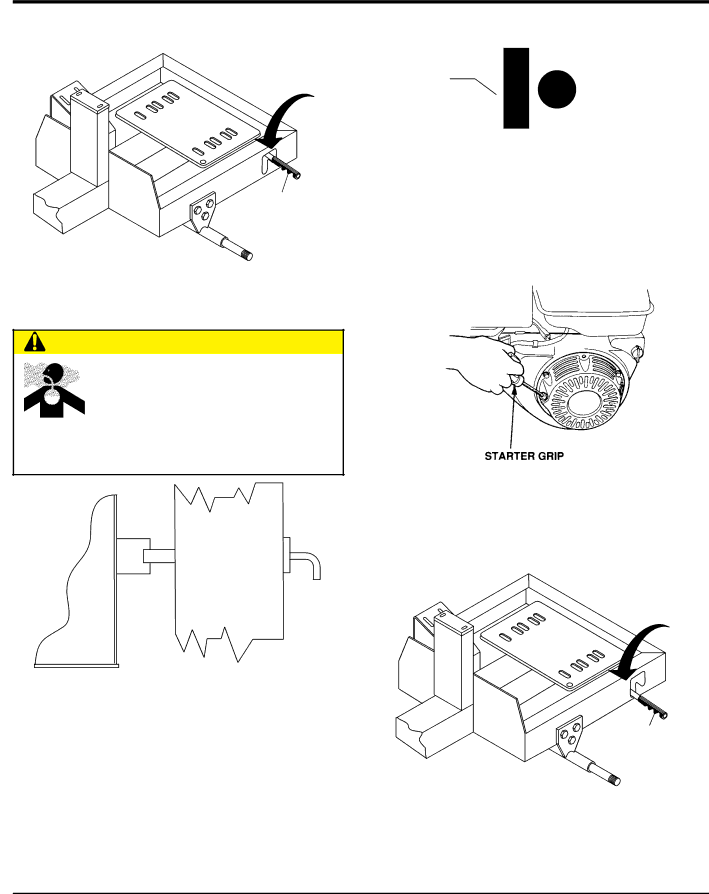
7.Pull the starter grip (Figure 22) lightly until you feel resistance, then pull briskly. Return the starter grip gently.

Figure 22. Starter Grip

8.Place the belt slip lever (Figure 23) in the mix position. This will tilt the engine placing tension on the V-belts enabling the shaft to rotate.

MIX

POSITION

BELT SLIP

LEVER

Figure 23. Belt Slip Lever (Mix Position)

WM63-series Mixer • operation and parts manual — rev. #0 (069/27/12) — page 23

Image 23
Contents MODELs WM63H5, wm63h8 Wm63e Proposition 65 Warning Silicosis Warning Silicosis/Respiratory WarningsWM63H5/WM63H8/WM63E Plaster And Mortar Mixers Table of ContentsChoose from three easy options Burn hazards Safety informationSaFeTY messages Explosive fuel hazardsGeneral saFeTY Before servicing equipment Mixer saFeTYEngine saFeTY gasoline models onlY Power Cord/Cable safety Fuel saFeTY gasoline models onlYGeneraTor saFeTY EleCTriC moTor saFeTY eleCTriC models onlY„ alwaYs shutdown engine before transporting Towing saFeTYEnvironmenTal saFeTY Tow Bar to Mixer Connection Safety chain connectionMixer Specifications SpecificationsDimensions DimensionsGeneral information Mixer Components ComponentsFuel Check InspectionBefore Starting Engine Oil CheckGrease Fittings Dumping Mechanism Start/Stop SwitchBelt Check Initial Servicing Basic engineElectric Motor Connection Electric motorElectric Motor Recommended Extension Cord Sizes Electric Motor Voltage SwitchAdjust paddles as shown in Figure Paddle blade adjustmentStart-up Turn the engine switch to the on positionBelt Slip Lever Start/Stop Position Stopping the Mixer electric motor OperationMixing/Dumping Stopping the Mixer GasolinePage First Every Maintenance engineEngine oil Engine air cleanerInstall drain bolt with sealing washer and tighten securely Drum Bearing Bracket Lubrication Maintenance MixerBall Socket and Clamp Face Maintenance Drum Head SealsInspectTooth Contact between Main Gear and Drive Pinion Wheel BearingsMain Gear and Drive Pinion Alignment Tires Wear/Inflation Grease Fittings Zerk Maintenance Electric MotorGear Lubrication Tires/Wheels/Lug NutsNever use an pneumatic air gun to tighten wheel lug nuts Lug Nut Torque RequirementsStart all wheel lug nuts by hand Suspension Mixer CleaningMixer Storage Troubleshooting engine TroubleshootingAir cleaner dirty? Clean or replace air cleaner Defective or worn drum support Adjust if necessaryDrum difficult to discharge tilt Blades adjusted too tight Replace sealsWiring diagram Explanation of Code in Remarks Column Qty Description Suggested Spare PartsNameplate and decals Safety Instructions521232 Decal, inspect before towing Part Name QTY RemarksFrame assy 507444 514842491692 530023Paddle shaft assy 530141 514752492584 NUT, Lock 1/2 530140C 3215 SCREW, HHC 1/2-13 X 3-1/2 EM200292Part Front Frame Rear Frame Steel tub assy491008 5300283249 20561-001Drum and paddle shaft complete assy EM961019 516069EM969013 NUT, Lock 3/8 3019092 07594-012 Roll PIN 3/16 X 3/4 20654-001Axle assy 8164 346929194 516476Engine assy 500214 KEY, Square 1/4 X 1/4 X 1-1/2 502226 EM905016492378 Bolt 3/8 NC X 1-3/4 G5 JISB2804C25 513868Electric motor assy 502213 492378 Bolt 3/8 X 1-3/4 G5 20216-00120061-001 492582 NUT, Nylon 5/16-18 35L229S302112 Cabinet assy2203 515014490202 13287FreigHT poliCY Terms and conditions of sale partsPage HERE’S HOW to GET Help