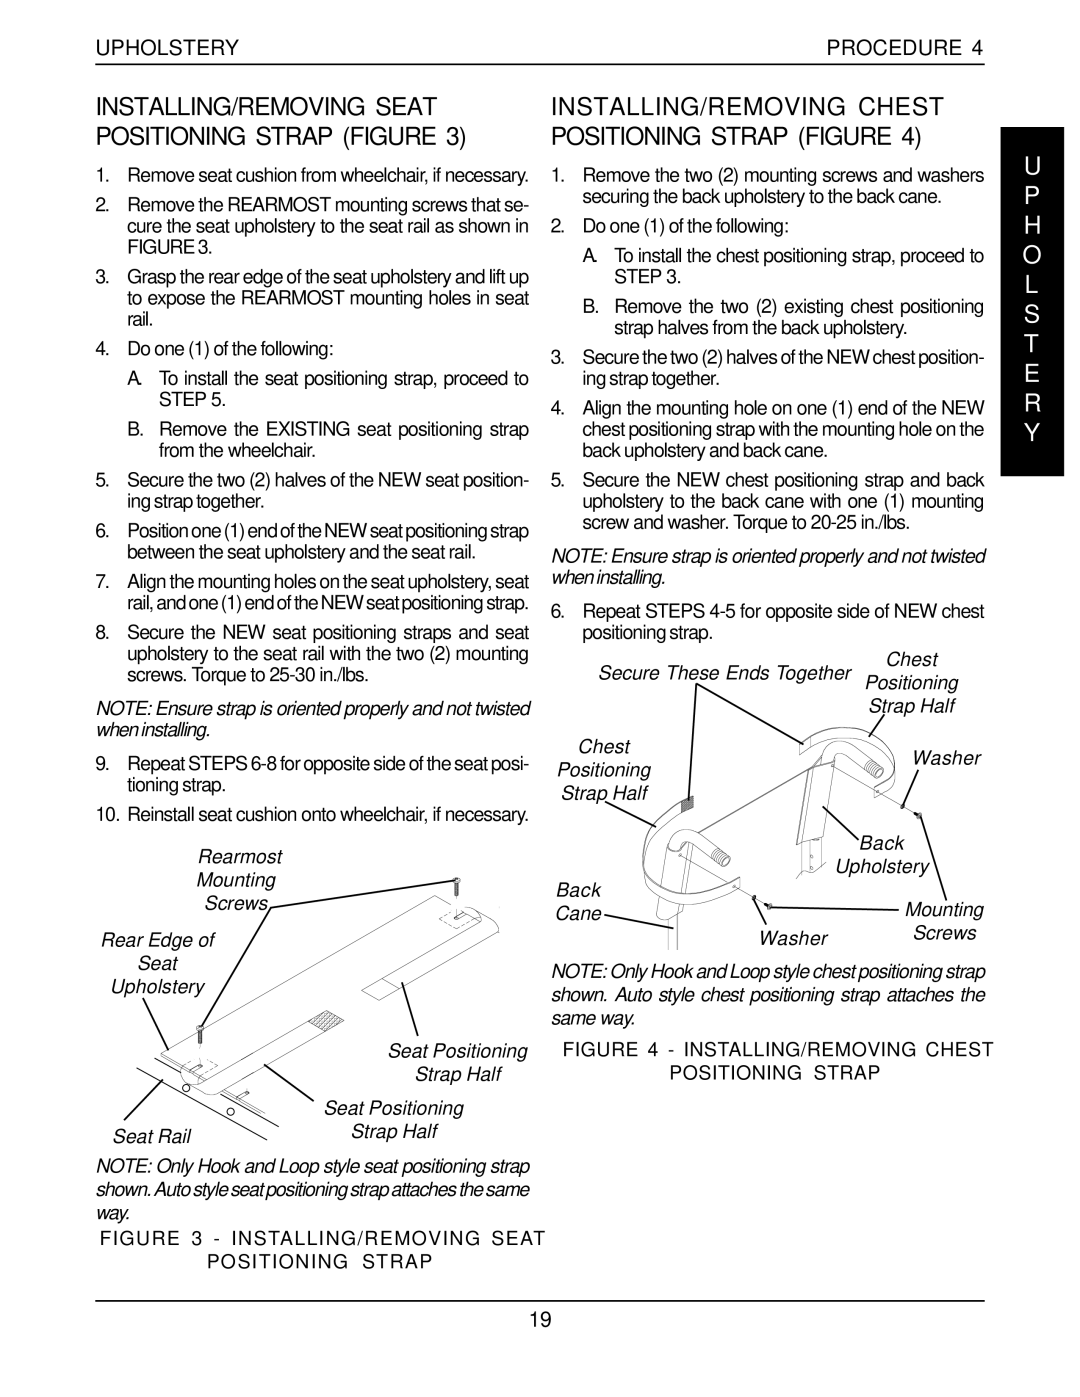
Invacare 1098348, 1101100 Troubleshooting, Maintenance/Transporting, Procedure 2SAFETY Inspection

Page 14

I

N

SS

AP

FE

EC

TT

YI

O N

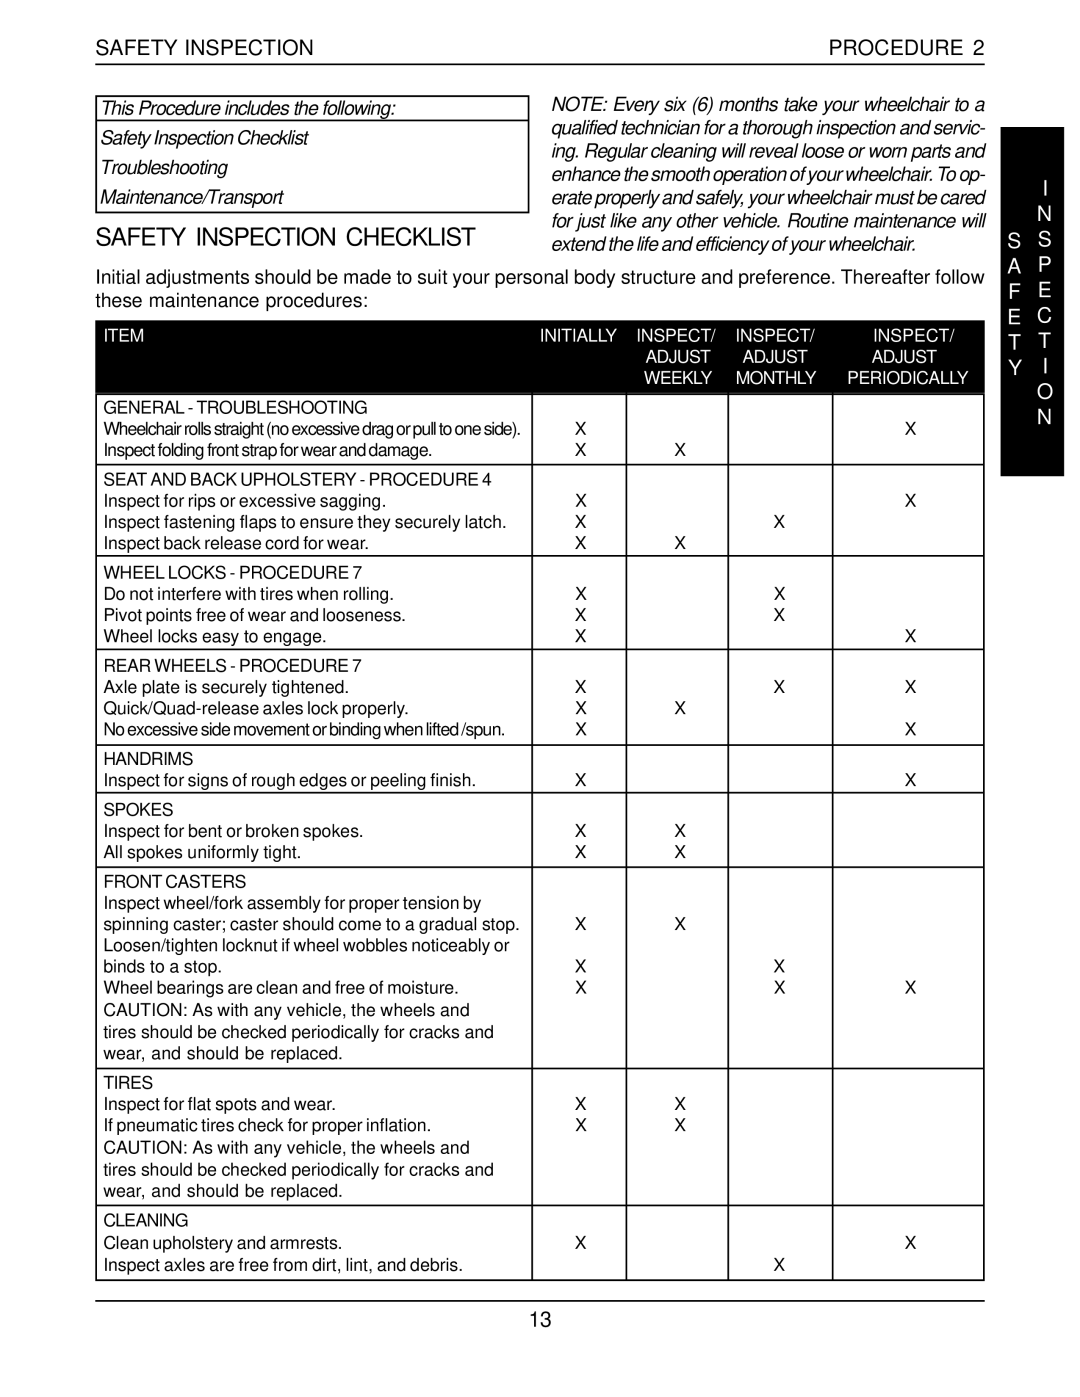
PROCEDURE 2SAFETY INSPECTION

TROUBLESHOOTING

CHAIR

CHAIR

SLUGGISH

CASTER

SQUEAKS

LOOSENESS

CHAIR

SOLUTIONS

VEERS

VEERS

TURN OR

FLUTTERS

AND

IN CHAIR

3 WHEELS


RIGHT

LEFT

PERFORMANCE


RATTLES


X

X

X

X


X

Check tires for correct


and equal pressure.


X

X

X

X


Check for loose stem


nuts.


X

X


Check spokes/nipples.


X

X


X


X

Check caster headtube


angle.


X

X


X

Check that rear wheels


are equally spaced away


from seat frame


(Procedure 7).


MAINTENANCE/TRANSPORTING

Maintenance Safety Precautions

WARNING

After ANY adjustments, repair or service and BEFORE use, make sure all attachment hardware is tightened securely - other- wise, injury or damage may result.

CAUTION

DO NOT overtighten hardware attaching to the frame. This could cause damage to the frame tubing.

Suggested Maintenance Procedures

1.BeforeusingyourInvacareSPYDER,makesureallnuts and bolts are tight. Check all parts for damage or wear and replace. Check all parts for proper adjustment.

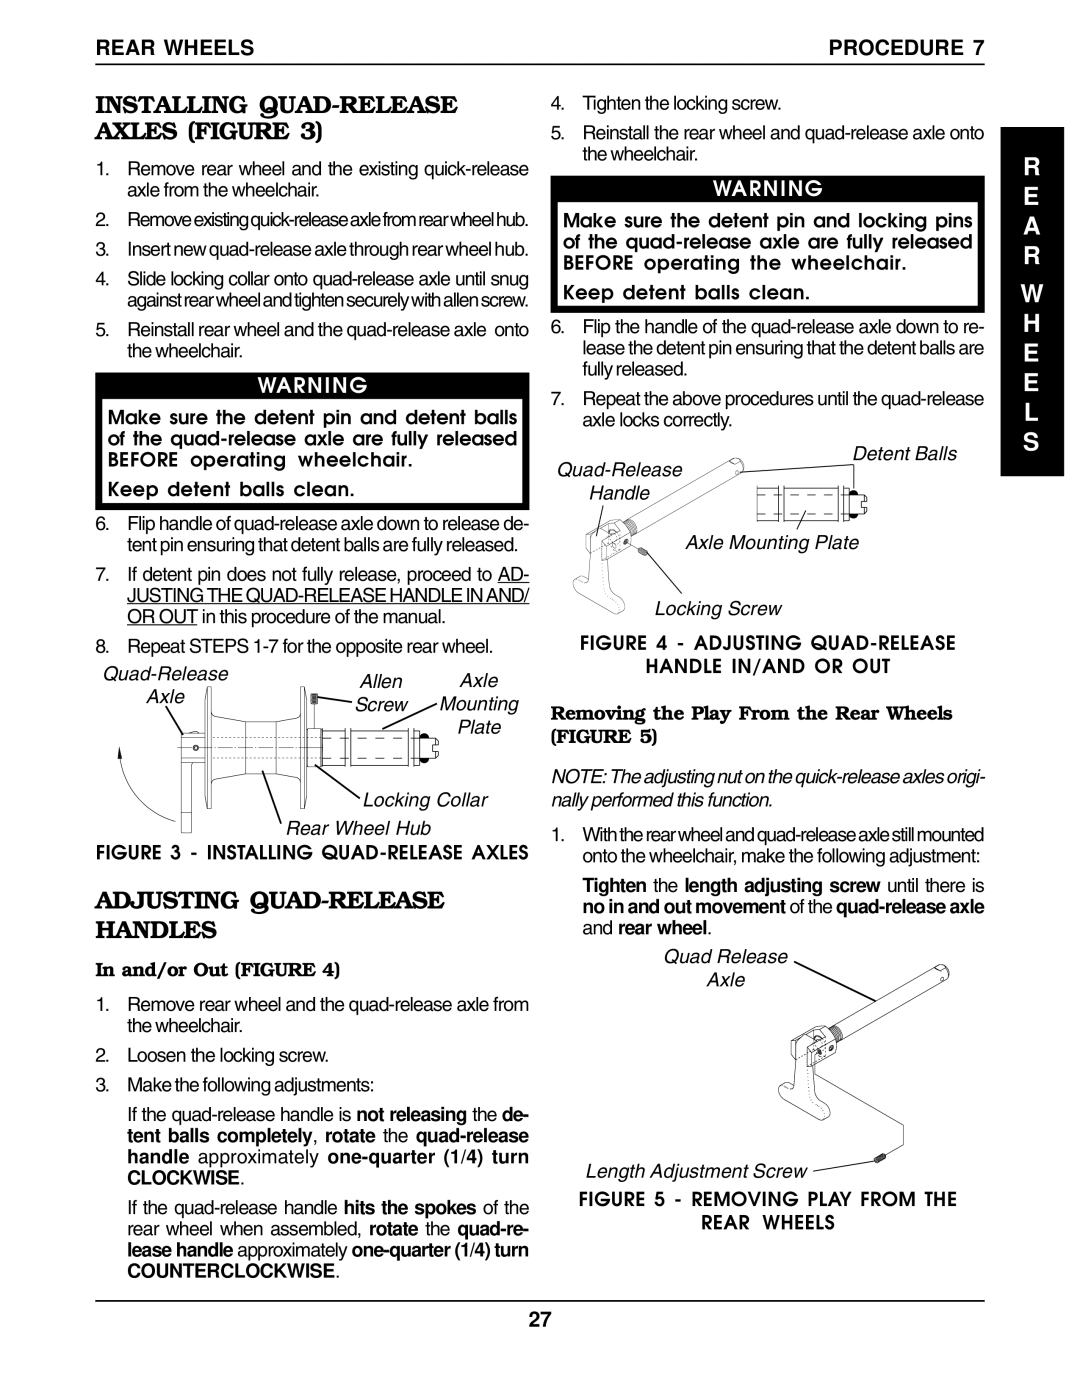
2.Keep quick/quad-release axles free of dirt and lint to ensure positive locking and proper operation. Refer to ADJUSTING QUICK-RELEASE AXLES or AD- JUSTING QUAD-RELEASE AXLES in PROCE- DURE 7 of this manual.

3.Oil quick-release axles at least once (1) a month (3- in-1 oil ® or equivalent).

WARNING

DO NOT use the wheelchair unless it has the proper tire pressure (p.s.i.). DO NOT overinflate the tires. Failure to follow these suggestions may cause the tire to explode and cause bodily harm.

4.Recommended tire pressure is listed on the sidewall of the tire.

CAUTION

As with any vehicle, the wheels and tires should be checked periodically for cracks and wear, and should be replaced.

5.Check wheels and tires periodically for cracks and wear. Ifdamaged,havethemreplacedbyaqualifiedtechnician.

6.Regularly check for loose spokes in the rear wheels. If loose, have them adjusted by a qualified technician.

7.Periodically check handrims to ensure they are se- cured to the rear wheels. If loose or damaged, have them tightened or replaced by a qualified technician.

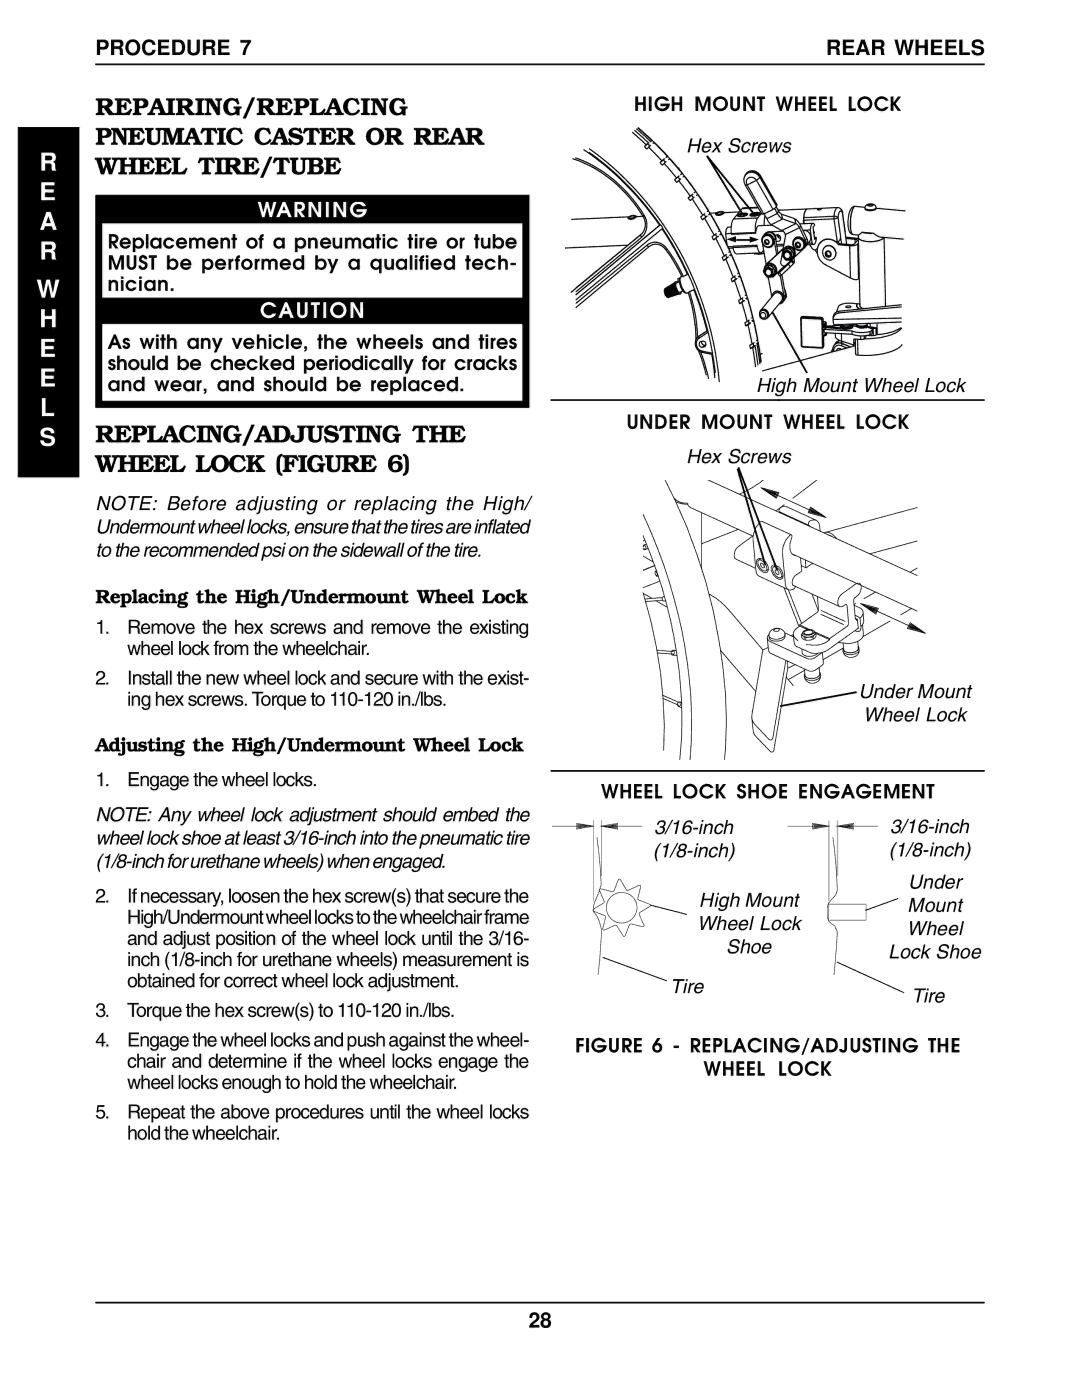
8.Periodically adjust wheel locks in correlation to tire wear. Refer to REPLACING/ADJUSTING THE WHEEL LOCK in PROCEDURE 7 of this manual.

9.Periodically check caster wheel bearings to make sure they are clean and free from moisture. Use a Teflon® lubricant if necessary.

10.Check upholstery for sagging, rips or tears.

Transporting the Invacare Spyder

1.Remove the seating system. Refer to seating sys- tem owner's manual.

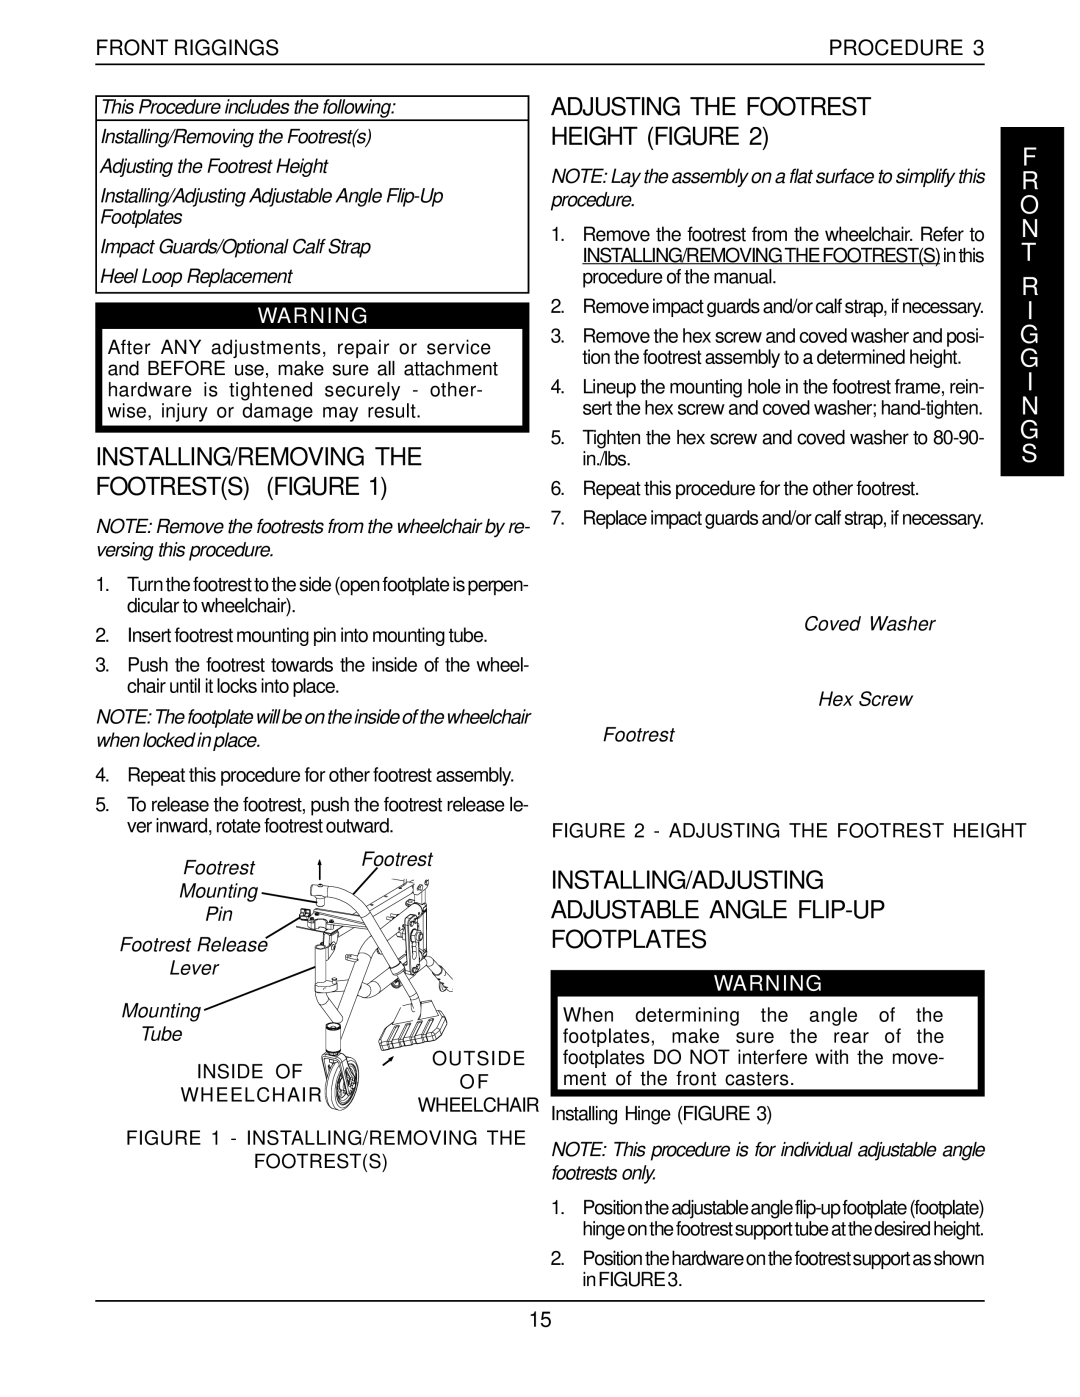
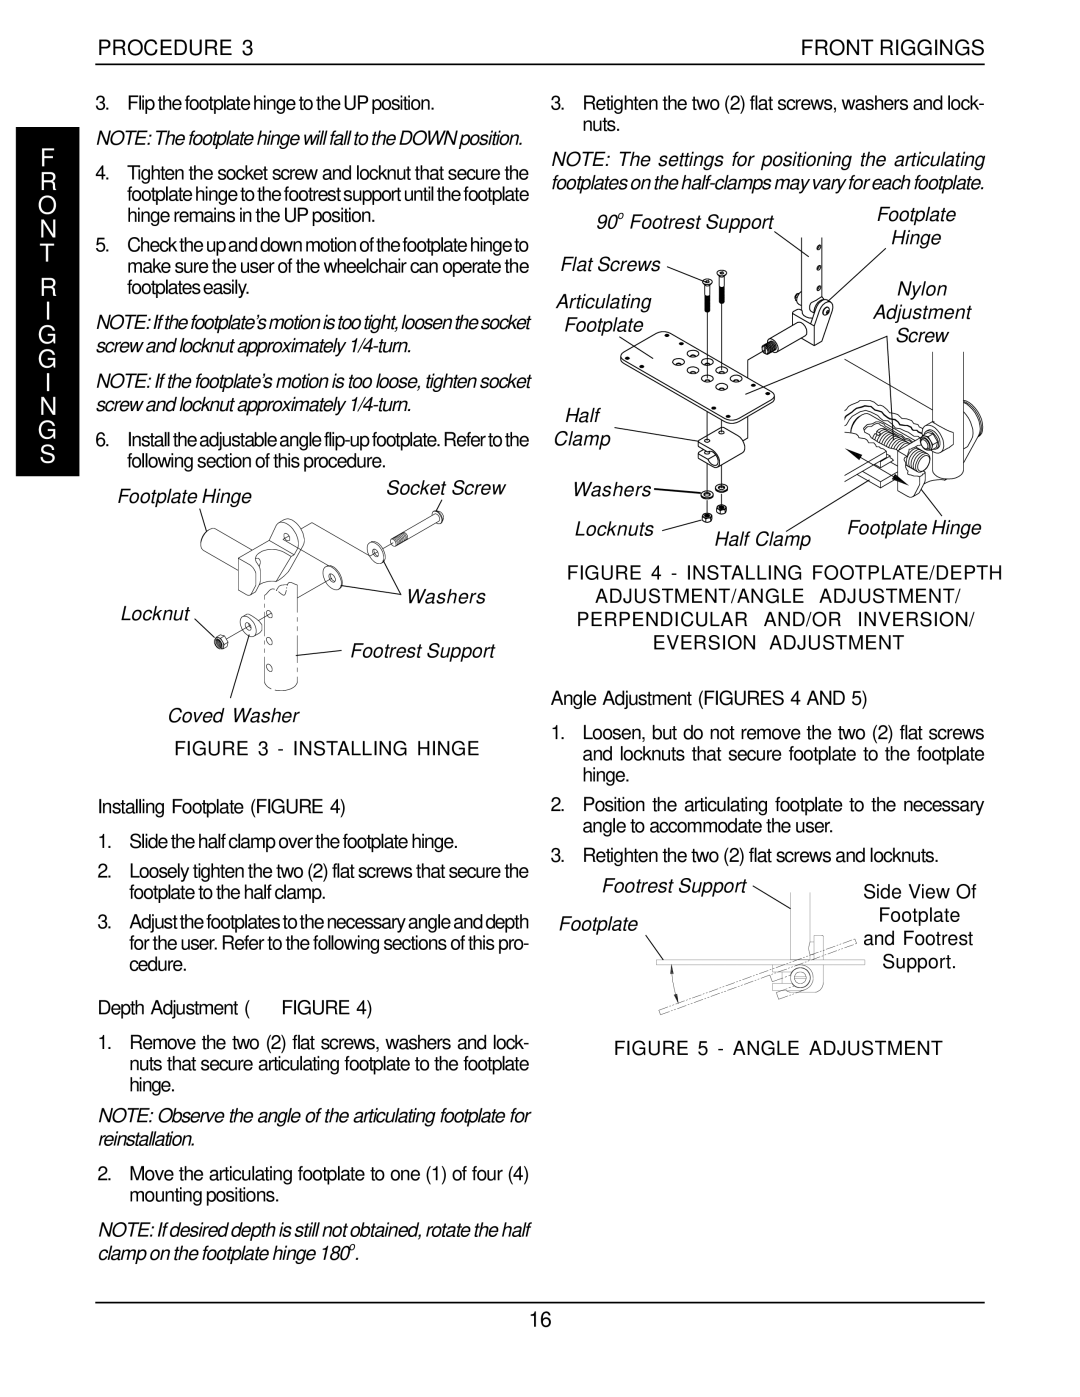
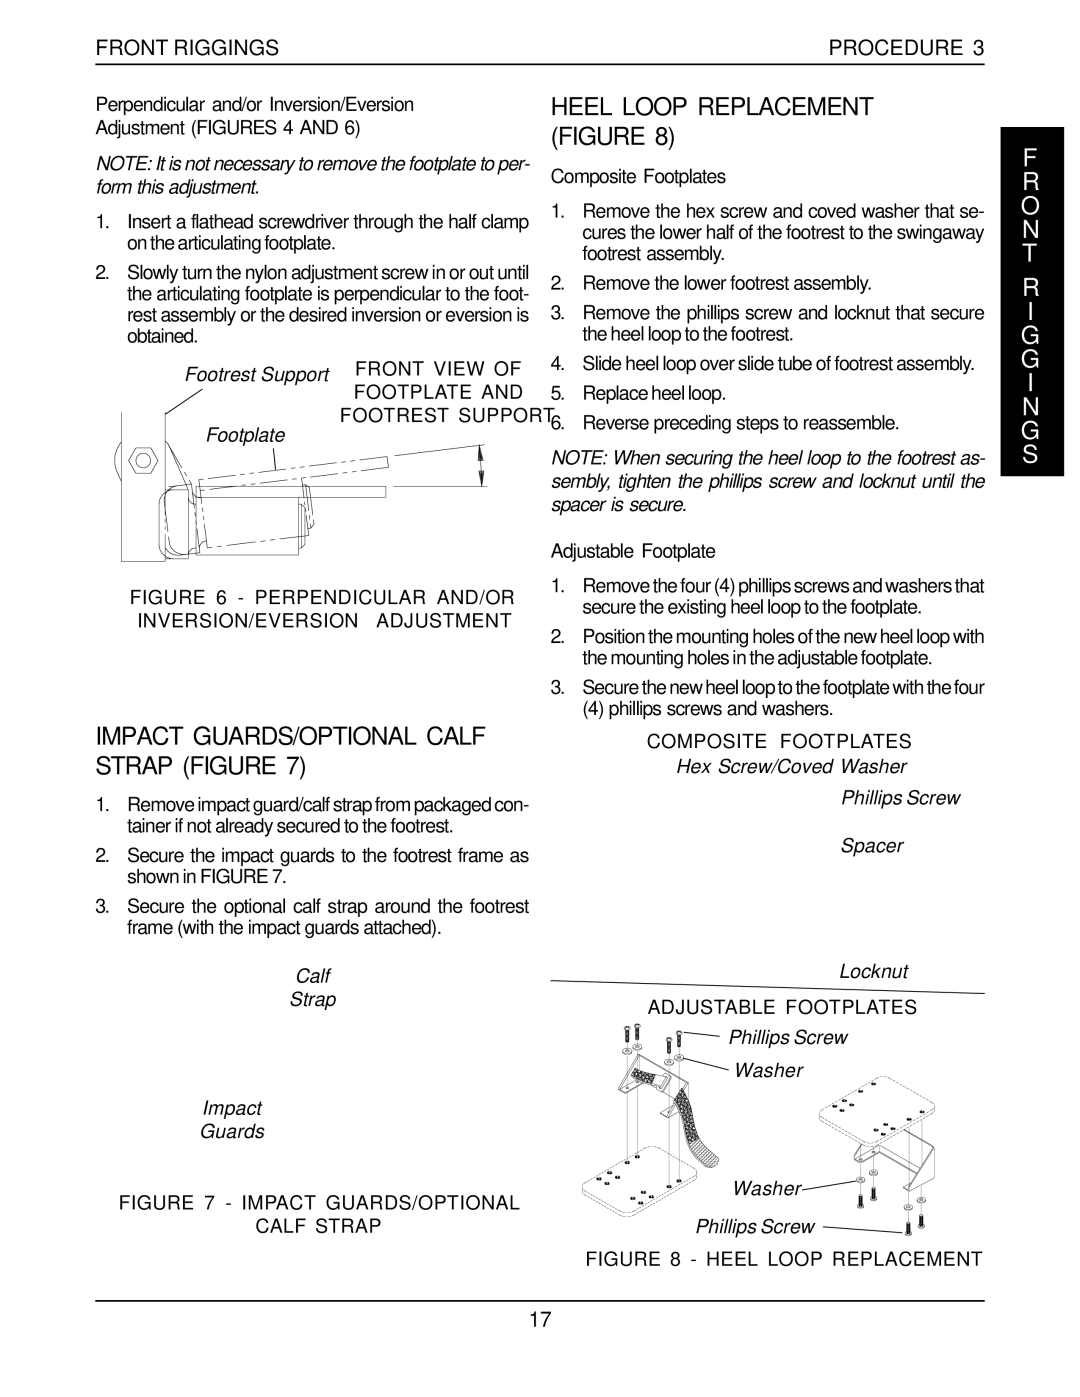
2.Remove the footrests. (PROCEDURE 3).

3.Remove the arms. (PROCEDURE 6).

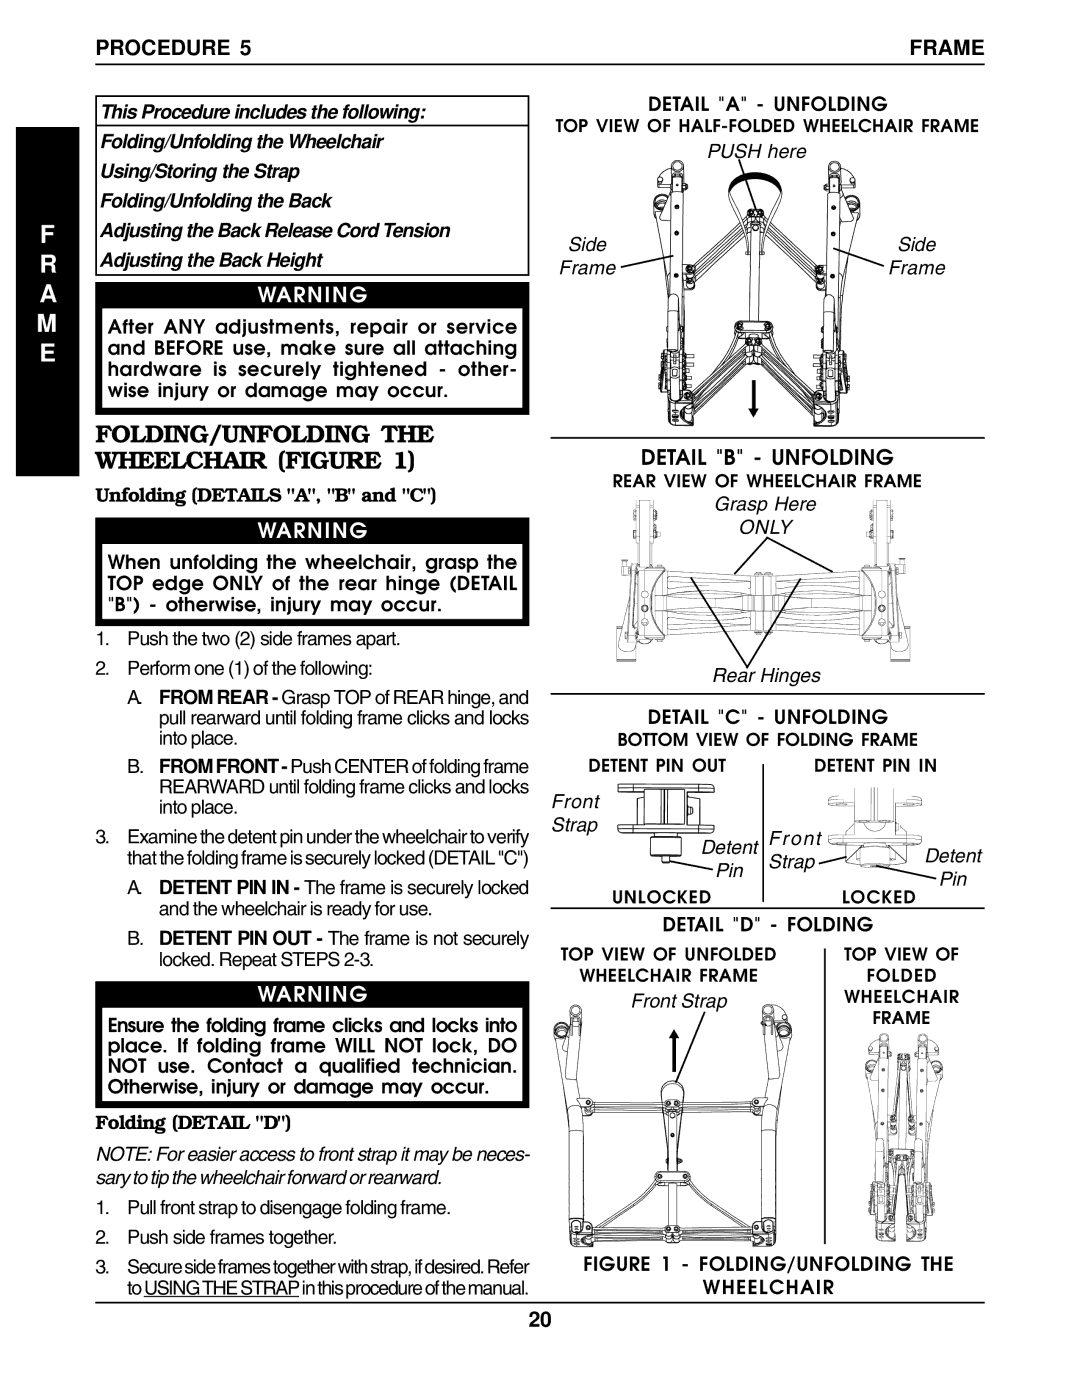
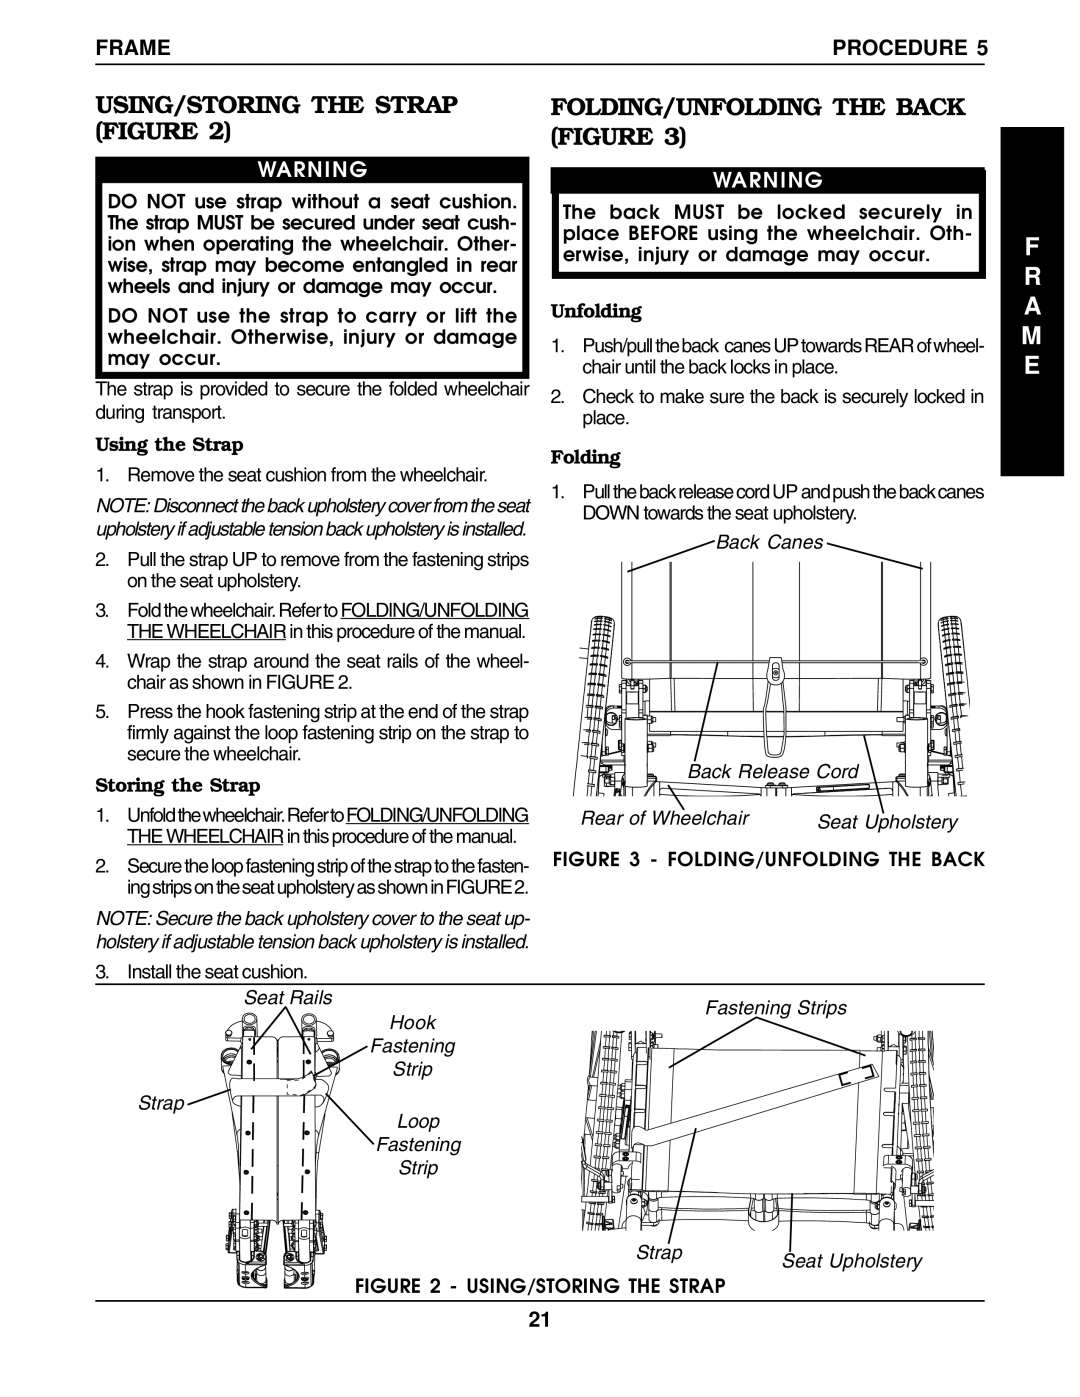
4.Fold down the back. (PROCEDURE 5).

5.Fold the wheelchair. (PROCEDURE 5).

6.Remove the rear wheels. (PROCEDURE 7).

7.After transporting, reverse STEPS 1-6 to prepare the wheelchair for use.

3-in-1 oil - Registered trademark of American Home Products Corporation. Teflon - Registered trademark of E. I. Du Pont De Nemours and Company.

14

Image 14
Contents 52,-4c R N I N G E C I a L T E STable of Contents B E L S LabelsSpecifications SpyderProcedure General Guidelines I E D N E E L R I a N L EGeneral Guidelines Procedure N L EI E D RE L I a N Tire PressureCoping With Everyday Obstacles SAFETY/HANDLING WheelchairsStability And Balance Functional Reach From a Wheelchair Tilting StairwaysESCALATORS? Sorry Transferring To And From Other SeatsSafety Inspection Checklist Safety Inspection ProcedureProcedure 2SAFETY Inspection TroubleshootingMAINTENANCE/TRANSPORTING INSTALLING/ADJUSTING Adjustable Angle FLIP-UP Footplates INSTALLING/REMOVING the Footrests FigureAdjusting the Footrest Height Figure Front Riggings ProcedureDepth Adjustment Figure Procedure Front RiggingsInstalling Footplate Figure Angle Adjustment Figures 4Impact GUARDS/OPTIONAL Calf Strap Figure Heel Loop Replacement FigureAdjustable Footplate Composite FootplatesReplacing Seat Upholstery Figure Installing Optional Fabric Clothing Guards FigureH O L S T E R Y Upholstery Procedure FOLDING/UNFOLDING the Wheelchair Figure Procedure FrameM E Unfolding Details A, B and CFOLDING/UNFOLDING the Back Figure USING/STORING the Strap FigureFrame Procedure M E Adjusting the Back Release Cord Tension FigureAdjusting the Back Height Figure Back Release Cord LockAdjusting the T-ARMS Adjusting Half ARM Height FigureINSTALLING/REMOVING T-ARMS Figure Arms ProcedureInside T-Arm Procedure ArmsFollowing Set Screws Outside Post Arm Release Lever Arm PadArm Side Guard Adjusting T-ARM Transfer Assists AND/OR Side Guards FigureInstalling Optional Rigid Clothing Guards Figure Socket Screws Transfer Assist Bottom ClampProcedure Rear Wheels REMOVING/INSTALLING Rear Wheels FigureAdjusting QUICK-RELEASE Axles Figure A RRear Wheels Procedure Installing QUAD-RELEASE Axles FigureAdjusting QUAD-RELEASE Handles And/or Out FigureReplacing the High/Undermount Wheel Lock REPLACING/ADJUSTING the Wheel Lock FigureAdjusting the High/Undermount Wheel Lock Hex Screws High Mount Wheel LockInstalling Anti-tippers Figure INSTALLING/ADJUSTINGAdjusting Anti-tippers Figure ANTI-TIPPERSPage R R a N T Y Limited WarrantyWarranty One InvacareWay