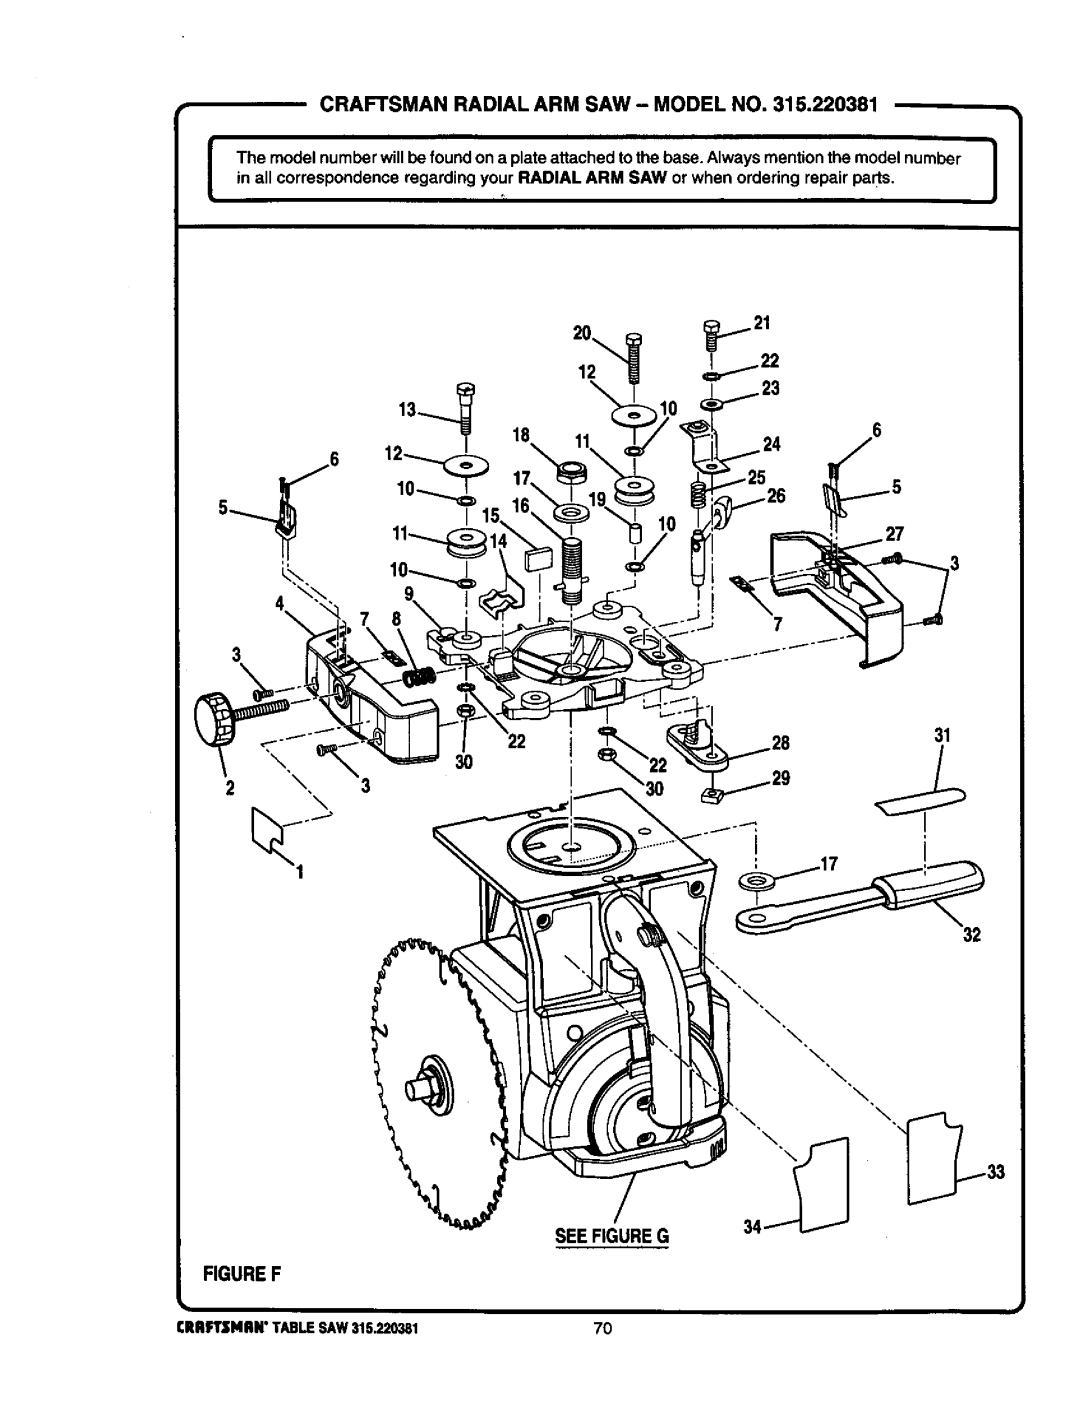
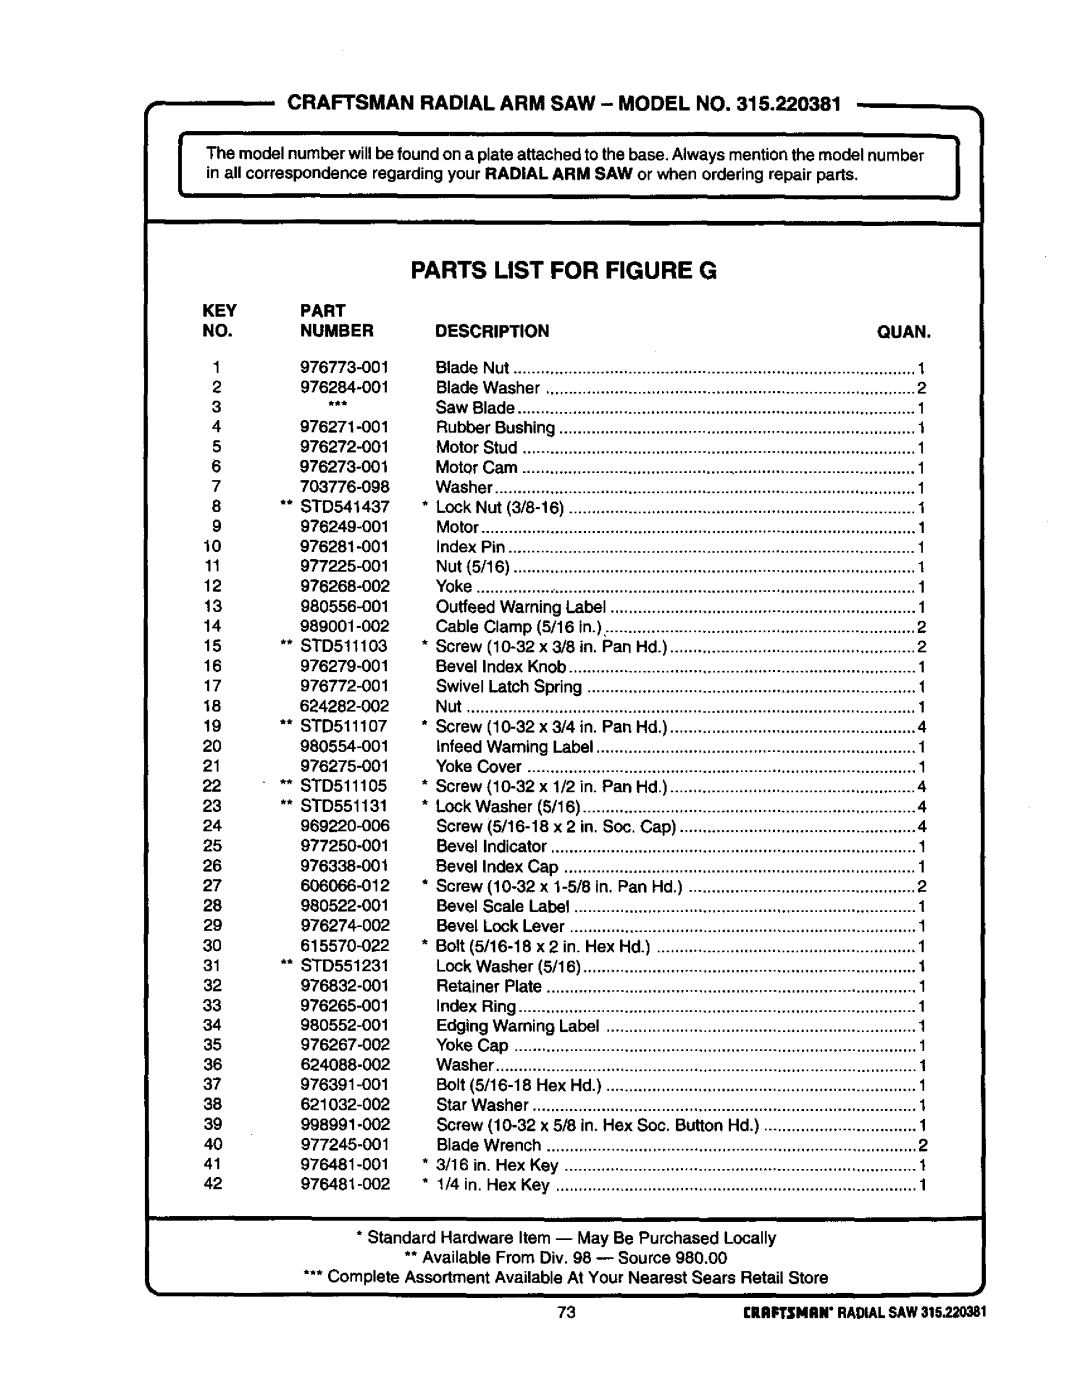
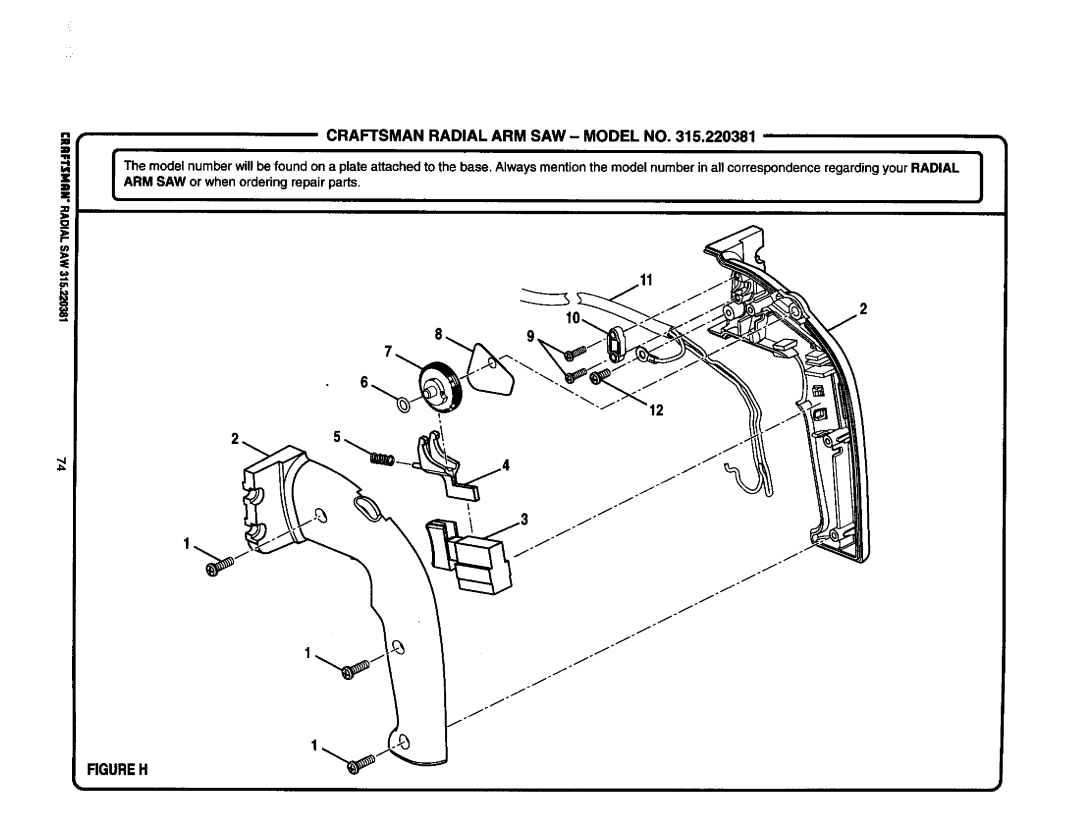
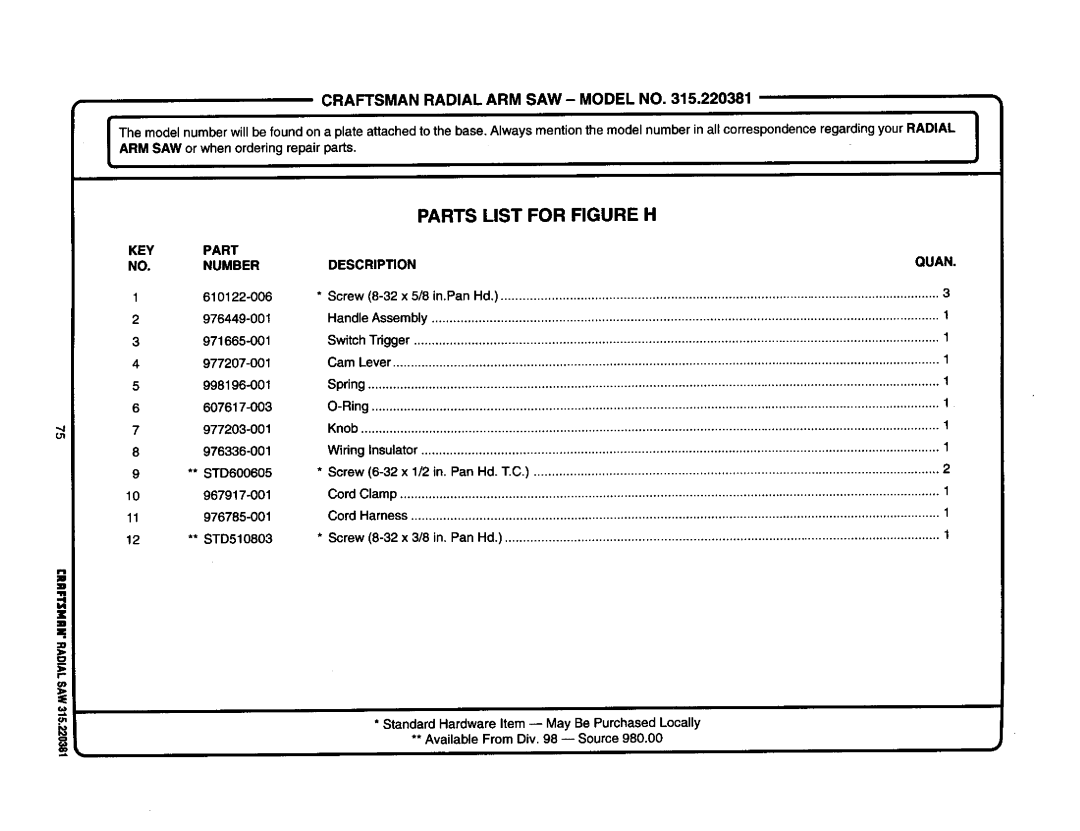
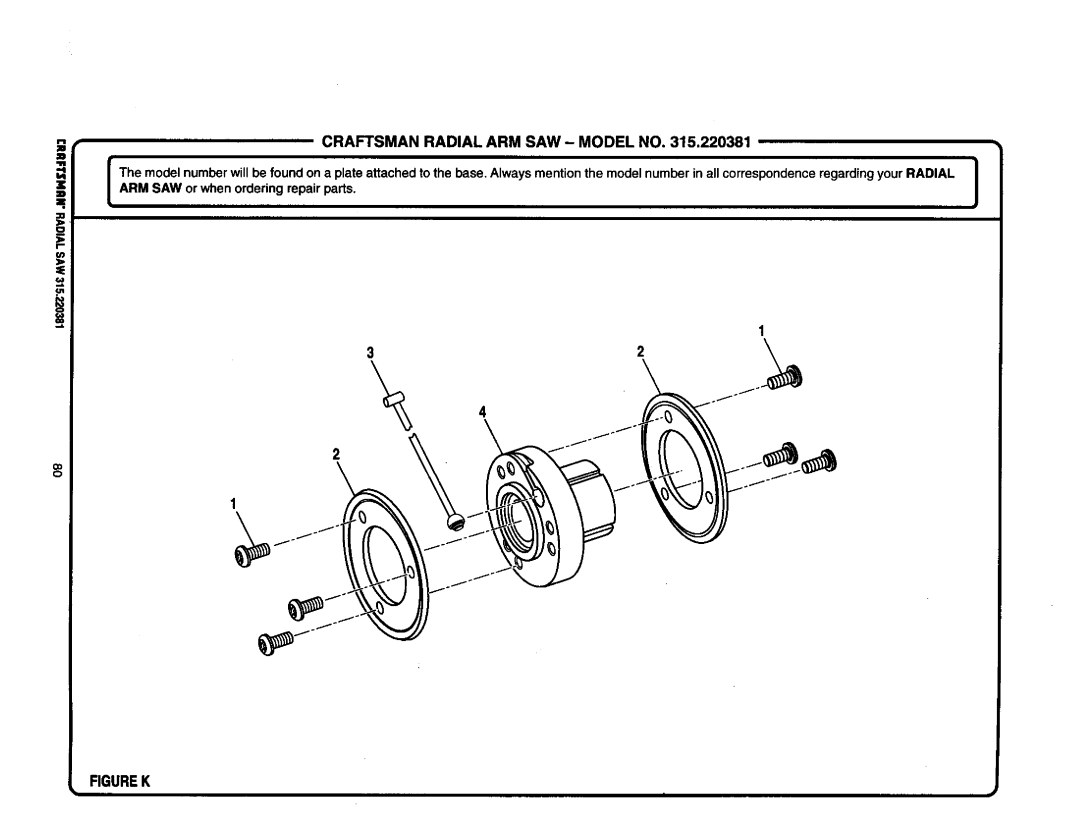
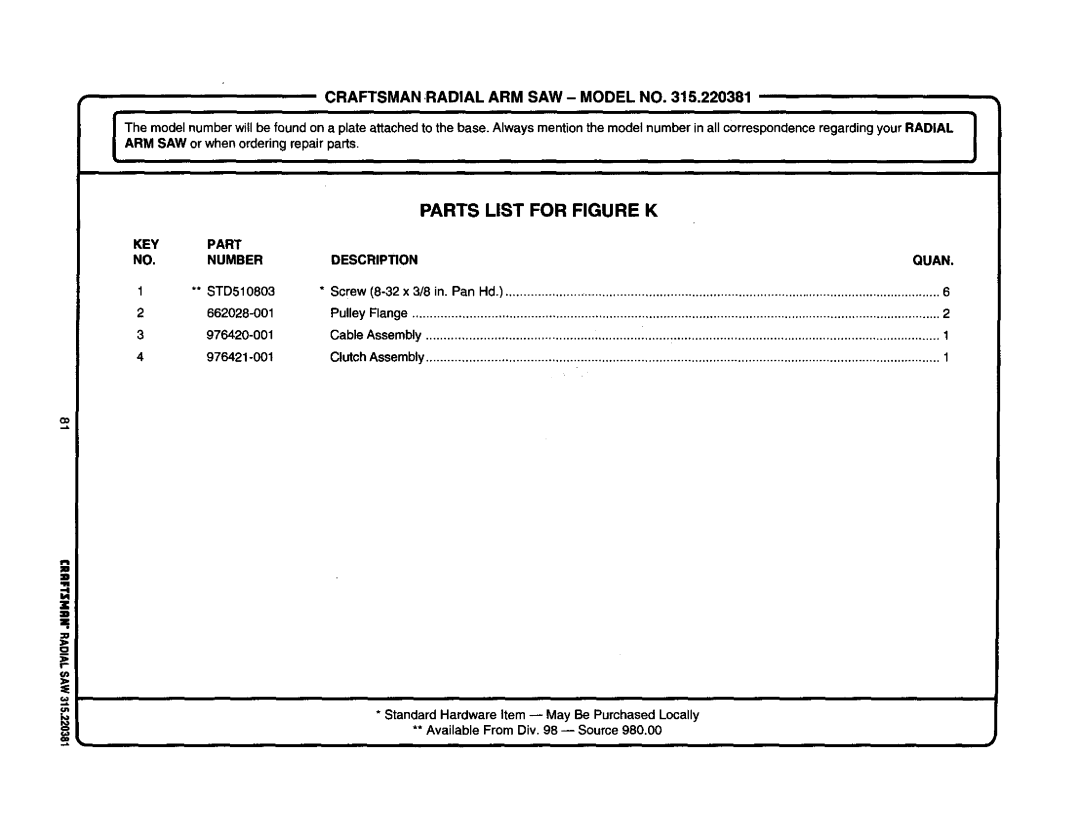
Craftsman 315.220381 owner manual Parts List for Figure H, Descripon Ouan

Page 75

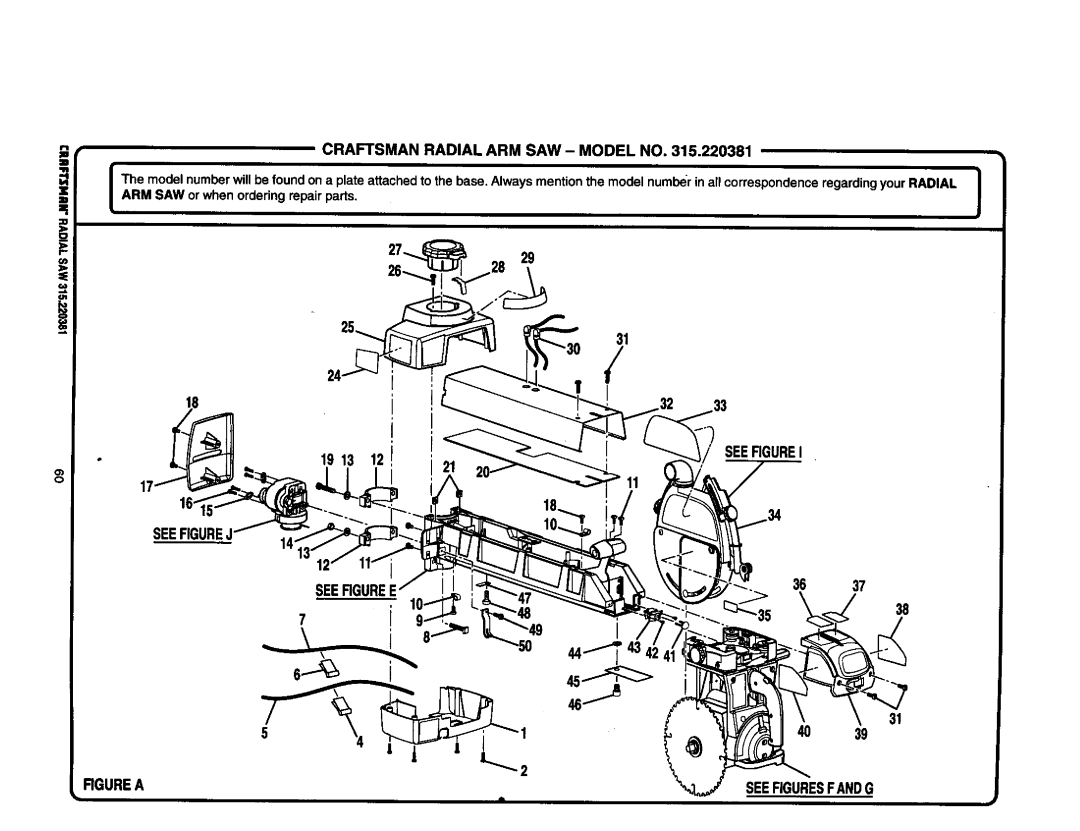
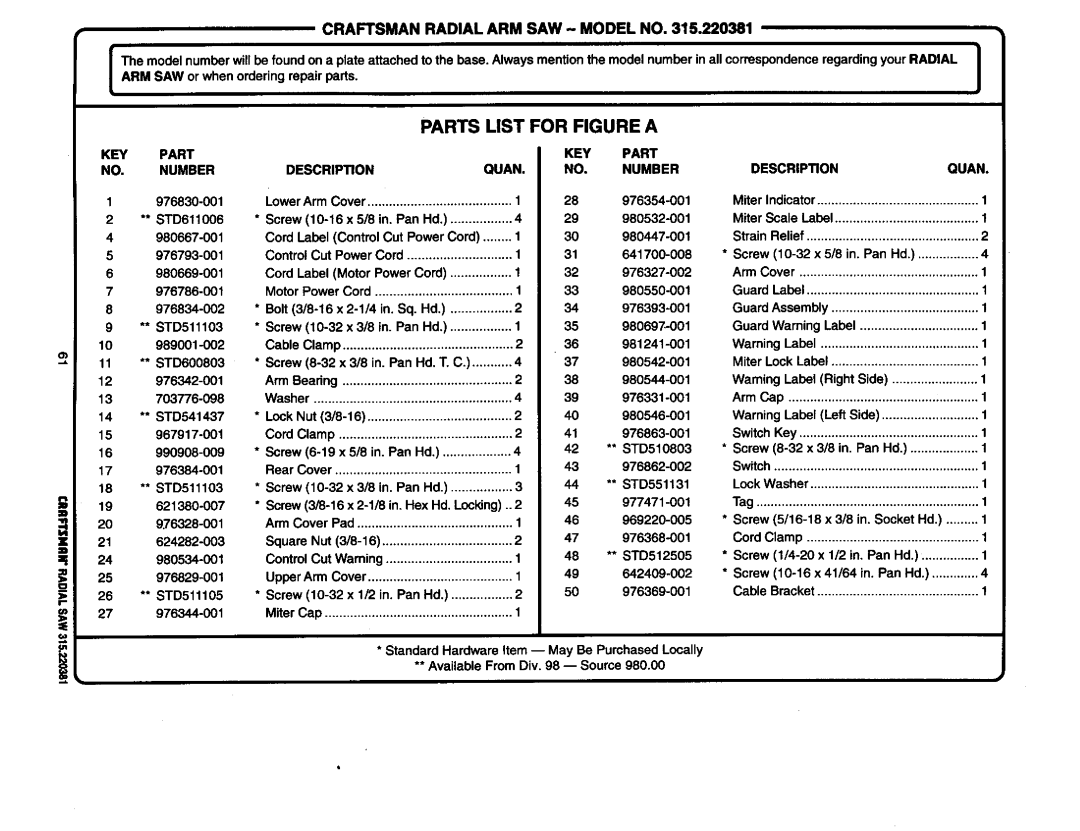
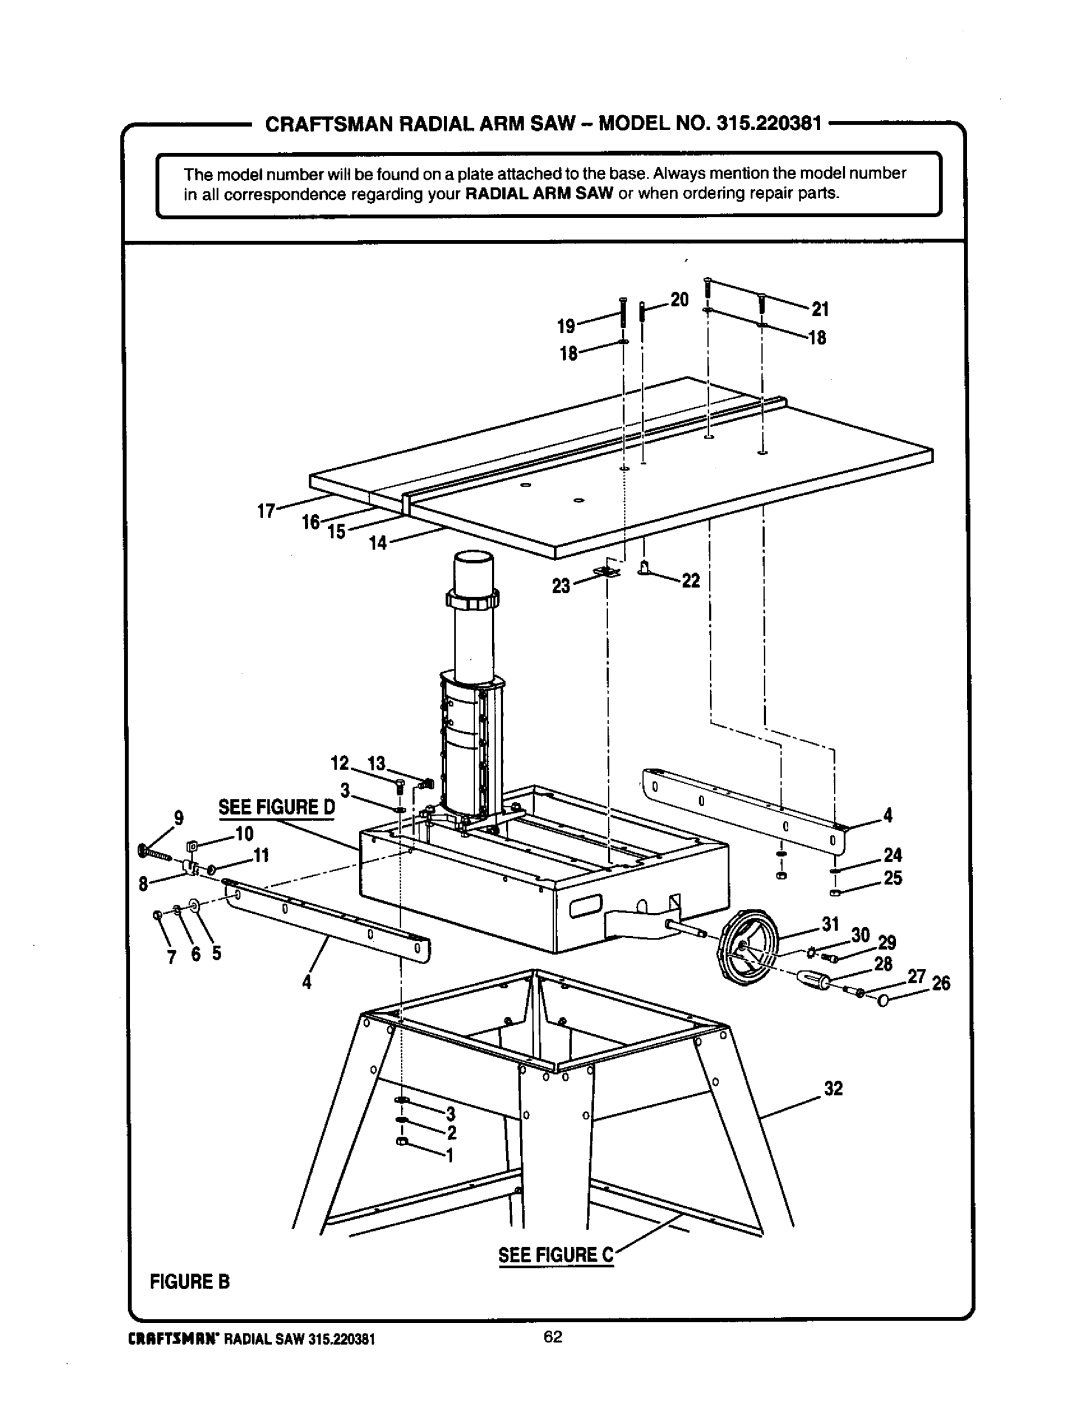
CRAFTSMAN RADIAL ARM SAW- MODEL NO. 315.220381


ARM SAW or when ordering repair

.

J

The model number will be found on partsplate attached to the base. Always mention the model number in all correspondence regarding your RADIAL

PARTS LIST FOR FIGURE H

KEY


PART

NO.


NUMBER

1


610122-006

2


976449-001

3


971665-O01

4


977207-001

5


998196-001

6


607617-003

7


977203-001

ot


8


976336-001

9

**

STD600605

10


967917-001

11


976785-001

12

**

STD510803

DESCRIP_ON

OUAN.

* Screw (8-32 x 5/8 in.Pan Hd.)

3

Handle Assembly

t

Switch Trigger

1

Cam Lever

1

Spring

1

O-Ring

1

Knob

1

Wiring Insulator

1

* Screw (6-32 x 1/2 in. Pan Hd. T.C.)

2

Cord Clamp

1

Cord Harness

1

* Screw (8-32 x 3/8 in. Pan Hd.)

1

X

z

m

=.

_

* Standard Hardware Item --May Be Purchased Locally


•* Available From Div. 98 --Source 980.00

Image 75
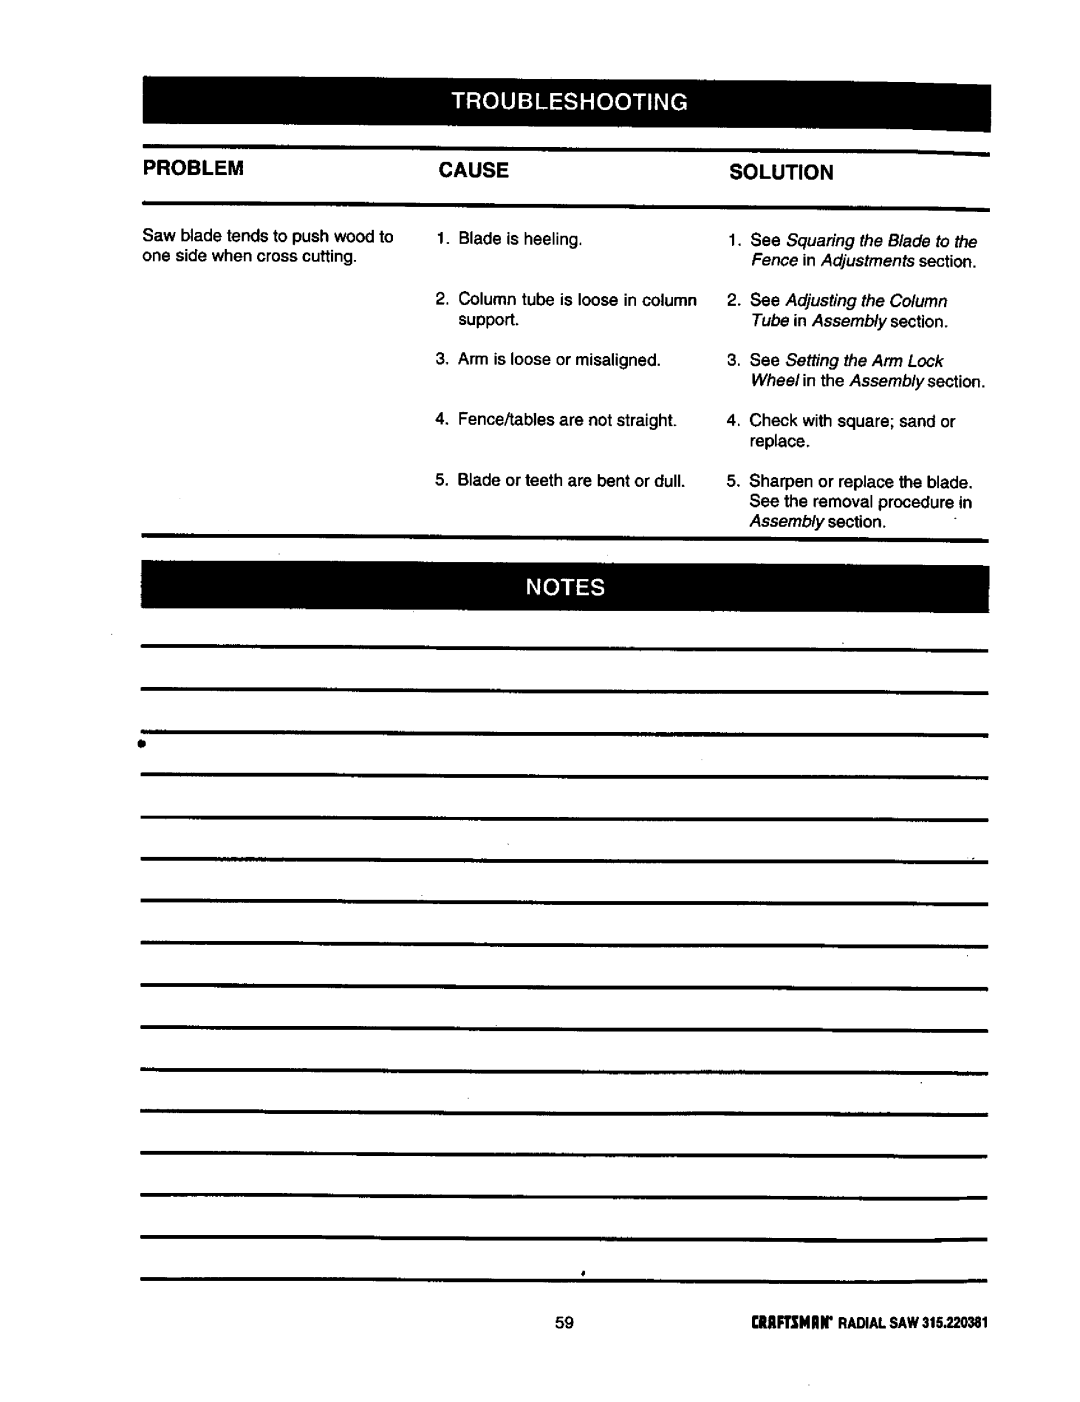
Contents Ofess Ional Radial ARM SAWFull ONE Year Warranty on Craftsman Radial ARM SAW 28-29 Meaning Safety Alert Symbol SymbolAvoid Awkward Operations and Hand Be Sure the Blade Clears the Work RIP only Workpieces Longer than Grounding PIN Coverofgrounded Outletbox GroundinginstructionsChanging Voltage See FiguresBladearbor Gum BladeBevelAngleRAFTSNANRADIALSAW315,220381 Sawassemblyshownaspacked Cdef IIoII000 Level Io@CRE.ANTPARTS Inch Radii Arm SawAdvertencia Knowyourradialsaw See aYoke 19IIRFTSMRNRADIALSAW315.220381 FeatureslistSee Figures 9A-9D Miterscale Armlockknob Yokepivotlatch RIPFigures 9A and 9B Dustguide Holddown MOTOR13/6.5AMP- Powersthebladeand isSee Figure lOB Assembly and Adjustments sections beforeTighten. See Figure I OA See Figure I OAElevating Shaft Handwheel Screw Starwasher Mounting SAW to LEG Stand Attaching Elevating HandwheelSee Figure SAW Base LEG Sawbase Hexbolt Flat Washer LockwasherCarriagearm Lockknob Installing the Yoke AssemblyArmviewedfrombelow Armlockknob ARM CapscrewsBlade Arbor Mounttablesupports Usingtheseholelocations Removing the BladeAttaching Table Supports Yokelock Handle Setting the ARM Lock KnobArmcap Motor Yokelock Handle Assembly See Figures 17,4and 17BBevel Bevel Setting the Bevel Lock LeverStarwasher Bevel BevellockleverinColumn ARM Tube Support Rear Coverscrews HEXBOLT2 HEXNUT2 Adjusting the Column TubeTightening the ARM and Column See Figures 20A 20DSilverblack Screws Columnsupport Elevation AdjustmentRotation Adjustment ColumntubeAdjusting the Carriage Bearings CarriagebearingEccentricscrew Wrench Graspandhold Carriagebearing Rightside Tablesupport Leveling Table SupportsSee Figures 22A and 22B Blade Wrenchat Front ArmlockknobHexnut Installing the Front TableSee Figures 23A 23C 23ALeveling the Front Table See Figures 25A 25CReartablefence Spacertablefronttable Clamp Bracket Squarenut HoleBlade Rotation Hten WRENCH2 See Figures 27A 27C Installing RIP Scale Indicators Carriage SpeednutSpring Carriage Screws Lockknob See Figures 29,4 2gC Aligning the ARM for Cross CutsLock Lever Fronttable Socket Elevating Headscrews Handwheel Aligning Blade to Table AT 0 BevelSee Figures 30A 30D Indexcap BevelFramingsquare Yokelockhandle Squaring Blade to FenceSee Figures 31A 31C HexboltsSee Figures 32A-32C Noadjustment Needed BevelAdjustment GAP Paralleling Blade to TableAligning the RIP Scale Indicators IN-RIPSCALEONRIGHTSIDEOFARM RIP-SCALEINDICATORSee Figures 33A 33B Barrel Carriage Assembly SOCKETF.34 Installing Control CUT DeviceRIP Cuts Basic Operation of the Radial ARM SAWTypes of Cuts Cross CutsSwitch and Switch KEY Insertswitchkey Switchon Switchoff Causes of KickbackAvoiding Kickback Pushsticks Pushblocks Featherboard PushsticksPushblocks FeatnerboardsCarnage Lockknob Tableclamps Making a Cross CUTMaking a Miter CUT Making a Bevel CUT Making a Compound Cross CUT Beveledand Elevating HandwheelYoke Armpivotlatch Swwchyokelock Handle RIP CUT Hazards and Precautions Setting UP a RIP CUTElevating Handwheel Infeedfor Ripcutting Making a RIP CUT See Figure Review the Hazards and PrecautionsSupportlongworkpieces Making Other CutsSee Figures 48 Cutting Long WorkpiecesCuts NON-THROUGHMOTOR/ELECTRICAL General MaintenanceSolution Problem CauseProblem Remove handwheel clean and lubricate the shaft See Squaring the Blade to See Adjusting the ColumnTube in Assembly section AdjustmentssectionCause Solution Fence in AdjustmentssectionAssembly section Seefigure KEY Part Craftsmanradial ARM SAW- ModelnoKEY Part Number Description QuanFigureb Craftsman Radial ARM SAW Model no KEY Part NO.NUMBER63CRRFTSMRNRADIALSAW315.220381 Figurec Descripon Quan Parts List for Figure CFigured 67CRRFTSNHNRADIALSAW315220381 Parts List for Figure DFiguree Parts List for Figure E See Figure G Figuref71CRAFTSMANRADIALSAW315.220381 976287-001CRAFTSMANTABLESAW315,22038172 See Figure F Seefigureh73CRRPTSNRNRADIALSAW315.220381 Parts List for Figure GFigureh Descripon Ouan Parts List for Figure HFigurei Craftsmanradial ARM SAW Modelno Parts ListFigurej Craftsmanradial ARM SAW- Modelno ,220381 Parts List for Figure JFigurek Parts List for Figure K Parts Direct s