Grizzly G1021 instruction manual Maintenance, GeneralKnives

Page 33

SECTION 7: MAINTENANCE

GeneralKnives

Make a habit of inspecting your planer each time you use it. Check for the following conditions and repair or replace when necessary.

1.Loose mounting bolts.

2.Worn switch.

3.Worn or damaged cords and plugs.

4.Damaged V-belts.

5.Any other condition that could hamper the safe operation of this machine.

Table

The table and other non-painted surfaces on the Model G1021 should be protected against rust and pitting. Wiping the table clean after every use ensures that moisture from wood dust isn’t allowed to trap moisture against bare metal sur- faces.

Some woodworkers recommend using automo- tive paste wax on exposed steel and cast iron surfaces. The wax provides a layer of protection, as well as reducing friction between lumber and the table, making cuts faster and smoother. Avoid waxes that contain silicone or other synthetic ingredients. These materials can find their way into lumber that’s being worked, and can make staining and finishing difficult. If you use paste wax, make sure that it’s 100% Carnauba wax.

We recommend that dull knives be taken to a pro- fessional knife sharpener. Improperly sharpened knives can cause a number of defects to lumber and put unnecessary load on the motor and drive systems. If you can avoid sharpening knives yourself, allow them to be handled by a trained sharpener.

If you must do the job yourself, take note of the following information.

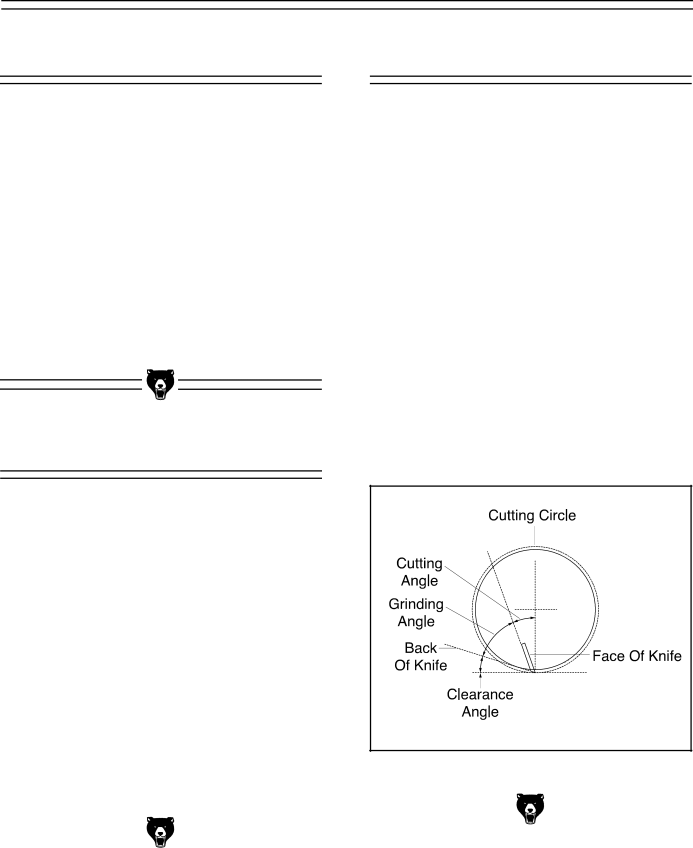
You will be dealing with a cutting angle of 35 degrees and a grinding angle of 35 degrees. See Figure 39. The grinding angle has been deter- mined by the factory to be the best compromise for planing a wide variety of wood types. In most cases, that angle will produce excellent work. If you choose to change the angle of your bevel, be sure to consult with a trained sharpener, or with a reference book before you commit to changing the angle of bevel.

Figure 39. Recommended sharpening angles.


G1021 15" Planer

-33-

Image 33
Contents Planer Page Table Of Contents Adjustment Block Pattern Warranty and Returns Safety Instructions For Power Tools SafetySafety Instructions For Power Tools Additional Safety Instructions For Planers Circuit Requirements Fusing220V Operation Grounding Extension CordsCommentary IntroductionParts Inventory UnpackingSite Considerations Clean UpAssembly OverviewOptional Stand Starter Switch Planer UnitTo Mount the Planer Handwheel Knife Setting Jig To Assemble the Knife Setting JIGTo Mount the Handwheel Extension Rollers Dust Port To Attach the Extension RollersTo Attach the Dust Port Overview of planer adjustment controls G1021 15 Planer AdjustmentsTable Adjustment Gauge BlockTo Check Table Parallelism To Inspect the Knives Knife InspectionTo SET the Knives Knife SettingChip Breaker To Adjust the ChipbreakerTo Check Roller Height Feed Roller HeightTo Adjust Roller Height To Adjust Roller PressureFeed Roller Pressure Bed Rollers To Adjust the BED RollersChip Deflector To Adjust the Chip DeflectorAnti-KickbackBelts To INSPECT/ADJUST the PulleysGearbox To Check Belt TensionTo Inspect the Gearbox Extension Rollers Extension RollersThickness Scale To Adjust the ScaleTable Locks OperationsPower Feed HandwheelDepth Limiter Type Shear PSI Test Run Wood SpeciesPlaning Difficulties GeneralKnives MaintenanceFill Drain LubricationAdjustment Section Closure Symptom Possible Cause Corrective Action TroubleshootingReference 145 79 80 146 See page 41-42 for Reference Number Listing See page 41-42 for Reference Number Listing Pulley Cover PK06M G1021 15 Planer Warranty and Returns