HP R830/R840 manual Using the Design Gallery Menu, Removing red eyes, Applying artistic effects

Page 29

5 Using the Design Gallery Menu

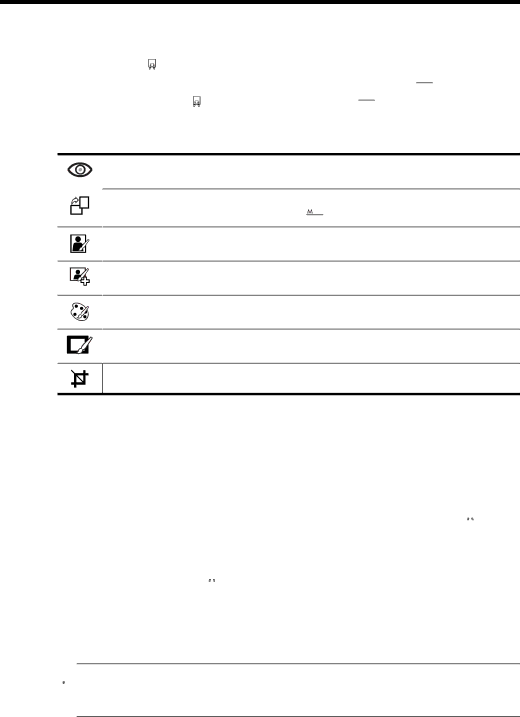
You can use the Design Gallery features to enhance your captured images.

1.While inPlayback, useto scroll to an image, then press .

2.Useto highlight Design Gallery, then press .

3.Useto highlight an option, then pressand follow any on-camera instructions.

4.Pressrepeatedly to return toPlayback.

Remove Red Eyes—Allows you to remove red eyes in images containing human subjects (see Removing red eyes” on page 27).

Rotate—Rotates the displayed image. Use clockwise in 90-degree increments. Press

to rotate the image clockwise or counter- to save the image in the new orientation.

Apply Artistic Effects—Allows you apply a creative effect to an image (see “Applying artistic effects” on page 27).

Enhance Photos—Allows you to correct certain flaws on an image (see Enhancing photos” on page 28).

Modify Color—Allows you to apply a color effect to an image (see “Modifying colors” on page 29).

Add Borders—Allows you to add a border to an image (see Adding borders” on page 29).

Crop—Allows you to crop an image (see Cropping images” on page 30).

Removing red eyes

When you select Remove Red Eyes, the camera processes the current still image to remove red eyes from the subjects.

The red-eye removal process takes a few seconds, after which the image displays with green boxes around corrected areas, along with the Remove Red Eyes menu:

Save Changes (Default)—Overwrites the original image and returns to theDesign Gallery Menu.

View Changes—Displays a magnified view of the image with green boxes around the corrected areas.

Cancel—Returns to the Design Gallery Menu without saving the red eye changes.

Remove Red Eyes is only available for pictures taken with a flash.

Applying artistic effects

TIP: If you need to crop an image (see Cropping images” on page 30), do so before applying artistic effects, adding borders, or enhancing photos. If you plan to apply artistic effects, modify colors, or enhance photos, do so before adding a border.

Using the Design Gallery Menu

27

Image 29
Contents HP Photosmart R830/R840 series Digital Camera Legal and notice information Contents Using HP Photosmart Express Using the Design Gallery MenuTroubleshooting Reviewing images and video clipsSpecifications Shutter button Getting startedCamera top, side, and back Before taking pictures Camera front and bottomCamera dock insert Turn on the camera Install the batteryCharge the battery Set the date and time Choose the languageSet the region Install the software Install and format an optional memory cardTIP To switch between Picture Capture, Video Record, Using your cameraWindows Macintosh015 Taking pictures and recording video clipsTaking pictures Indicator Description Focusing on the subjectRecording video clips Instant ReviewFor pictures only Using Focus LockOptimizing focus Optimizing exposure Using zoomOptical zoom Digital zoomChapter Red eye Setting the flashUsing the shooting modes Using Panorama mode Video Record Using the Picture Capture and Video Record menusR830 series R840 series±1.0 Exposure BracketingUsing the Burst setting Using the Self-Timer settingsExposure Compensation Adaptive LightingWhite Balance ISO speedFavorite Using PlaybackReviewing images and video clips Magnifying images Deleting imagesViewing thumbnails Tagging images Using the Playback MenuViewing slideshows Tag menu, select Tag Menu SetupStitching panoramas Defining tags in WindowsChapter Applying artistic effects Using the Design Gallery MenuRemoving red eyes Enhancing photos Modify Color menu Modifying colorsAdding borders Cropping images Transferring images with HP Photosmart Software Transferring and printing imagesTransferring images without HP Photosmart Software Connecting to the computerPhotosmart Express Menu see Using HP Photosmart Express on Printing directly to a printer Using a memory card readerChapter Using the Photosmart Express Menu Using HP Photosmart ExpressMarking images for printing To display the Photosmart Express MenuSharing images Buying prints onlineSending images to online destinations Setting up online destinations in the cameraPhotosmart Express Menu, then highlight PlaybackNever, 15, 30, 45 Default, 60 seconds Using the Camera Setup MenuProblems and solutions TroubleshootingResetting the camera Have to recharge the Lithium Ion battery frequently Battery gauge goes up and down frequentlyLithium Ion battery will not charge Camera does not respond when I press a buttonMy image is too bright Image Display is not workingMy image is blurry Images are missing on my camera My image is grainyCamera gets warm or even hot to the touch Camera responds sluggishly when trying to review imagesMy camera shuts down unexpectedly Cannot transfer images from the camera to my computerLens Error general-R840-021,R830-021 Camera error messagesUnable to format card-R840-202,R830-202 Batteries cannot be charged-R840-435,R830-435Helpful websites Product supportGetting assistance Under Learn about , click Digital PhotographyGetting assistance Top points about batteries Managing batteriesPlayback Menu Icon DescriptionCharge location SignalsCharging complete Docks battery bay light turns on solid Safety precautions for recharging batteries Specifications Dimensions Image Quality Video Quality settingsWeight PowerVideo quality Index Page Product name