LG Electronics LP121HEM-Y8 manual Electrical Parts, Shroud, Outdoor Motor, Compressor, Capacitor

Page 12

2.2.4 SHROUD

1.Remove the axial fan. (Refer to section 2.2.3)

2.Remove the 4 screws which fasten the condenser with the shroud and the basepan. (See Figure 11)

3.Remove the shroud.

4.Re-install the component by referring to the removal procedure.

2.3. ELECTRICAL PARTS

2.3.1 OUTDOOR MOTOR

1.Remove the clamp cord and disconnect a wire housing in control box. (Refer to section 2.1.2)

2.Remove the axial fan. (Refer to section 2.2.3)

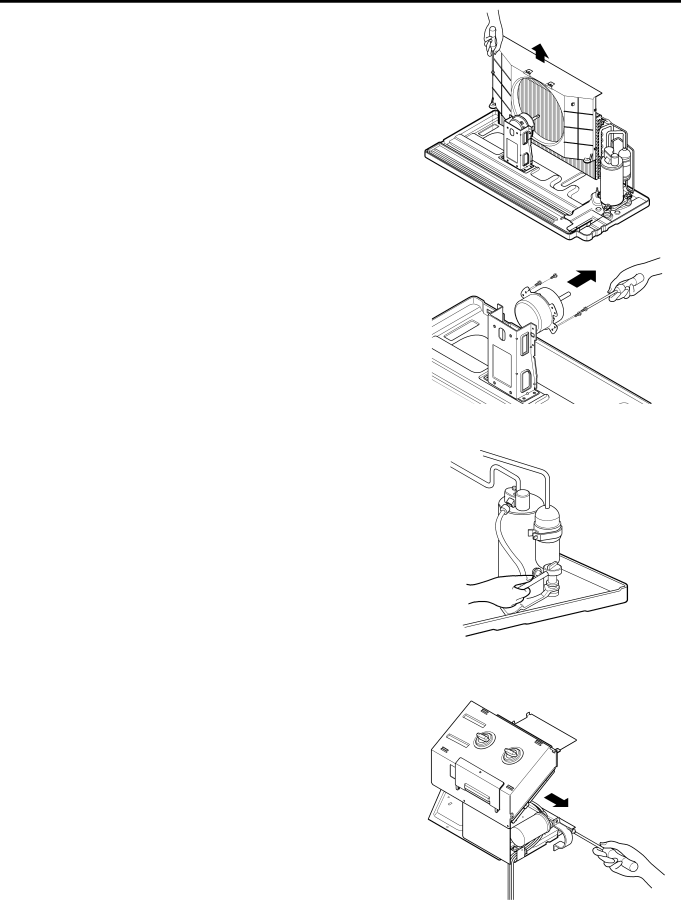
3.Remove the 2 screws which fasten the motor. (See Figure 14)

4.Remove the motor

5.Re-install the component by referring to the removal procedure, above.

2.3.2INDOOR MOTOR (Refer to section 2.2.2)

2.3.3COMPRESSOR

1.Discharge the refrigerant system using a refrigerant recovery system.

If there is no valve to attach the recovery system, install one (such as a WATCO A-1) before venting the refrigerant. Leave the valve in place after servicing the system.

2.Disconnect the 3 leads from the compressor.

3.After purging the unit completely, unbraze the suction and discharge tubes at the compressor connections.

4.Remove the 3 nuts and the 3 washers which fasten the compressor. (See Figure 15)

5.Remove the compressor.

6.Re-instill the components by referring to the removal procedure, above.

Figure 13

Figure 14

Figure 15

2.3.4 CAPACITOR

1. Remove the control box. (Refer to section 2.1.2)

2. Remove 1 screw and disconnect the leads which connected to the box type capacitor.

(See Figure 16)

3. Remove 1 screw and the clamp which fastens the can-type capacitor.

4. Disconnect all the leads of capacitor terminals.

5. Re-install the components by referring to the removal procedure, above.


Figure 16


Copyright ©2008 LG Electronics. Inc. All right reserved.

- 12 -

Only for training and service purposes

LGE Internal Use Only


Image 12
Contents SVC Manual Specification LGE Internal Use OnlyFeatures and Benefits Sleeve and the Rear GrilleDoor Switch/Occupancy Sensor Outdoor Air Temperature SwitchoverTemperature limits Quick Heater RecoveryControl Locations Operation Electric Heating ModelVentilation Cooling only ModelTemperature Limiting Additional ControlsRemoving the Front Grille Additional ControlsMolex Housing Spec REMOTE/LOCAL ControlEnergy Saver Front Desk ControlDisassembly Instructions Mechanical PartsFront Grille Control BOX AIR Handling Parts Electric Heater Electric Heater Model onlyCross Flow FAN Axial FANElectrical Parts ShroudOutdoor Motor CompressorPower Cord 6 P.C.BRefrigeration Cycle CondenserEvaporator Capillary TubeLGE Internal Use Only Pulling Vacuum Installation HOW to Install the UnitDimension of air conditioner Dimension of sleeve assembly optionalWall Sleeve Installation Wall Case Installation DataGeneral Installation of Wall Case in Wall Opening As shipped, the LG wall sleeve is ready for installationPreparation of the Front Grille Preparation of the Wall Case for All Types of ConstructionLGE Internal Use Only Sub-Base Connected Unit Installation Electrical Safety Electrical RequirementsElectrical Data for 230/208V Model 208, 230, and 208/230 Volt UnitsField Installed Accessories InstallationControl Panel Key Lock DescriptionCondensate Disposal Pump Kit Installation Part No AYSB2101Hazardous Voltage Place the top cover assembly back into the unit Spraying Architecture Grille Aluminum Single Pack Architectural GrilleDrain Installation Condensate Drain kitPart No AYDR101 Outdoor Drain Kit Installation Outdoor Drain Kit InstallationIndoor Drain Kit Installation ChecklistLeveling Legs Part No AYLL101Leveling Leg Assembly Leveling Leg Assembly Installation on Wall SleeveHard Wire Kit Junction Box Kit Installation and Wiring ProcedurePart No AYAGALA01 Use Copper Conductors Only208/230 Volt Units Volt UnitsRemote Escutcheon Kit Part No AYRE110Subbase Part No AYSB1101 230/208V 20A AYSB2101 230/208V 30AAfter wiring is complete, mount covers a and F to To each installation instruction for that accessorySkirting Hole Location Right Cover Assembly Subbase with provided screws. FigureTroubleshooting Guide Outside DimensionsPiping System 066mm 406mm 505mmTroubleshooting Guide Fails to Start Complaint Cause Remedy Room AIR Conditioner Voltage Limits 208/230V 187V 253VComplaint Cause Remedy Piping Diagrams Th2 Thermistor for Evaporator pipe temperatureTh3 Thermistor for outdoor Air temperature Th4 Thermistor for Condenser pipe Air temperatureSchematic Diagram CN-NNExploded View 435300BJanuary