Exmark TTS16KA363 Check Safety Interlock System, Check for Loose Hardware, Service Air Cleaner

Page 28

Maintenance

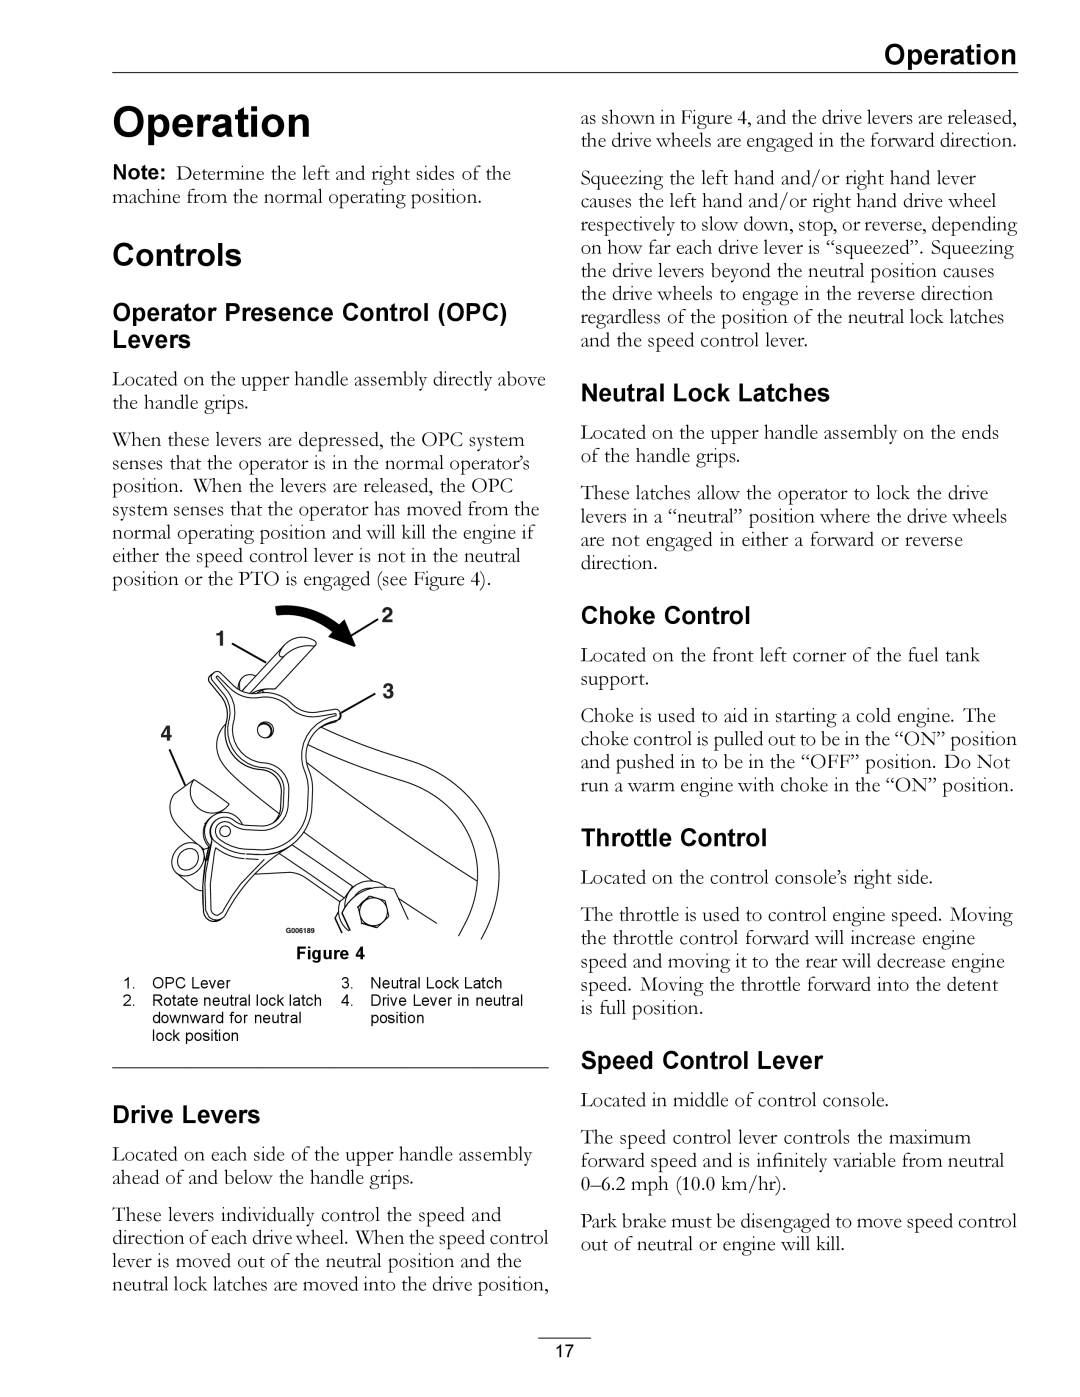
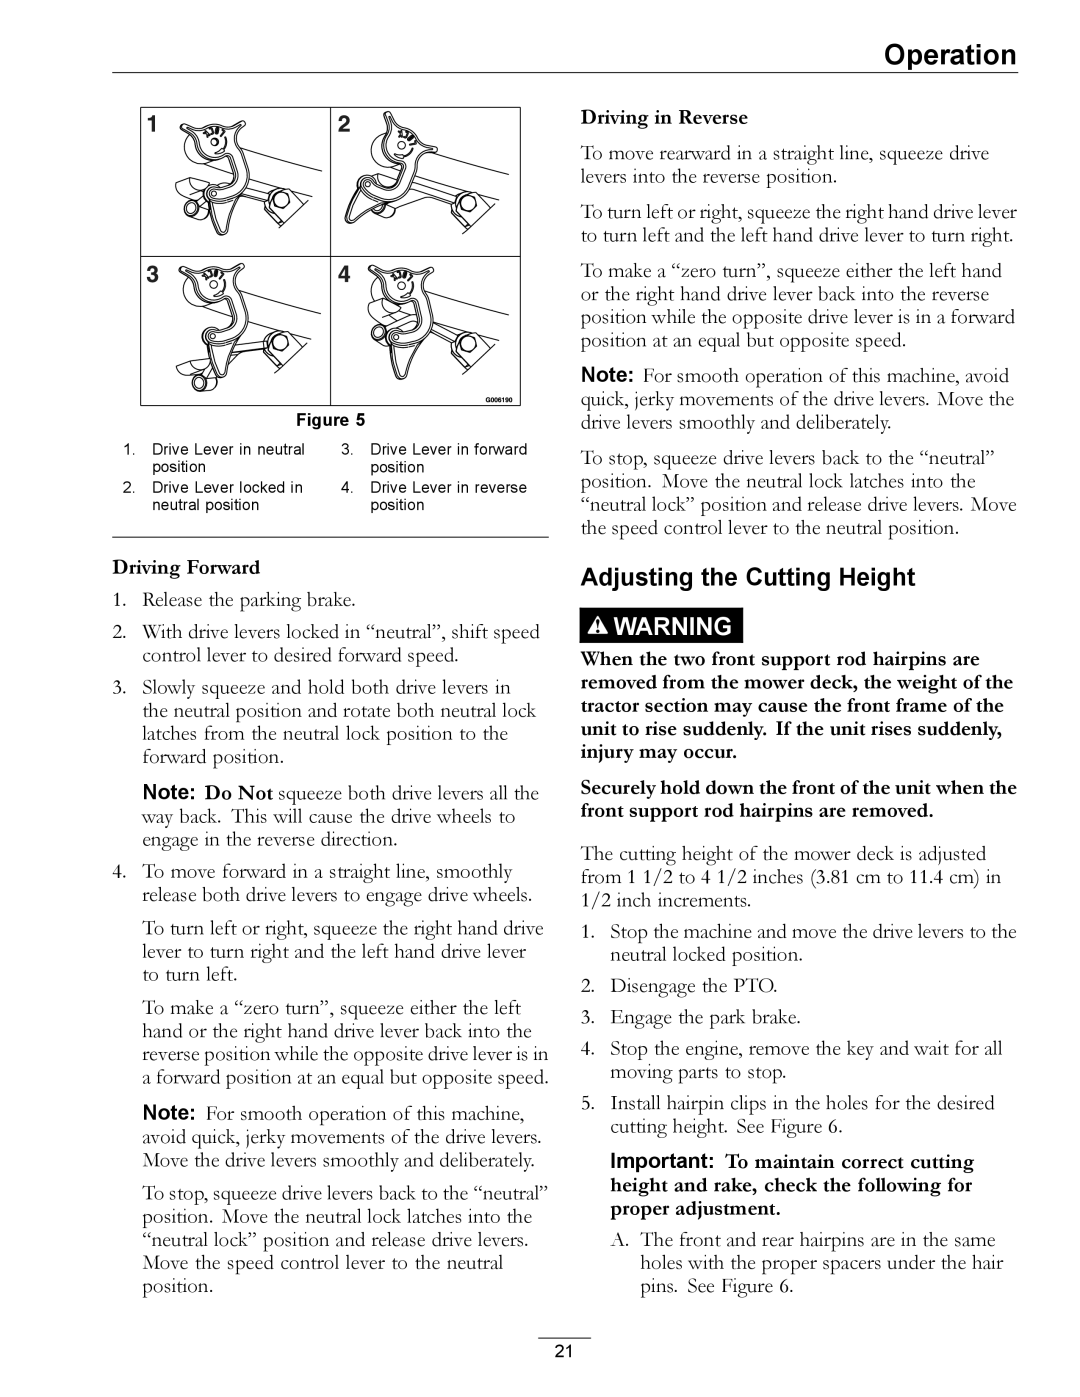
Figure 13

1.

Rod

4.

Mower deck

2.

Spring

5.

Discharge deflector


bracket

3.

Discharge deflector

6.

Assembled view

3.Hook the bent end of the rod around the front discharge deflector bracket to retain it from sliding out. Place the leg of the spring with the loop in the notch in the discharge deflector to hold the discharge deflector in the down position (see Figure 13).

Important: The discharge deflector must be spring loaded in the down position. Lift the deflector up to test that it snaps to the full down position.

Check Safety Interlock System

Service Interval: Before each use or daily

1.For Electric Start Units Only: Check starting

circuit. Starter should crank with: Operator Presence Control levers depressed, speed control lever in neutral, and PTO disengaged.

Try to start the engine with OPC levers disengaged, speed control lever in neutral and PTO disengaged–starter must not crank.

Try to start with, OPC levers depressed, speed control lever in any speed but neutral and PTO disengaged–starter must not crank.

Try to start with OPC levers depressed, speed control lever in neutral and PTO engaged–starter must not crank. .

2.For All Units: Check OPC circuits. Clear the area. Disengage the park brake. Run engine at one-third throttle, then, with drive levers and neutral lock latches in neutral lock position, move the speed control lever out of neutral and release OPC levers–engine must stop. Again, run engine at one-third throttle, move the speed control lever to neutral, engage PTO and release OPC levers–engine must stop.

Note: Park brake must be disengaged before the speed control lever is moved out of neutral or engine will kill.

For Manual Start Engines: The park brake must be disengaged before the PTO is engaged or the engine will kill.

Note: If machine does not pass any of these tests, do not operate. Contact your authorized EXMARK

SERVICE DEALER.

Important: It is essential that operator safety mechanisms be connected and in proper operating condition prior to use for mowing.

Check for Loose Hardware

Service Interval: Before each use or daily

1.Stop engine, wait for all moving parts to stop, and remove key. Engage parking brake.

2.Visually inspect machine for any loose hardware or any other possible problem. Tighten hardware or correct the problem before operating.

Service Air Cleaner

Service Interval: Every 25 hours—Service the foam element. (May need more often under severe conditions. See the Engine Owner’s manual for additional information.)

Every 100 hours—Service the paper element. (May

28

Image 28
Contents Turf Tracer Series California Introduction Contents Safety Safety Alert SymbolSafe Operating Practices TrainingSafety Operation Slope OperationMaintenance and Storage Safety Safety and Instructional Decals 413327 103-1977 109-3148 116-0404 117-2718 Model Numbers SpecificationsSystems Dimensions Product Overview Torque RequirementsOperation ControlsOff-Run Switch Manual Start Only Ignition Switch Electric Start OnlyTracking Adjustment Knob Park Brake LeverPre-Start Operating InstructionsOpen the Fuel Shut-Off Valve Starting the Engine Manual StartDisengaging the PTO Stopping the EngineDriving the Machine Drive Lever/Neutral Lock Latch OperationDriving Forward Adjusting the Cutting HeightDriving in Reverse Adjusting the Anti-Scalp Rollers Transporting Transporting a UnitMaintenance Recommended Maintenance SchedulesCheck Engine Oil Level Check Battery Charge Electric Start Units OnlyProposition 65 Warning Service Interval As required Do Not jump start a weak battery if these conditions existCheck Mower Blades Install bushing/blade assembly into spindleReplacing the Discharge Deflector Service Air Cleaner Check Safety Interlock SystemCheck for Loose Hardware Change Engine Oil Check Tire PressuresCheck Condition Of Belts Check Hydraulic Oil LevelCheck Spark Plugs Change Fuel FilterChange Hydraulic System Filter LevelHydraulic System Air Purge Wheel Hub-Slotted Nut Torque Specification Replace Emissions Air Intake FilterStyle a black finish Torque the slotted nut to 140-155 ft-lb 190-210 N-mInspect PTO Clutching Belt Tension Thread Locking AdhesivesMobil HTS Grease Or Food-Grade Anti-seize Copper-Based Anti-seizePark Brake Adjustment Hydro Drive Linkage AdjustmentDeck Leveling Pump Drive Belt TensionAdjust Hydro Control Linkages Repeat above adjustments if necessaryHydro Pump Spring Tension Setting Tracking AdjustmentDrive Lever Linkage Adjustment PTO Safety Switch Clean Engine and Exhaust System AreaRemove Engine Shrouds and Clean Cooling Fins Retighten PTO switch mounting hardwareClean Debris From Machine Clean Grass Build-Up Under DeckBattery Disposal Waste DisposalTroubleshooting Problem Possible Cause Corrective ActionTroubleshooting Schematics Electrical DiagramSchematics Hydraulic Diagram Exmark Commercial Turf Equipment Service Record Date Description of Work Done Service Done ByPage This page may be copied for personal use See EXMARK’S Complete Line of Accessories and Options