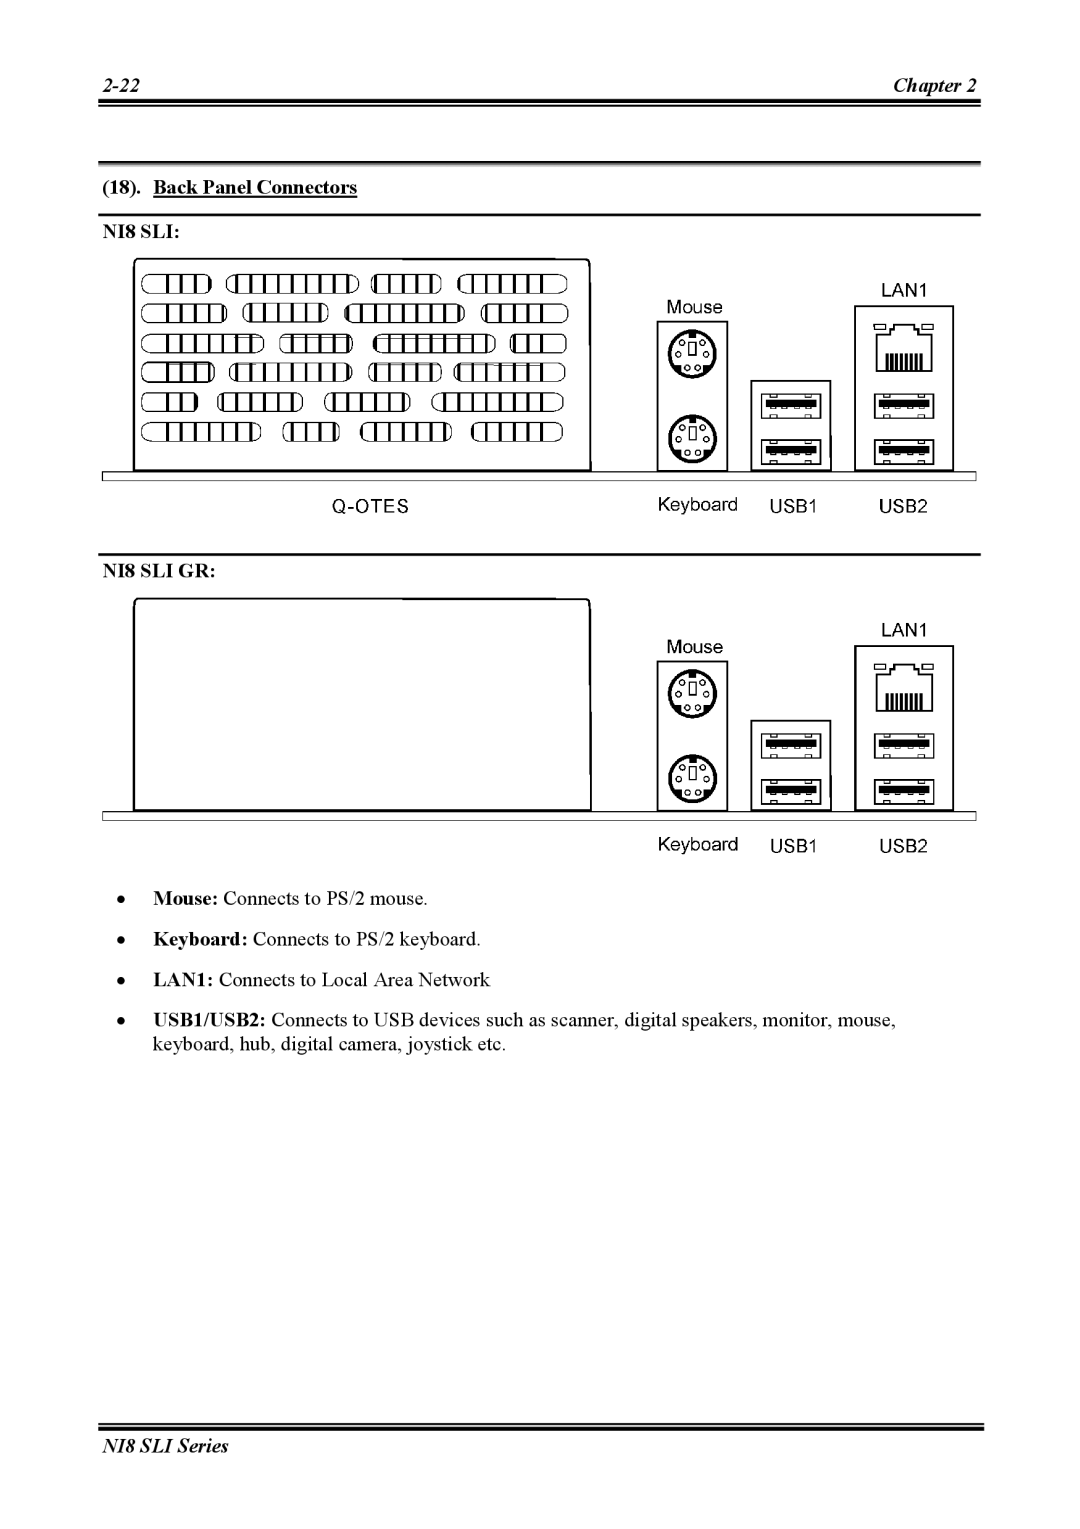
NI8 SLI Series
Intel Pentium 4 System Board Socket User’s Manual
4200-0460-05 Rev
Copyright and Warranty Notice
NI8 SLI Series
Chapter
Hardware Setup
BIOS Setup
Introduction
Load Fail-Safe Defaults
1-1. Features & Specifications
Chapter 1. Introduction
ABIT Q-OTES Technology For model NI8 SLI only
9. NV Firewall
11. Internal I/O Connectors
2x SATA connectors For model NI8 SLI only
10. Audio
1-2. Layout Diagram
Introduction
User’s Manual
Chapter
NI8 SLI Series
Chapter 2. Hardware Setup
2-1. Install The Motherboard
2-2. Install CPU, Heatsink and Fan Assembly
8. Secure the lever with the hook under retention tab
Channel A
2-3. Install System Memory
Method
Channel B
Channel B
Method
Channel A
DIMM1
2-4. Install two Graphics Cards with NVIDIA SLI Technology
NOTE Please handle the switchboard with caution. Watch out for the sharp edges
6. Insert the SLI Bridge Connector into the SLI goldfingers on each graphics card
2-5. Connectors, Headers and Switches
1. ATX Power Input Connectors
SYSFAN1 System Fan Power Connector
2. FAN Power Connectors
CPUFAN1 CPU Fan Power Connector NBFAN1 Chipset Fan Power Connector
AUXFAN1 Auxiliary Fan Power Connector
Pin 1-2 shorted default Normal operation
3. CMOS Memory Clearing Header
4. GURU Clock Connection Header
USB-PWR2
5. Wake-up Header
USB-PWR1
USB-PWR3
6. AudioMAX Slot
S/PDIF Connection
2-15
Hardware Setup
8. Internal Audio Connector
7. Front Panel Audio Connection Header
RST Pin 5
9. Front Panel Switches & Indicators Headers
HLED Pin 1
SPKR Pin 13, 15, 17
11. Status Indicator
10. Additional USB Port Headers
FP-USB1 FP-USB2 FP-USB3
12. Floppy and IDE Disk Drive Connectors
13. POST Code Display
See Appendix for both AWARD and AC2005 POST Code definition
14. Serial ATA Connectors
15. PCI Express x16 Slot
17. SLI Switchboard Slot
16. PCI Express x1 Slots
18. Back Panel Connectors NI8 SLI NI8 SLI GR
Mouse Connects to PS/2 mouse Keyboard Connects to PS/2 keyboard
LAN1 Connects to Local Area Network
Chapter 3. BIOS Setup
OC Guru
3-1. µGuru Utility
OC Guru
ABIT EQ
External Clock
CPU Operating Speed
Multiplier Factor
MEM Clock
Click Enter key to enter its submenu
ABIT EQ
Power Cycle Statistics
OC Guru
Beep Enable
# Temperature Monitoring
Shutdown Enable
CPU Temperature/System Temperature/PWM Temperature
Beep Enable
# Voltage Monitoring
Shutdown Enable
All Voltages
Beep Enable
# Fan Speed Monitoring
Shutdown Enable
CPU/NB/SYS/AUX/OTES FAN Speed
# FanEQ Control
Click Enter key to enter its submenu
Press
Reference Temperature
BIOS Setup
CPU FanEQ Control
Control Temperature High/Low
Click Enter key to enter its submenu
3-10
Chapter
NI8 SLI Series
Reference Temperature
Click Enter key to enter its submenu
NB/SYS/AUX/OTES FanEQ Control
Control Temperature High/Low
3-2. Standard CMOS Features
Date mmddyy
Time hhmmss
Capacity
Access Mode
IDE HDD Auto-Detection
Cylinder
Landing Zone
# Back to Standard CMOS Features Setup Menu
Precomp
Sector
3-3. Advanced BIOS Features
# CPU Feature
Thermal Management
Quick Power On Self Test
# Back to Advanced BIOS Features Setup Menu
Execute Disable Bit
Hard Disk Boot Priority
Security Option
Boot Up Floppy Seek
Boot Up NumLock Status
MPS Version Control For OS
SLI Broadcast Aperture
3-4. Advanced Chipset Features
Memory Timings
LDT Frequency
3-5. Integrated Peripherals
# OnChip IDE Device
IDE1/2 Master/Slave RAID, Serial-ATA 1/2 RAID
# RAID Config
RAID Enable
OnChip IDE-1 Controller
OnChip USB
# OnChip PCI Device
LAN Boot ROM
USB Keyboard Support Via
OnBoard SATA Controller
# Back to Integrated Peripherals Setup Menu
# OnBoard PCI Device For model NI8 SLI only
SATA Mode
ACPI Suspend Type
3-6. Power Management Setup
Power Button Function
Resume by USB From S3
Time hhmmss Alarm
Power-On by Alarm
Date of Month Alarm
POWER ON Function
Hot Key Power ON
Restore On AC Power Loss
3-7. PnP/PCI Configurations
Init Display First
Resources Controlled By
IRQ Resources
BIOS Setup
3-27
PCI/VGA Palette Snoop
3-10. Set Password
3-8. Load Fail-Safe Defaults
3-9. Load Optimized Defaults
3-11. Save & Exit Setup
Appendix A. Install nVidia nForce Chipset Driver
9. Click Next
now., and click Finish to complete setup
6. Click Next
7. Click Next
Appendix B. Install Realtek Audio Driver
Output digital and analog
No Output
Output digital only
S/PDIF-In to S/PDIF-Out pass through mode
Appendix C. Install Silicon Image 3132 SATA Driver NI8-SLI
Install Silicon Image 3132 SATA Driver NI8-SLI
User’s Manual
NI8 SLI Series
Appendix C
Appendix D. Install Silicon Image 3132 RAID Driver NI8-SLI
After entering the installation menu, move your
enable the item “RAID” first in the BIOS menu
5. Click Finish
8. Click Finish
Appendix D
Appendix E. Install USB 2.0 Driver
NI8 SLI Series
Appendix E
Appendix F. Install uGuru Utility
NI8 SLI Series
Appendix F
Appendix G. Generate NVRaid Floppy Disk 32 bit/64 bit
Generate NVRaid Floppy Disk 32 bit/64 bit
User’s Manual
NI8 SLI Series
Appendix G
Appendix H. Generate SIL3132Raid Floppy Disk 32 bit/64 bit NI8-SLI
Generate SIL3132Raid Floppy Disk 32 bit/64 bit NI8-SLI
User’s Manual
NI8 SLI Series
Appendix H
POST
Appendix I. POST Code Definition
AWARD POST Code Definitions
Description
Appendix
E8POST.ASM starts
Page
Power Off Sequence
AC2005 POST Code Definition
Power On Sequence
Button reset
NI8 SLI Series
Appendix
Appendix J. Troubleshooting Need Assistance?
Q & A
Example
CONFIG.SYS
Q How can I get a quick response to my request for technical support?
Example
Main instructions
Module Part Number MT9VDDT1672AG, CAS Latency 2, Speed MHz 200 MHz
Contact Person
Technical Support Form
Company Name
# Fax Number
Appendix K. How to Get Technical Support
alt.comp.hardware.homebuilt alt.comp.hardware.pc-homebuilt
alt.comp.periphs.mainboard.abit comp.sys.ibm.pc.hardware.chips
alt.comp.hardware.overclocking
Appendix K
RMA Center http//rma.abit-usa.com
Sales sales@abit-usa.com
Marketing marketing@abit-usa.com
E-mail sales@abitcomputer.co.uk
No. 323, Yang Guang St
Thank You ABIT Computer Corporation
Serving all other territories
Neihu, Taipei, 114, Taiwan