IlE3iE
Electric Power
Carts and stands When placed or
Installation
AC power cord
Damaae Requiring Service
Connect the right and left speakers to the main unit
Check the AC voltage
Connect the stereo turntable to the main unit
Connect the supplied antennas
AM antenna
Press CLOCtVDIMMER once, then press Enter within 4 seconds
To turn the unit on
Turn Multi JOG to designate the hour, then press
Turn Multi JOG to designate the minute, then press Enter
Press GEQ repeatedly to select the equalization mode
To select with the remote control
Sound adjustment during recording
Press T-BASS
When an FM stereo broadcast contains noise
To select a band with the remote control
To change the AM tuning interval
Press TUNER/BAND to select the FM or AM band
Selecting a track with the remote control
To start play when the power is off Direct Play Function
To play one disc onl~ press one of Disc Direct Play
To stop play, press
To clear a preset station
Selecting a preset number on the main unit
Repeat steps 1
II ~
Press one of Disc Direct Play 1-5 to select a disc
Press Prgm while pressing Shift in stop mode
To erase a recording
Insert the tape to be recorded on into Deck
Press on Deck 1 to start recording
Press on Deck 1 to start recording on the first side
Insert the tape into Deck
Press Numbered Buttons Remote
To designate Tape
Direct Play 2, then press +10 and O
Repeat for the rest of the tracks for side a
To check the order of the programmed track numbers
To change the program of each side
Prepare the source
Press Timer to display ~, then press Enter within 6 seconds
Get ready for the Tape function or the timer recording
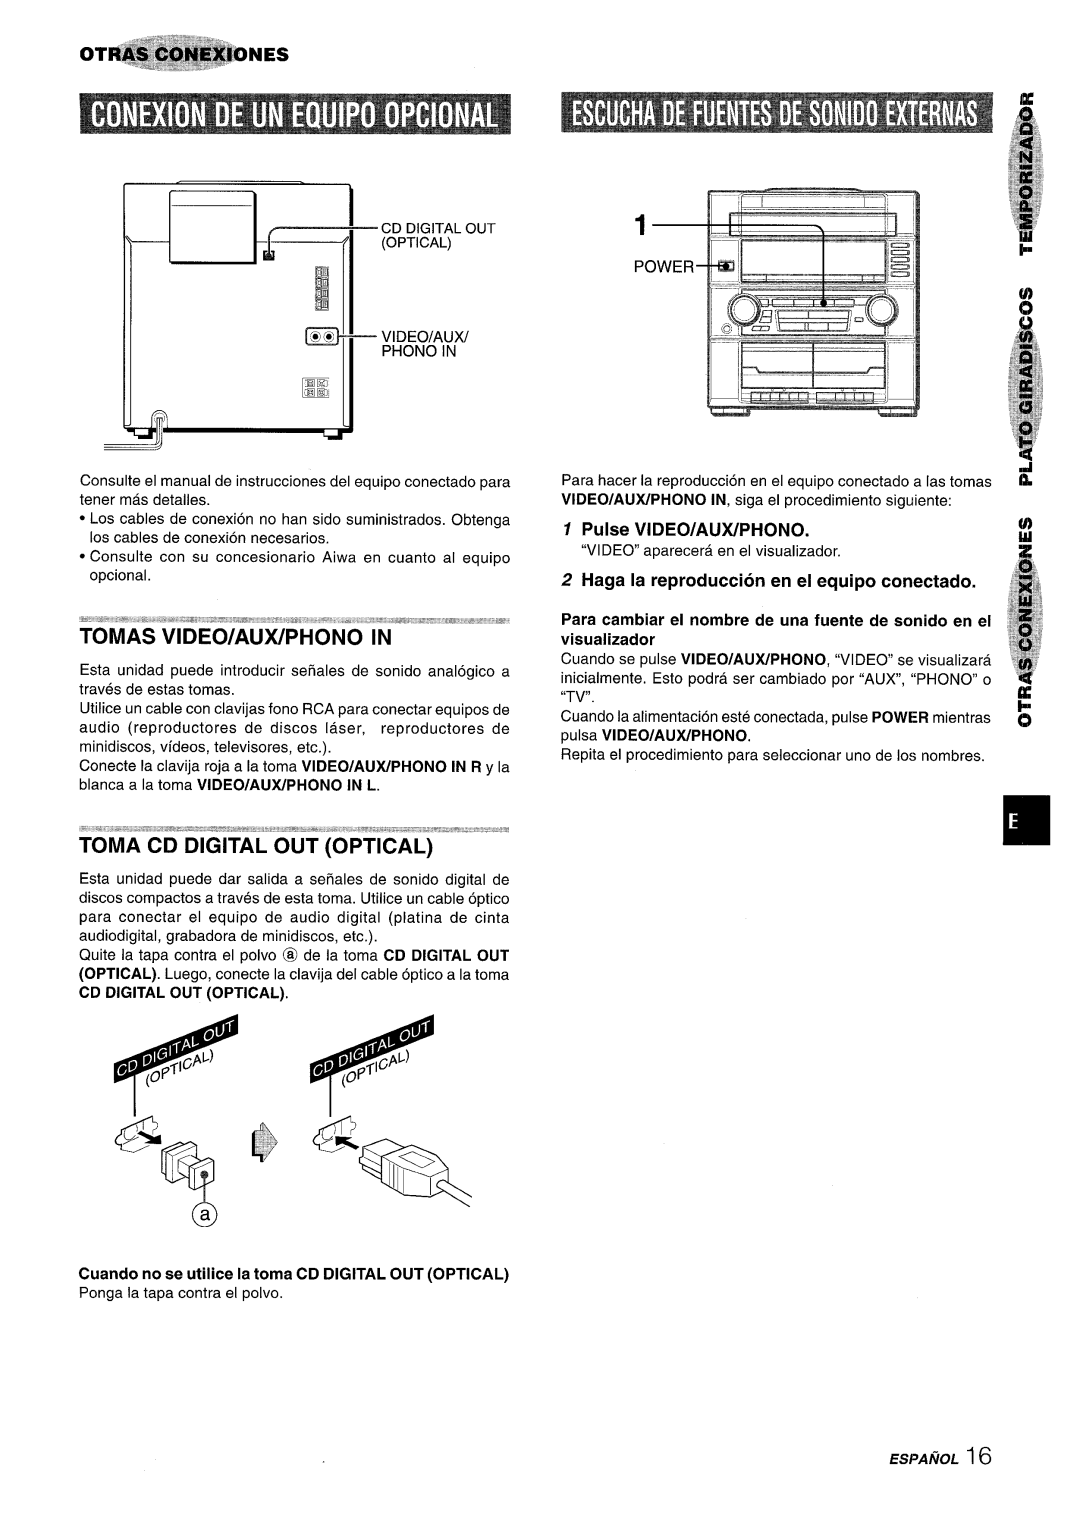
Press VIDEO/AUX/PHONO on the main unit
Adjust the volume to minimum
Adjust the volume according to your preference
Used
Press VIDEO/AUX/PHONO
Sound is emitted from one speaker only
To demagnetize the heads
Cassette deck section
Superficie de montaje Ponga la unidad sobre una
ELECTRiCAS, no Quite LA Cubierta
Entrada de objetos y l~quidos Tenga cuidado de que
Eneraia electrica
Ajustes DE Audio Ecualizador Grafico
No Trate DE Reparar LA Unidad Usted Mismo
Sintonizacion Manual Preajuste DE Emisoras
Basicas
Conecte el cable de alimentacion de CA a una toma de CA
Conecte Ias antenas suministradas
Importante
Speakers L
Espanol
Conexion DE UNA Antena Exterior
Demo
Gire Multi JOG para designar la hors, y Iuego pulse Enter
Gire Multi JOG para designar el minute, y Iuego Pulse Enter
GEQ Shift Phones
Pulse T-BASS
Para reducir la iluminacion del visualizador
Para buscar rapidamente una emisora busqueda automatic
Pulse Tunefuband para seleccionar la banda de FM ode AM
Para cambiar el intervalo de sintonizacion de AM
Rece Mono Tuner Band Shift
Cable DE Bajada LA Antena Unidad DE Descarga
Ajuste DEL Temporizador Para Dormir Plato Giradiscos
Conecte el plato giradiscos estereo a la unidad principal
Compruebe la tension de CA
Cuando reemplazar Ias pilas
Para posicionar Ias antenas Antena de FM
Insertion de Ias pilas
Para encender la unidad
Para cancelar la demostracion del juego
Para desconectar la alimentacion
Ventanilla parpadeante
Pulse repetidamente GEQ mientras pulsa Shift
Utilization de auriculares
@ Modo de sintonizacion de emisoras preajustadas El
Para borrar una emisora preajustada
Repita Ios pasos 1 y
Cintas utilizable
Pulse TAPE, Iuego pulse WA para abrir el portacasete
NGE
Editi Check Random Repeat
Shift Disc
II IL
Pulse de la platina 1 para iniciar la grabacion
Inserte la cinta que vaya a grabar en la platina
El Ios discos
Antes de pulsar , programe Ios temas consulte la pagina
Edit
Inserte la cinta en la platina
Para detener la grabacion
Por temporizador se visualizaran durante 4 segundos
Prepare la fuente de sonido
Vaya a reproducer en primer Iugar en el compartimiento
Pulse Sleep mientras pulsa Shift Preparatives
Ajuste el volumen segun sus preferencias
Pulse VIDEO/AUX/PHONO de la unidad principal
Inicie la reproduction en el plato giradiscos
CD Digital OUT Optical
Pulse VIDEO/AUX/PHONO
Cuando no se utilice la toma CD Digital OUT Optical
La cinta no se mueve
Para desmagnetizar Ias cabezas
Seccion del
Alerter I’utilisateur sur la presence d’une
Explication des symboles graphiques
Et indiquee sur I’appareil
SX-ZR25
Antenne exterieure
Nettoyez I’appareil comme indique clans Ie mode d’emploi
Re~arations exiaeant I’intervention d’un rxofessionnel
NE PAS Essayer DE Reparer SOI-MEME L’APPAREIL
Enceintes
Verifiez la tension du secteur
Raccordez Ie tourne-disque stereo a I’appareil principal
Raccordez Ies antennes fournies
’ACCORDEMENT ‘D’UNE Antenne Exterieure
Pour reinitialiser Ie jeu
Mode de demonstration de jeu
Pour jouer Ie jeu de demonstration
Shift Bass Volume
Pour annuler Ie mode selectionne
Appuyez sur T-BASS
Utilisation d’un casque
Mono Tuner Band Shift
Appuyez sur Tunewband pour selectionner la gamme FM ou AM
Appuyez sur pour commencer la lecture
Repetez Ies etapes 1 et
Appuyez sur Tape puis sur W= pour ouvrir Ie porte-cassette
Chargez Ies disques
Direct
PI-AY
Plages selectionnees
PRGapparalt sur I’afficheur
Selectionnee Selectionnees Numero de programme
’enregistrement
Inserez la cassette a enregistrer clans la platine
Appuyez sur La platine Pour cornmencer
De la telecommande Tout Maintenant
La premiere Face
Appuyez Sur
Face B de la cassette face arriere
10~~d-’
Enter
Preparez la source
‘~#
Lancez la lecture du disque sur Ie tourne-disque
Reglez Ie volume au minimum
Reglez Ie volume selon vos preferences
Mettez I’appareil raccorde en marche
Appuyez sur VIDEO/AUX/PHONO
CD Digital OUT
Optical
Section Tuner
Generalities
Section Platine a Cassette
Section Lecteur CD
Droits D’AUTEUR
IHF
@ Deck Name/Nombre/Nom Page/Pagina/Page
Name/Nombre/Nom Page/Pagina/Page
~OpENiCLosE