AKG Acoustics WMS 400 user manual Instrucciones de manejo, Retry Exit

Models: WMS 400

1 104
Download 104 pages 7.89 Kb
Page 82
Image 82

3 Puesta en servicio

3.11Sistemas multicanal 1. Asegúrese de asignar una frecuencia de transmisión a cada canal de emisión (transmisor + receptor).

2.Para encontrar frecuencias sin ruidos de intermodulación en forma rápida y fácil, recomendamos seleccionar en el menú Auto Channel frecuencias que estén dentro del mismo Preset y del mismo grupo de frecuencias.

Nota: En caso de perturbaciones de la recepción en una frecuencia, busque con Auto Channel Setup (ver capítulo 3.9.2) el próximo subcanal libre de interferencias del grupo de frecuencias seleccionado. Si no encuentra ningún subcanal libre de interferencias, seleccione con Auto Group Setup otro grupo de frecuencias dentro del mismo Preset y vuelva a seleccionar la frecuencia para cada canal (ver capí- tulos 3.9.1 y 3.9.2).

3.Por razones físicas, no debe operar más de un canal de emisión en la misma frecuencia al mismo tiempo y en el mismo lugar. Esto causaría fuertes ruidos.

3.11.1Regular las frecuencias 1. Ajuste en el receptor para el canal no. 1 la frecuencia con Auto Group Setup (véase el Capítulo 3.8.1). para sistemas multicanales 2. Ponga en marcha todos los radiomicrófonos excepto aquello para el canal no. 1, transmisores de

(Auto Channel Setup) monitor, etc. (también los de otros fabricantes) en el lugar del evento. Esto es necesario para que el recep-

tor pueda encontrar aquellas frecuencias que también durante el evento estén libres de perturbaciones.

>RETRY<: repetir

SAVE >Y<: guardar

SAVE <N<: no guardar

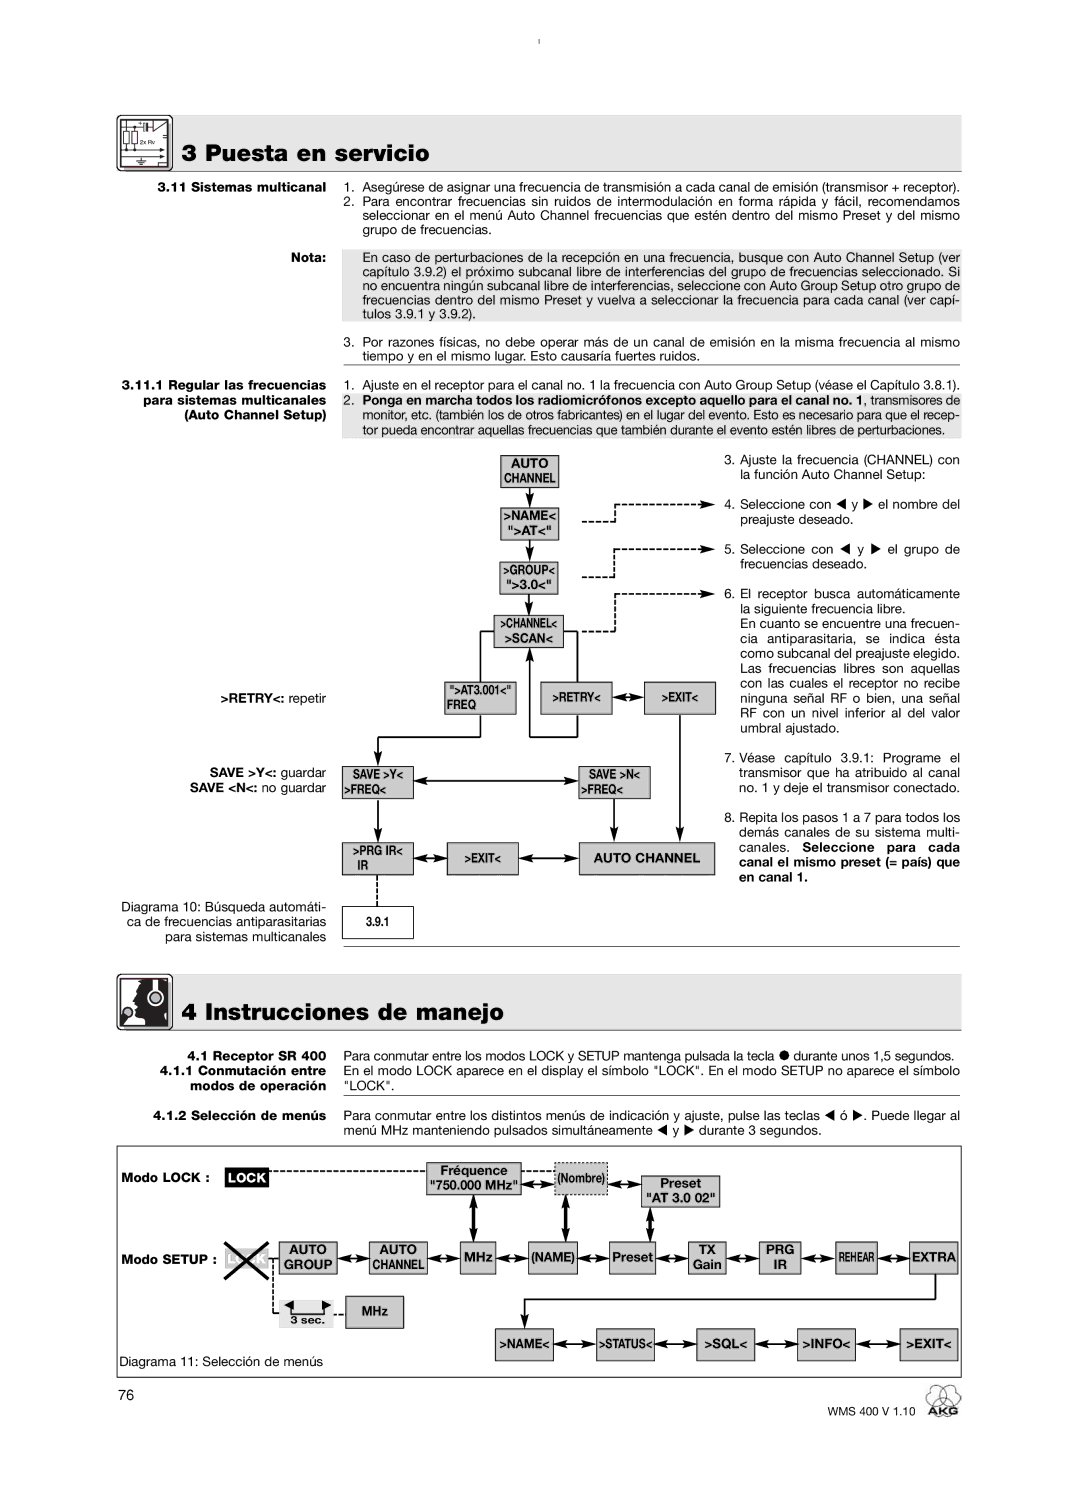
Diagrama 10: Búsqueda automáti- ca de frecuencias antiparasitarias para sistemas multicanales


AUTO


3. Ajuste la frecuencia (CHANNEL) con


CHANNEL


la función Auto Channel Setup:


4. Seleccione con

y

el nombre del


>NAME<


preajuste deseado.


">AT<"


5. Seleccione con

y

el grupo de


frecuencias deseado.


>GROUP<


">3.0<"


6. El receptor busca automáticamente


la siguiente frecuencia libre.


>CHANNEL<


En cuanto se encuentre una frecuen-


>SCAN<


cia antiparasitaria, se indica ésta


como subcanal del preajuste elegido.


Las frecuencias libres son aquellas


con las cuales el receptor no recibe


">AT3.001<"


>RETRY<


>EXIT<


ninguna señal RF o bien, una señal


FREQ


RF con un nivel inferior al del valor


umbral ajustado.


7. Véase capítulo 3.9.1: Programe el


SAVE >Y<


SAVE >N<


transmisor que ha atribuido al canal

>FREQ<


>FREQ<


no. 1 y deje el transmisor conectado.


8. Repita los pasos 1 a 7 para todos los


demás canales de su sistema multi-


canales. Seleccione

para cada

>PRG IR<


>EXIT<


AUTO CHANNEL

IR


canal el mismo preset (= país) que


en canal 1.


3.9.1


4 Instrucciones de manejo

4.1 Receptor SR 400 Para conmutar entre los modos LOCK y SETUP mantenga pulsada la tecla durante unos 1,5 segundos.

4.1.1Conmutación entre En el modo LOCK aparece en el display el símbolo "LOCK". En el modo SETUP no aparece el símbolo

modos de operación

"LOCK".

4.1.2 Selección de menús

Para conmutar entre los distintos menús de indicación y ajuste, pulse las teclas ó . Puede llegar al


menú MHz manteniendo pulsados simultáneamente y durante 3 segundos.

Modo LOCK :

LOCK


Fréquence

(Nombre)

Preset


"750.000 MHz"


"AT 3.0 02"


Modo SETUP :

LOCK

AUTO

AUTO

MHz

(NAME)

Preset

TX

PRG

REHEAR

EXTRA

GROUP

CHANNEL

Gain

IR


3 sec.

MHz


>NAME<

>STATUS<

>SQL<


>INFO<

>EXIT<

Diagrama 11: Selección de menús


76


WMS 400 V 1.10

Page 82
Image 82
AKG Acoustics WMS 400 user manual Instrucciones de manejo, Retry Exit

WMS 400 specifications

AKG Acoustics has long been recognized as a premier brand in the professional audio industry, particularly in the realm of wireless microphone systems. Among its celebrated offerings, the WMS 4000, WMS 400, and WMS 40 series stand out for their advanced technology and robust performance, catering to a range of applications from live performances to studio recordings.

Starting with the WMS 4000, this system is engineered for versatility and reliability. It features a sophisticated transmission diversity system that minimizes dropouts and ensures clear audio quality. The WMS 4000 offers an extensive frequency range, accommodating diverse environments and frequencies. A standout feature is its digital pilot tone, which automatically mutes the transmitter when it is switched off, effectively preventing unwanted noise during transitions. With a range of up to 300 meters, the WMS 4000 is ideal for large venues, allowing performers ample space to move without compromising sound quality.

Next, the WMS 400 series maintains the high standards set by its predecessor while providing a more accessible option for mid-level performers. It combines ease of use with quality audio performance, boasting a user-friendly interface that simplifies setup and operation. The WMS 400 employs an efficient frequency management system, which automatically scans the environment to select the best frequencies available, ensuring optimal performance with minimal interference. The system also features a rugged metal chassis, enhancing durability for live applications.

The WMS 40 series serves as an entry-level solution, perfect for beginners and small venues. It is lightweight and features a straightforward design, making it easy to operate for users without extensive technical knowledge. One of its most notable characteristics is its plug-and-play functionality, allowing for quick setup without complicated configurations. The WMS 40 series also offers excellent sound quality through its crystal-clear audio transmission and robust reception, making it a popular choice for schools, theaters, and small events.

All of these systems benefit from AKG's heritage in sound engineering, incorporating advanced audio processing technologies that ensure superior sound fidelity. They also come with a variety of microphone options, including handheld, lavalier, and headworn microphones, providing flexibility to meet different performance needs. Whether for a professional stage or an intimate setting, the AKG WMS series delivers outstanding performance, reliability, and user-friendly features that cater to a wide range of audio applications.