3 Setting Up

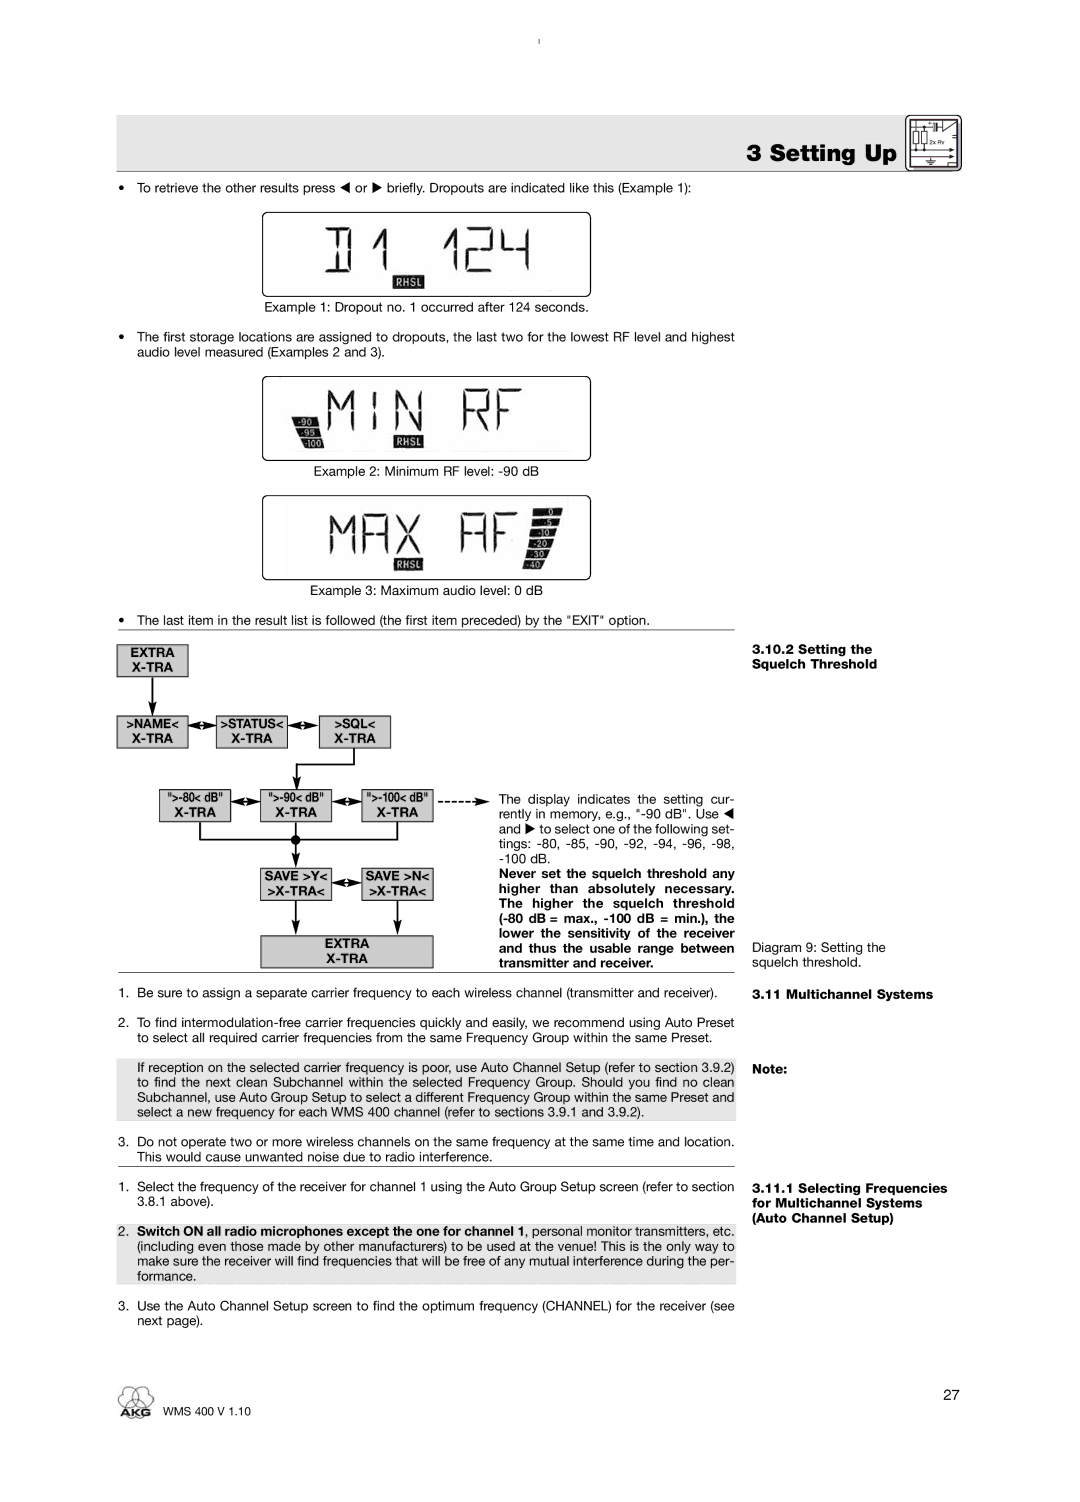
• To retrieve the other results press or briefly. Dropouts are indicated like this (Example 1):

Example 1: Dropout no. 1 occurred after 124 seconds.

The first storage locations are assigned to dropouts, the last two for the lowest RF level and highest audio level measured (Examples 2 and 3).

Example 2: Minimum RF level: -90 dB

Example 3: Maximum audio level: 0 dB

• The last item in the result list is followed (the first item preceded) by the "EXIT" option.

EXTRA

X-TRA

>NAME<

>STATUS<

>SQL<

X-TRA

X-TRA

X-TRA

3.10.2Setting the Squelch Threshold

">-80< dB"


">-90< dB"


">-100< dB"

X-TRA


X-TRA


X-TRA


SAVE >Y<


SAVE >N<


>X-TRA<


>X-TRA<


EXTRA


X-TRA

The display indicates the setting cur- rently in memory, e.g., "-90 dB". Use and to select one of the following set- tings: -80, -85, -90, -92, -94, -96, -98, -100 dB.

Never set the squelch threshold any higher than absolutely necessary. The higher the squelch threshold (-80 dB = max., -100 dB = min.), the lower the sensitivity of the receiver and thus the usable range between transmitter and receiver.

Diagram 9: Setting the squelch threshold.

1.Be sure to assign a separate carrier frequency to each wireless channel (transmitter and receiver).

2.To find intermodulation-free carrier frequencies quickly and easily, we recommend using Auto Preset to select all required carrier frequencies from the same Frequency Group within the same Preset.

3.11 Multichannel Systems

If reception on the selected carrier frequency is poor, use Auto Channel Setup (refer to section 3.9.2) to find the next clean Subchannel within the selected Frequency Group. Should you find no clean Subchannel, use Auto Group Setup to select a different Frequency Group within the same Preset and select a new frequency for each WMS 400 channel (refer to sections 3.9.1 and 3.9.2).

3.Do not operate two or more wireless channels on the same frequency at the same time and location. This would cause unwanted noise due to radio interference.

1.Select the frequency of the receiver for channel 1 using the Auto Group Setup screen (refer to section 3.8.1 above).

2.Switch ON all radio microphones except the one for channel 1, personal monitor transmitters, etc. (including even those made by other manufacturers) to be used at the venue! This is the only way to make sure the receiver will find frequencies that will be free of any mutual interference during the per- formance.

3.Use the Auto Channel Setup screen to find the optimum frequency (CHANNEL) for the receiver (see next page).

Note:

3.11.1Selecting Frequencies for Multichannel Systems (Auto Channel Setup)

27

WMS 400 V 1.10

Page 33
Image 33
AKG Acoustics WMS 400 user manual Setting the Squelch Threshold, TRA Save Y Save N Extra, Multichannel Systems

WMS 400 specifications

AKG Acoustics has long been recognized as a premier brand in the professional audio industry, particularly in the realm of wireless microphone systems. Among its celebrated offerings, the WMS 4000, WMS 400, and WMS 40 series stand out for their advanced technology and robust performance, catering to a range of applications from live performances to studio recordings.

Starting with the WMS 4000, this system is engineered for versatility and reliability. It features a sophisticated transmission diversity system that minimizes dropouts and ensures clear audio quality. The WMS 4000 offers an extensive frequency range, accommodating diverse environments and frequencies. A standout feature is its digital pilot tone, which automatically mutes the transmitter when it is switched off, effectively preventing unwanted noise during transitions. With a range of up to 300 meters, the WMS 4000 is ideal for large venues, allowing performers ample space to move without compromising sound quality.

Next, the WMS 400 series maintains the high standards set by its predecessor while providing a more accessible option for mid-level performers. It combines ease of use with quality audio performance, boasting a user-friendly interface that simplifies setup and operation. The WMS 400 employs an efficient frequency management system, which automatically scans the environment to select the best frequencies available, ensuring optimal performance with minimal interference. The system also features a rugged metal chassis, enhancing durability for live applications.

The WMS 40 series serves as an entry-level solution, perfect for beginners and small venues. It is lightweight and features a straightforward design, making it easy to operate for users without extensive technical knowledge. One of its most notable characteristics is its plug-and-play functionality, allowing for quick setup without complicated configurations. The WMS 40 series also offers excellent sound quality through its crystal-clear audio transmission and robust reception, making it a popular choice for schools, theaters, and small events.

All of these systems benefit from AKG's heritage in sound engineering, incorporating advanced audio processing technologies that ensure superior sound fidelity. They also come with a variety of microphone options, including handheld, lavalier, and headworn microphones, providing flexibility to meet different performance needs. Whether for a professional stage or an intimate setting, the AKG WMS series delivers outstanding performance, reliability, and user-friendly features that cater to a wide range of audio applications.