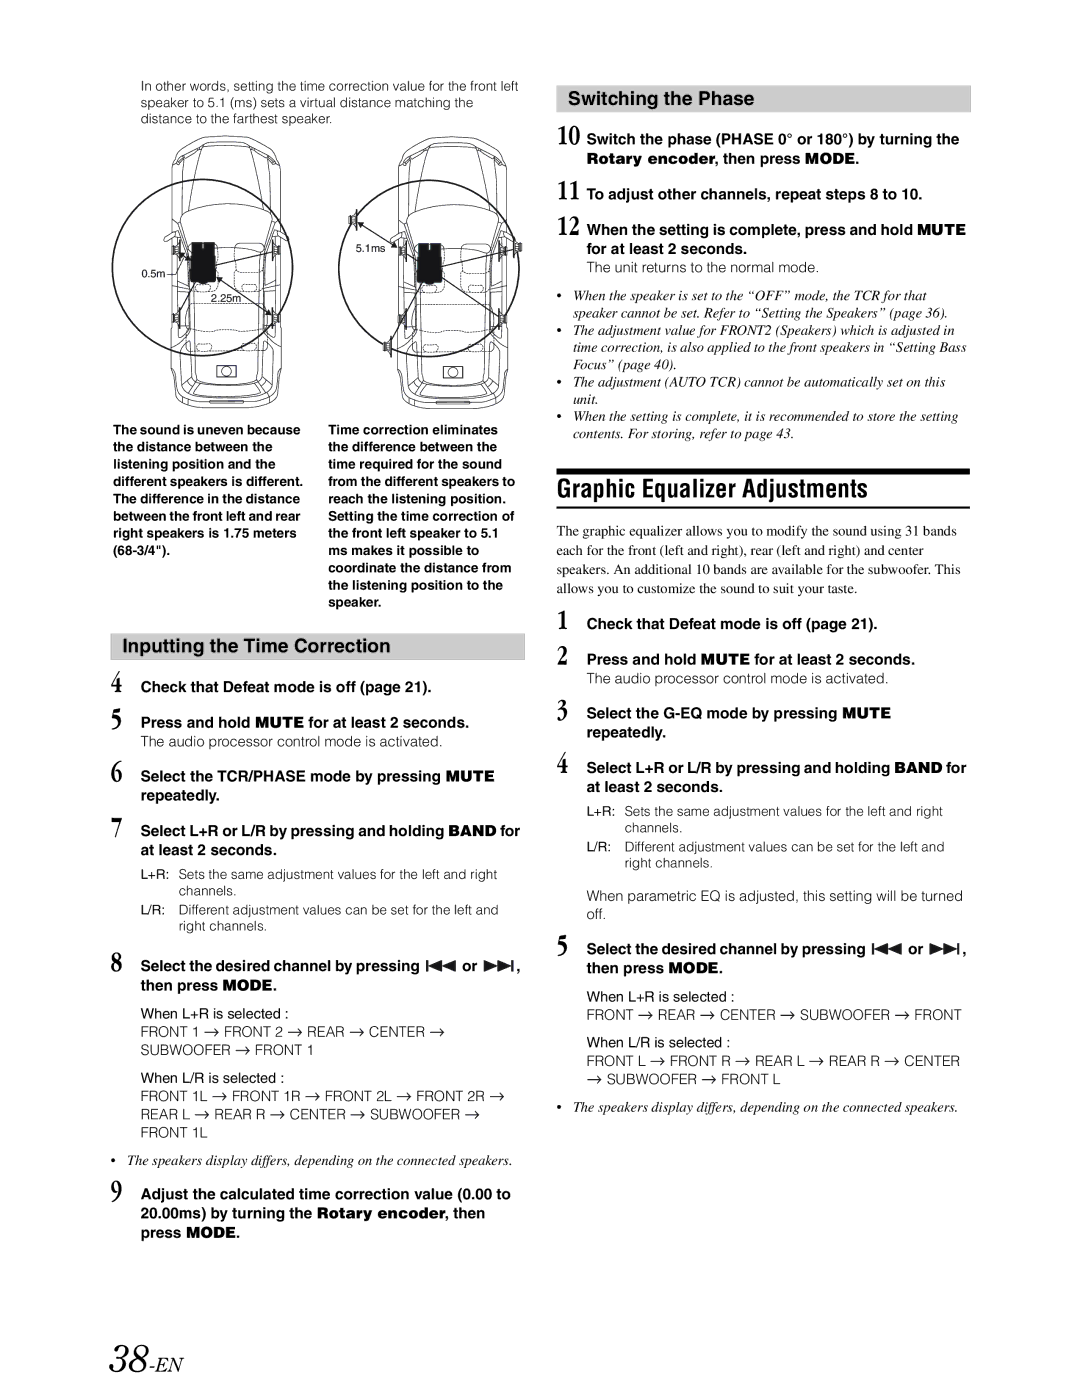
In other words, setting the time correction value for the front left speaker to 5.1 (ms) sets a virtual distance matching the distance to the farthest speaker.
5.1ms
0.5m![]()
2.25m
Switching the Phase
10 Switch the phase (PHASE 0° or 180°) by turning the Rotary encoder, then press MODE.
11 To adjust other channels, repeat steps 8 to 10.
12 When the setting is complete, press and hold MUTE for at least 2 seconds.
The unit returns to the normal mode.
• When the speaker is set to the “OFF” mode, the TCR for that |
speaker cannot be set. Refer to “Setting the Speakers” (page 36). |
• The adjustment value for FRONT2 (Speakers) which is adjusted in |
time correction, is also applied to the front speakers in “Setting Bass |
Focus” (page 40). |
• The adjustment (AUTO TCR) cannot be automatically set on this |
unit. |
• When the setting is complete, it is recommended to store the setting |
The sound is uneven because the distance between the listening position and the different speakers is different. The difference in the distance between the front left and rear right speakers is 1.75 meters
Time correction eliminates the difference between the time required for the sound from the different speakers to reach the listening position. Setting the time correction of the front left speaker to 5.1 ms makes it possible to coordinate the distance from the listening position to the speaker.
contents. For storing, refer to page 43. |
Graphic Equalizer Adjustments
The graphic equalizer allows you to modify the sound using 31 bands each for the front (left and right), rear (left and right) and center speakers. An additional 10 bands are available for the subwoofer. This allows you to customize the sound to suit your taste.
1Check that Defeat mode is off (page 21).
Inputting the Time Correction
4Check that Defeat mode is off (page 21).
5Press and hold MUTE for at least 2 seconds.
The audio processor control mode is activated.
6Select the TCR/PHASE mode by pressing MUTE repeatedly.
7Select L+R or L/R by pressing and holding BAND for at least 2 seconds.
L+R: Sets the same adjustment values for the left and right channels.
L/R: Different adjustment values can be set for the left and right channels.
8Select the desired channel by pressing  or
or  , then press MODE.
When L+R is selected :
FRONT 1 ![]() FRONT 2
FRONT 2 ![]() REAR
REAR ![]() CENTER
CENTER ![]()
SUBWOOFER ![]() FRONT 1
FRONT 1
When L/R is selected :
FRONT 1L ![]() FRONT 1R
FRONT 1R ![]() FRONT 2L
FRONT 2L ![]() FRONT 2R
FRONT 2R ![]()
REAR L ![]() REAR R
REAR R ![]() CENTER
CENTER ![]() SUBWOOFER
SUBWOOFER ![]() FRONT 1L
FRONT 1L
•The speakers display differs, depending on the connected speakers.
9Adjust the calculated time correction value (0.00 to 20.00ms) by turning the Rotary encoder, then press MODE.
2Press and hold MUTE for at least 2 seconds.
The audio processor control mode is activated.
3Select the
4Select L+R or L/R by pressing and holding BAND for at least 2 seconds.
L+R: Sets the same adjustment values for the left and right channels.
L/R: Different adjustment values can be set for the left and right channels.
When parametric EQ is adjusted, this setting will be turned off.
5Select the desired channel by pressing  or
or  , then press MODE.
When L+R is selected :
FRONT ![]() REAR
REAR ![]() CENTER
CENTER ![]() SUBWOOFER
SUBWOOFER ![]() FRONT
FRONT
When L/R is selected :
FRONT L ![]() FRONT R
FRONT R ![]() REAR L
REAR L ![]() REAR R
REAR R ![]() CENTER
CENTER
![]() SUBWOOFER
SUBWOOFER ![]() FRONT L
FRONT L
•The speakers display differs, depending on the connected speakers.
