Getting Started
Apple Computer, Inc
Apple Computer, Inc. All rights reserved
Contents
Battery
Appendix B Care, Use, and Safety Information
Page
Getting Started
Connecting the Internal Modem
Plug the A/C plug on the power adapter into an outlet
Plugging In the Computer
Opening the Display
Problems Turning the Computer On?
Turning the Computer On
Tips for Using the Trackpad
Moving Items on the Screen
Adjusting the Internal Display
Adjusting the Brightness
Adjusting the Display Resolution
Mac OS 9, click the Resolution icon in the Control Strip
Resolutions Supported by the Built-In Display
Calibrating Your Battery for Best Performance
Where to Go From Here
If you would like additional information, see the following
Put Your PowerBook to Sleep
What to Do When You Are Finished Working
Shut Down Your PowerBook
Page
Getting to Know Your Computer
If You Are New to the Mac
Basic Features of Your PowerBook
Press and hold this key to activate the function keys F1-F12
Additional Features of Your PowerBook
Connect a standard phone line directly to the internal modem
Inside Your PowerBook
Removable hard disk
About Mac OS
Dock
Tips and Tricks
What You Can Do
To Get Started
To Learn More
ITools-Free Internet Services for Mac Users
ICards
Upload pictures to your iDisk to create custom iCards
Sherlock 2-Your Internet Search Detective
Connect to the Internet Open Sherlock
Macintosh Products Guide
Apple.com-Your Starting Place on the World Wide Web
Mac OS
QuickTime-Audio and Video on the Internet
What You Can Do
IMovie 2-Create and Edit Your Own Digital Movies
Shelf
Share your desktop iMovie with your friends and family
ITunes-Digital Music For Your Mac
New Playlist button Visuals button
Connect your PowerBook to your stereo system
Update software
Adjust your Software Update schedule
Multiple Users-Turn One Mac Into Many
Home
Create a new user
Keeping your computer secure
Mac Help-Answers to All Your Macintosh Questions
Using Your Computer
USB Devices and Battery Power
Using USB Devices
Universal Serial Bus USB
Using Multiple USB Devices at the Same Time
For More Information on USB
Your PowerBook
FireWire
Using FireWire Devices
FireWire Target Disk Mode
Power adapter
FireWire Devices and Battery Power
For More Information on FireWire
Inserting and Ejecting a PC Card
PC Cards
For More Information on PC Cards
How AirPort Provides Wireless Internet Access
AirPort Wireless Internet and Networking
For More Information on AirPort
For More Information on Using Ethernet
Ethernet 10/100/1000Base-T
Making an Infrared Connection
Infrared IrDA
For More Information on Infrared
External Video Support VGA and S-Video
Connecting an External Monitor
Using Your PowerBook With the Display Closed
To connect a device to the TV out port
Connecting a Television, VCR, or Other Video Device
For More Information on Using an External Monitor or TV
Mac OS X, use the Displays pane of System Preferences
To remove the battery
Battery
Removing and Replacing the Battery
Calibrating a New Battery for Best Performance
Mac OS X, use the battery icon in the menu bar
Charging a Battery
Swapping Batteries While the Computer Is in Sleep
Battery-Conservation Tips
For More Information on Your PowerBook Battery
DVD-ROM Drive
Inserting a CD or DVD Disc
Playing DVD Discs
Mac OS 9, use the Resolution portion of the Control Strip
Ejecting a Disc
For More Information on Your DVD Drive
Optional CD-RW Drive
Inserting a CD Disc
Keyboard Controls and Programmable Function Keys
Using the Standard Function Keys
Assigning Programmable Function Keys
Using the Embedded Numeric Keypad
For More Information on Keyboard Controls
Security Slot and Keyboard Lock
For More Information on Security Options
Page
Working With Your Operating System
Using Classic in Mac OS
Information About Software and Mac OS
Switching Between Operating Systems
Need Help?
Installing Additional Memory
Working Inside Your Computer
Installing Additional RAM
Working Inside Your Computer
Chapter
Locate the upper RAM expansion slot
Page
Working Inside Your Computer
Mac OS
Making Sure Your Computer Recognizes the New Memory
Working Inside Your Computer
Removing the Internal Hard Disk
Working Inside Your Computer
Chapter
Disconnect the connector cable from the logic board
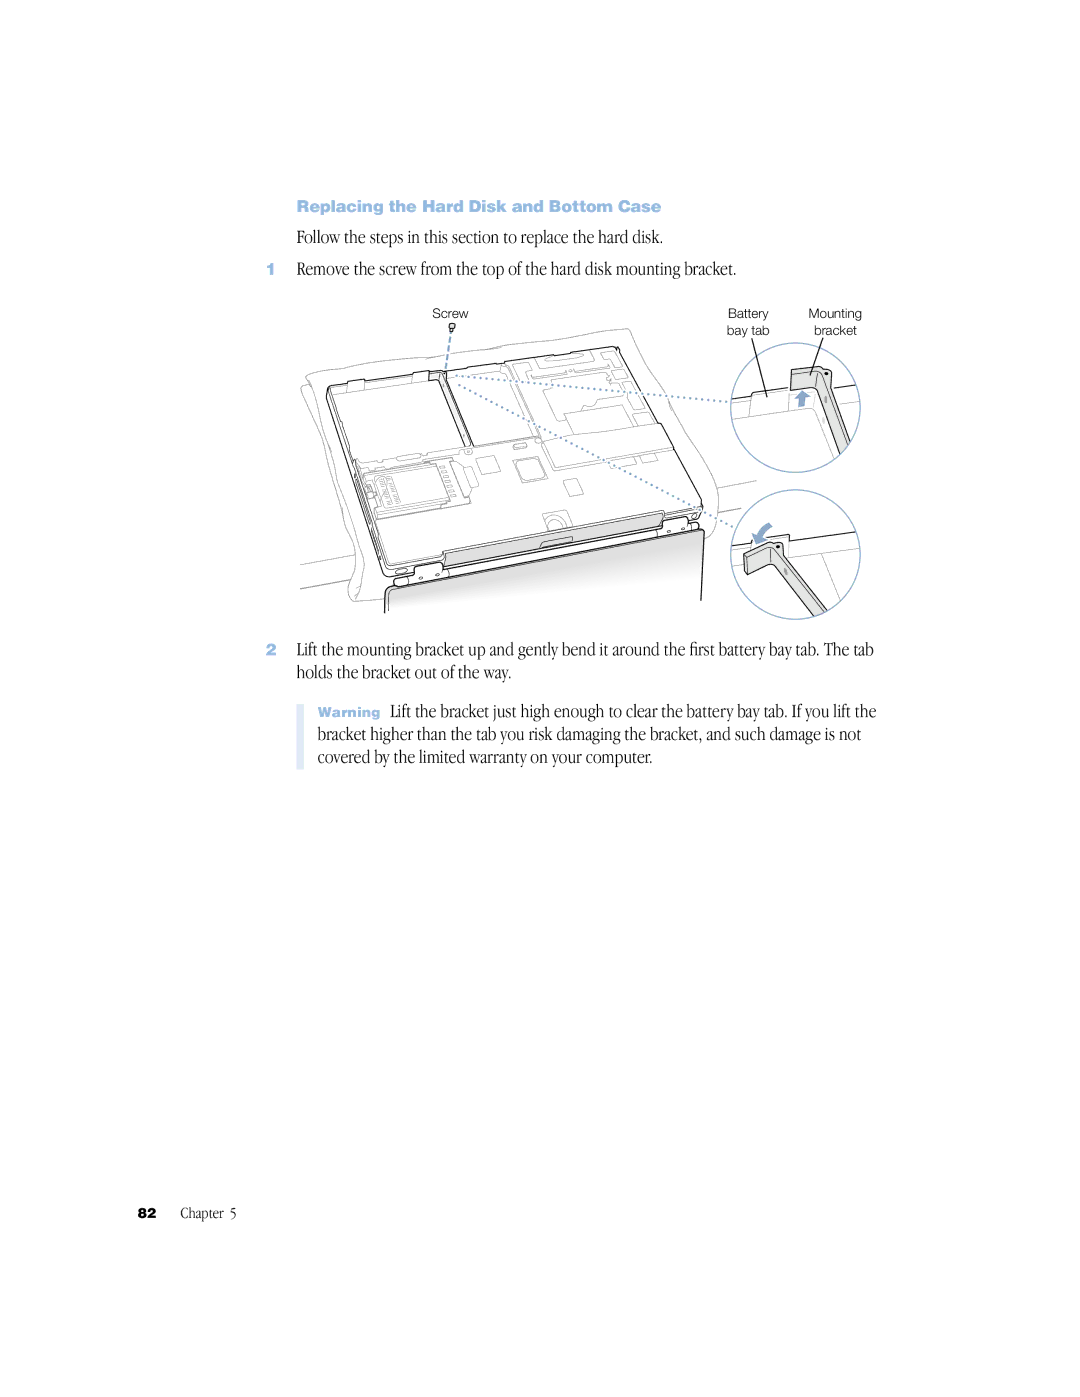
Replacing the Hard Disk and Bottom Case
Mylar sheath
Connect the hard disk connector cable to the logic board
Replace the battery and turn the computer over
Optical drive slot
Installing an AirPort Card
Connect the AirPort Card to the end of the antenna cable
Troubleshooting
Information in This Chapter
Problems That Prevent You From Using Your Computer
Troubleshooting
Insert the first software restore CD into your drive
Restoring Your Computer Software
Other Problems
Locating Your Product Serial Number
Page
Specifications
Apple System Profiler
Modem speed 56 kilobits per second Kbps
PowerBook Specifications
Video memory 16 MB DDR Sdram
Output DC 14.4 Capacity 3840 milliampere-hours mAh
Specifications
External S-Video or Composite Television PAL
Storing Your PowerBook
Cleaning Your PowerBook
Carrying Your PowerBook
Cleaning Your PowerBook Display
Connecting a Phone Line to the Internal Modem
Safety Instructions for Setting Up and Using Your Computer
Plugging In the Power Adapter
Using Your PowerBook
General Safety Instructions
Ergonomics
External mouse
Wavelength 790 nm Power out of objective lens 3.3 mW