Set the time and date | 29 |
When you preset your television to switch itself on or off at a particular time, or when you preset a timed recording of a programme on a connected video recorder, the clock ensures that these features are switched on and off at the right times.
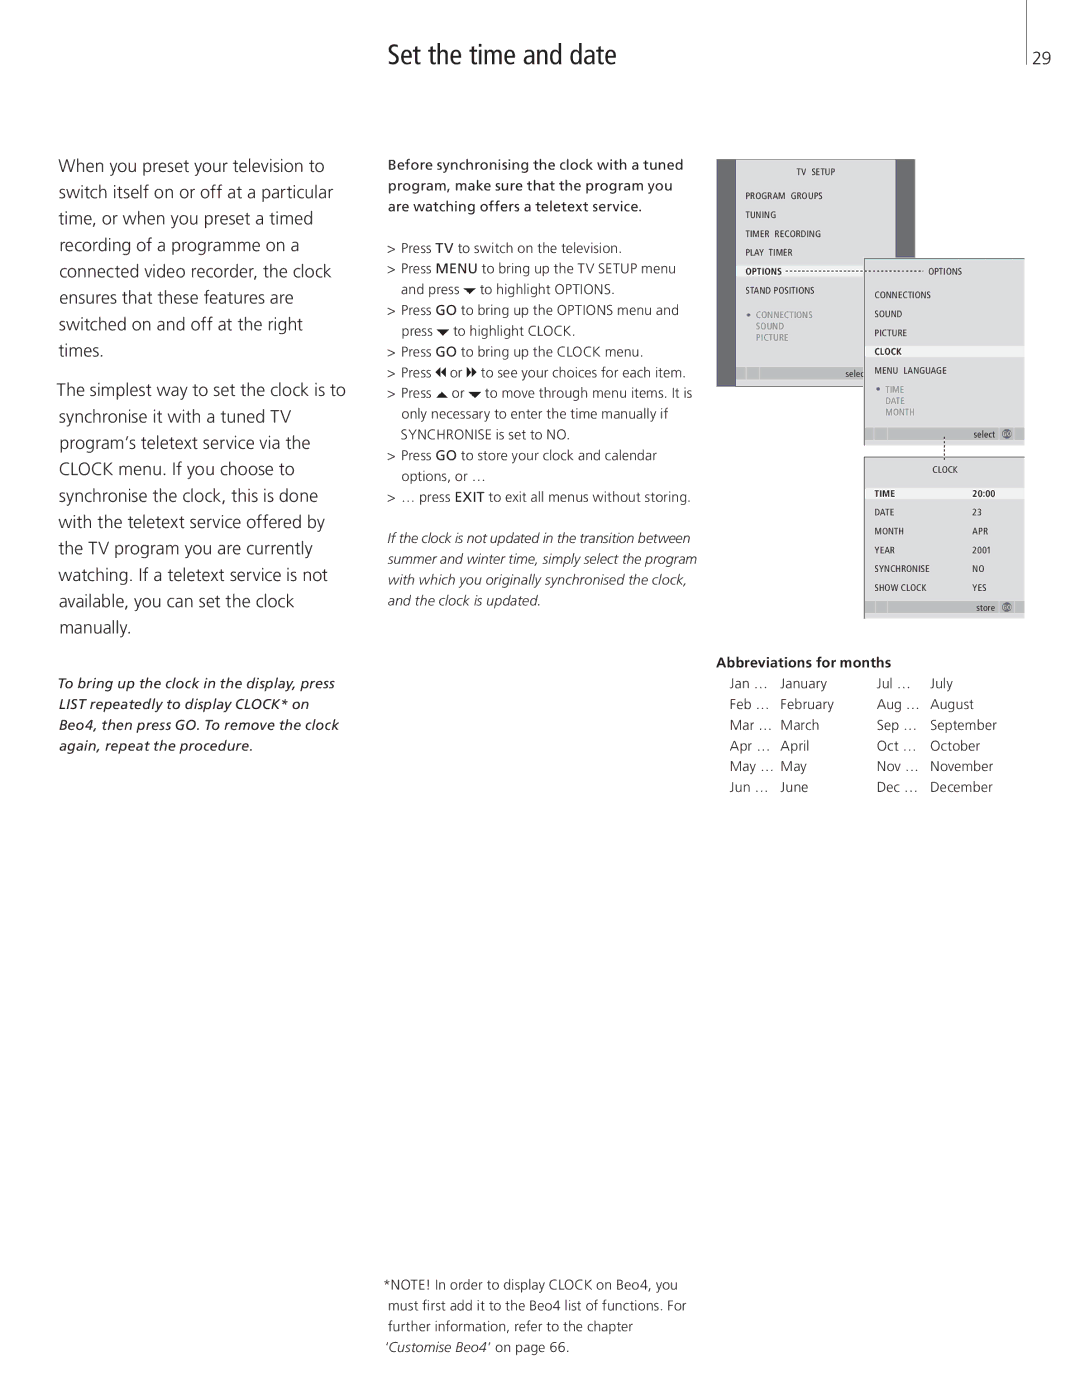
The simplest way to set the clock is to synchronise it with a tuned TV program’s teletext service via the CLOCK menu. If you choose to synchronise the clock, this is done with the teletext service offered by the TV program you are currently watching. If a teletext service is not available, you can set the clock manually.
Before synchronising the clock with a tuned program, make sure that the program you are watching offers a teletext service.
>Press TV to switch on the television.
>Press MENU to bring up the TV SETUP menu and press ![]() to highlight OPTIONS.
to highlight OPTIONS.
>Press GO to bring up the OPTIONS menu and press ![]() to highlight CLOCK.
to highlight CLOCK.
>Press GO to bring up the CLOCK menu.
>Press ![]() or
or ![]() to see your choices for each item.
to see your choices for each item.
>Press ![]() or
or ![]() to move through menu items. It is only necessary to enter the time manually if SYNCHRONISE is set to NO.
to move through menu items. It is only necessary to enter the time manually if SYNCHRONISE is set to NO.
>Press GO to store your clock and calendar options, or …
>… press EXIT to exit all menus without storing.
If the clock is not updated in the transition between summer and winter time, simply select the program with which you originally synchronised the clock, and the clock is updated.
|
|
| TV SETUP |
|
|
|
|
|
|
|
| |
| PROGRAM GROUPS |
|
|
|
|
|
|
|
| |||
| TUNING |
|
|
|
|
|
|
|
| |||
| TIMER RECORDING |
|
|
|
|
|
|
|
| |||
| PLAY TIMER |
|
|
|
|
|
|
|
| |||
| OPTIONS |
|
|
| OPTIONS |
|
|
|
|
| ||
| STAND POSITIONS |
| CONNECTIONS |
|
|
|
|
| ||||
|
|
|
|
|
|
|
|
|
| |||
|
| CONNECTIONS |
| SOUND |
|
|
|
|
| |||
|
| SOUND |
| PICTURE |
|
|
|
|
| |||
|
| PICTURE |
|
|
|
|
|
| ||||
|
|
|
|
|
|
|
|
|
|
| ||
|
|
|
|
| CLOCK |
|
|
|
|
| ||
|
|
| select |
| MENU LANGUAGE |
|
|
|
|
| ||
|
|
|
|
|
|
|
|
| ||||
|
|
|
|
|
|
|
|
|
|
|
|
|
|
|
|
|
| TIME |
|
|
|
|
| ||
|
|
|
|
| DATE |
|
|
|
|
| ||
|
|
|
|
| MONTH |
|
|
|
|
| ||
|
|
|
|
|
|
|
| select |
| GO |
|
|
|
|
|
|
|
|
|
|
|
|
| ||
|
|
|
|
|
|
|
|
|
|
|
|
|
|
|
|
|
|
|
| CLOCK |
|
|
|
|
|
|
|
|
|
| TIME | 20:00 |
|
|
|
| ||
|
|
|
|
| DATE | 23 |
|
|
|
| ||
|
|
|
|
| MONTH | APR |
|
|
|
| ||
|
|
|
|
| YEAR | 2001 |
|
|
|
| ||
|
|
|
|
| SYNCHRONISE | NO |
|
|
|
| ||
|
|
|
|
| SHOW CLOCK | YES |
|
|
|
| ||
|
|
|
|
|
|
|
| store |
| GO |
| |
|
|
|
|
|
|
|
|
|
| |||
|
|
|
|
|
|
|
|
|
|
|
|
|
To bring up the clock in the display, press LIST repeatedly to display CLOCK* on Beo4, then press GO. To remove the clock again, repeat the procedure.
Abbreviations for months |
| ||
Jan … | January | Jul … | July |
Feb … | February | Aug … | August |
Mar … | March | Sep … | September |
Apr … | April | Oct … | October |
May … | May | Nov … | November |
Jun … | June | Dec … | December |
*NOTE! In order to display CLOCK on Beo4, you must first add it to the Beo4 list of functions. For further information, refer to the chapter ‘Customise Beo4’ on page 66.
