Manuals
/
Barco
/
Computer Equipment
/
Printer
Barco
32X32, 12X8 manual Click OK to complete the Main Processor update installation, MatrixPRO
Models:
12X8
32X32
1
52
54
54
Download
54 pages
34.84 Kb
47
48
49
50
51
52
53
54
<
>
Specs
Install
Warranty
WIRING DETAIL FOR MatrixPRO-II MODELS WITH AUDIO OPTION
Presets and I/O Groups
Setup Mode
Highlights an essential operating procedure, condition or statement
NOTE The default IP Address is
Rgb Delay
Led Indicator Lamp Behavior
Page 52
Image 52
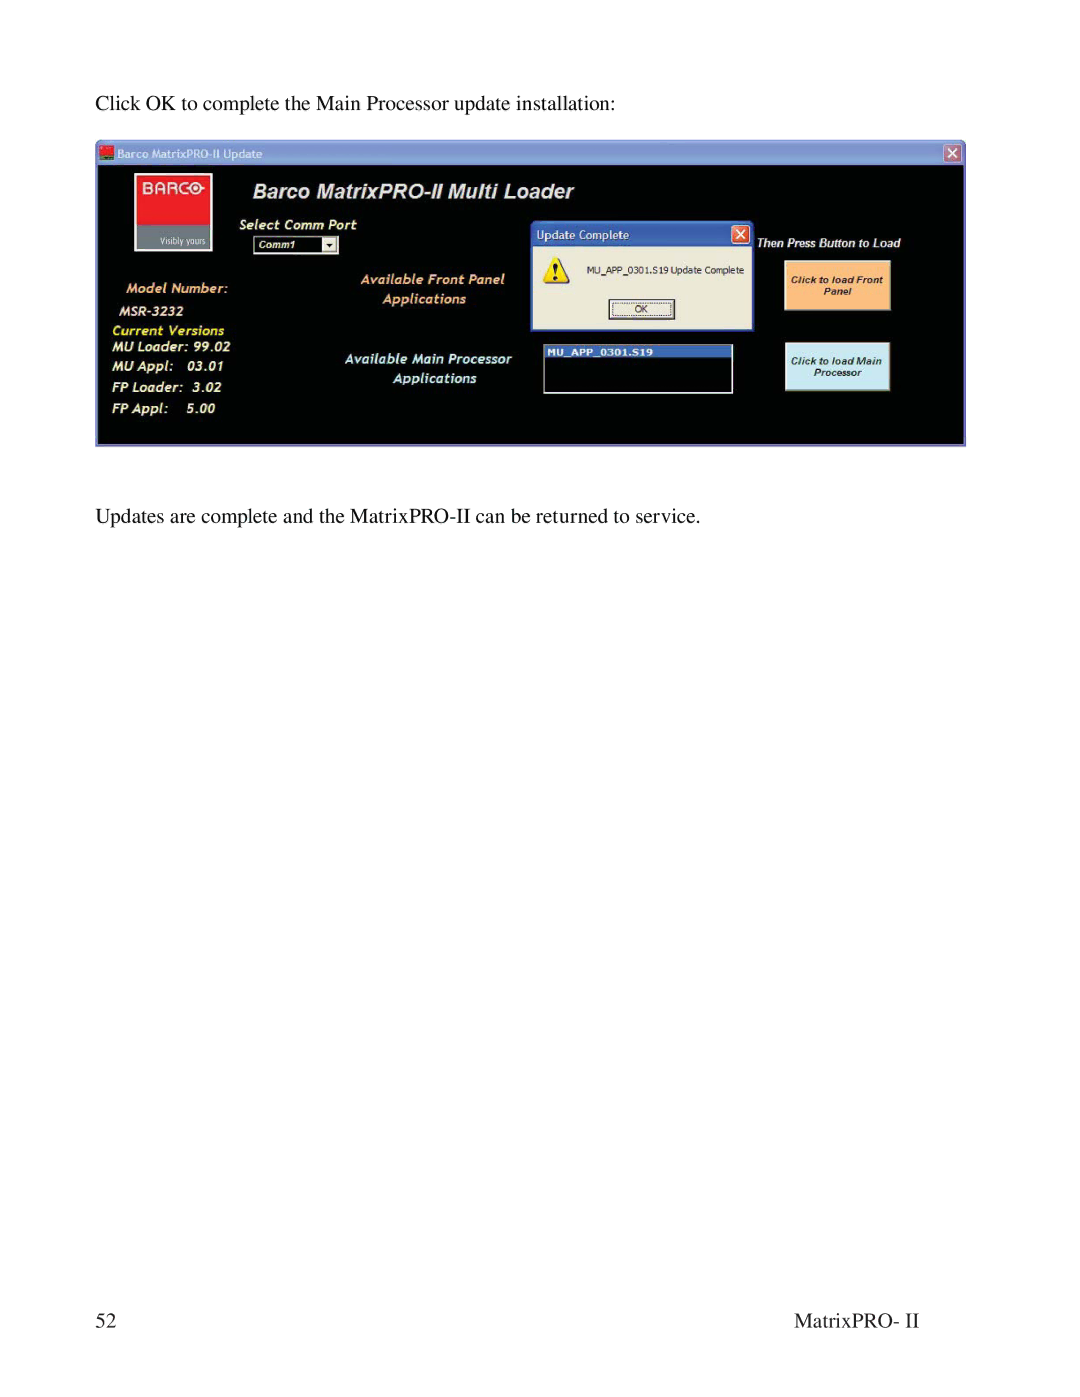
Click OK to complete the Main Processor update installation:
Updates are complete and the
MatrixPRO-II
can be returned to service.
52
MatrixPRO- II
Page 51
Page 53
Page 52
Image 52
Page 51
Page 53
Contents
MATRIX SWITCHER SERIES USERS GUIDE
MatrixPRO
COVERS MatrixPRO-II 12X8 THROUGH 32X32 MODELS
26-0903105-00
MatrixPRO
Warranty
Return Material Authorization RMA
CONTACT INFORMATION
In This Appendix
Guarantee and Compensation
Copyright
Federal Communications Commission FCC Statement
Trademarks
Company Address
MatrixPRO
Barco Inc
Barco N.V
Operators Safety Summary
Power Source
Use the Proper Power Cord
Do Not Remove Covers or Panels
Terms In This Manual and Equipment Marking
AVERTISSEMENT
VORSICHT
Highlights an essential operating procedure, condition or statement
Change History
Date
ECP #
Description
TABLE OF CONTENTS
APPLICATIONS
APPLICATION EXAMPLES
UNDERSTANDING THE LCD DISPLAY
INSTALLING THE LEGEND LABEL ASSEMBLY
SETUP MODE
SCREENPRO-II/SCREENPRO-II CONTROLLER SETUP
SPECIFICATIONS
RGB Delay Switching
Presets and I/O Groups
INTRODUCTION
Bandwidth and Frequency Response
FEATURES
NOTE The default IP Address is
APPLICATIONS
Serial and IP Control
APPLICATION EXAMPLES
NATIVE MODE APPLICATION SPLIT MODE APPLICATION
INSTALLATION
ENVIRONMENT
MatrixPRO-II AUDIO INPUT CONNECTOR WIRING
WIRING DETAIL FOR MatrixPRO-II MODELS WITH AUDIO OPTION
MatrixPRO-II AUDIO OUTPUT CONNECTOR WIRING
RJ-45 LAN Interface Cabling
RS-232 Remote Host Port Cabling DB9
Crossover Cable
Standard Patch Cable
LCD DISPLAY MENU TREE
MatrixPRO
LED INDICATOR LAMP BEHAVIOR
UNDERSTANDING THE LCD DISPLAY
FRONT AND REAR PANEL VIEWS
BARCO MSRF-1616 SHOWN
INSTALLING THE LEGEND LABEL ASSEMBLY
PRINT LABEL STRIP FROM CD-ROM, FILE NAME MATRIX LABEL.DOT
SETUP MODE
MAIN SETUP MENU PAGE
INPUT SETUP MENU PAGE
INPUT NUMBER
INPUT TRIM
AUDIO TYPE
VIDEO TYPE
SPLIT SETUP A RGB B RGB C RGB SAVE
CABLE LENGTH Input
SPLIT SETUP A SVIDEO B SVIDEO C COMPOSITE SAVE
OUTPUT SETUP MENU PAGE
RGB DELAY
SYNC EQU
CABLE LENGTH Output
VIDEO TYPE
MatrixPRO
TECH SUPPORT
SYSTEM SETUP MENU PAGE
SET TIME DATE
The set time and date screen looks like this
AMX DUET
DUET TCPIP/IP SETUP
DHCP and IP
LCD APPEARANCE SETUP
PRESET SETUP MENU PAGE
DELAY TIME
The screen for the preset setup will look like this
SELECTED PRESET
OUTPUT NUMBER
OPERATING MODE
MAIN OPERATING PAGE
VOLUME HANDLING PAGE
AUDIO LEVEL OUTPUT
LEVEL
NOT MUTED
20dB
EXECUTING PRESETS
FACTORY RESET
Setting Up the ScreenPRO-II Controller
ScreenPRO-II/ScreenPRO-II CONTROLLER SETUP
Configuring the ScreenPRO-II
Pressing the Router setup will bring up the ‘ROUTER SPECIFICATION’ screen which is shown below
The user will then set the IP Address to 192.168.0.244 using the bottom rotary encoder and the “NEXT IP QUAD” button to go from one field to the next. When the IP address is set and the IP Port Number is set to ‘23’ press the ‘TEST COMM’ button to establish communications between the controller and the ScreenPRO-II. A popup window will come up with the configuration of the ScreenPRO-II
The last step is to save the system, press the ‘BACK’ button until the Home Screen is displayed. It’ll look like this
SPECIFICATIONS
MatrixPRO-II Sizes
Bandwidth
Gain
MatrixPRO
Software Update Overview
Updating Software
Hardware Requirements
Downloading Software
Via Web Site
To download software from the web site
On the web, navigate to
Continue with the “Updating MatrixPRO-II Software” section
Updating MatrixPRO-II Software
Click on Next to bring up this screen
MatrixPRO
The program will setup the available Comm Ports on your PC
Use the pulldown menu shown below to select an available Comm Port and begin the update
When the loader application locates a good Comm Port, the following screen will appear. It will indicate the current versions of MatrixPRO-II firmware and the allow selection of the latest versions available. Select the most recent version of the Front Panel application and click on the Click to load Front Panel button to update the Front Panel Application
When the pop-up window below appears, click OK to complete the Front Panel update installation
A progress bar with appear to indicate update status
MatrixPRO
Updates are complete and the MatrixPRO-II can be returned to service
Click OK to complete the Main Processor update installation
MatrixPRO
MatrixPRO