Manuals
/
BenQ
/
Computer Equipment
/
Projector
BenQ
W1500 Dimensions, Ceiling mount installation, 339mm W x 120.2 mm H x 284.8 mm D, Unit mm
Models:
W1500
1
66
72
72
Download
72 pages
53.99 Kb
63
64
65
66
67
68
69
70
<
>
Troubleshooting
Specification
Install
Timing chart
Warranty
Dimension
See Connecting with video equipment on page 21 for connection details
Restart the projector to reset the settings
System Setup Auto Off
Entering the password recall procedure
Page 66
Image 66
Dimensions
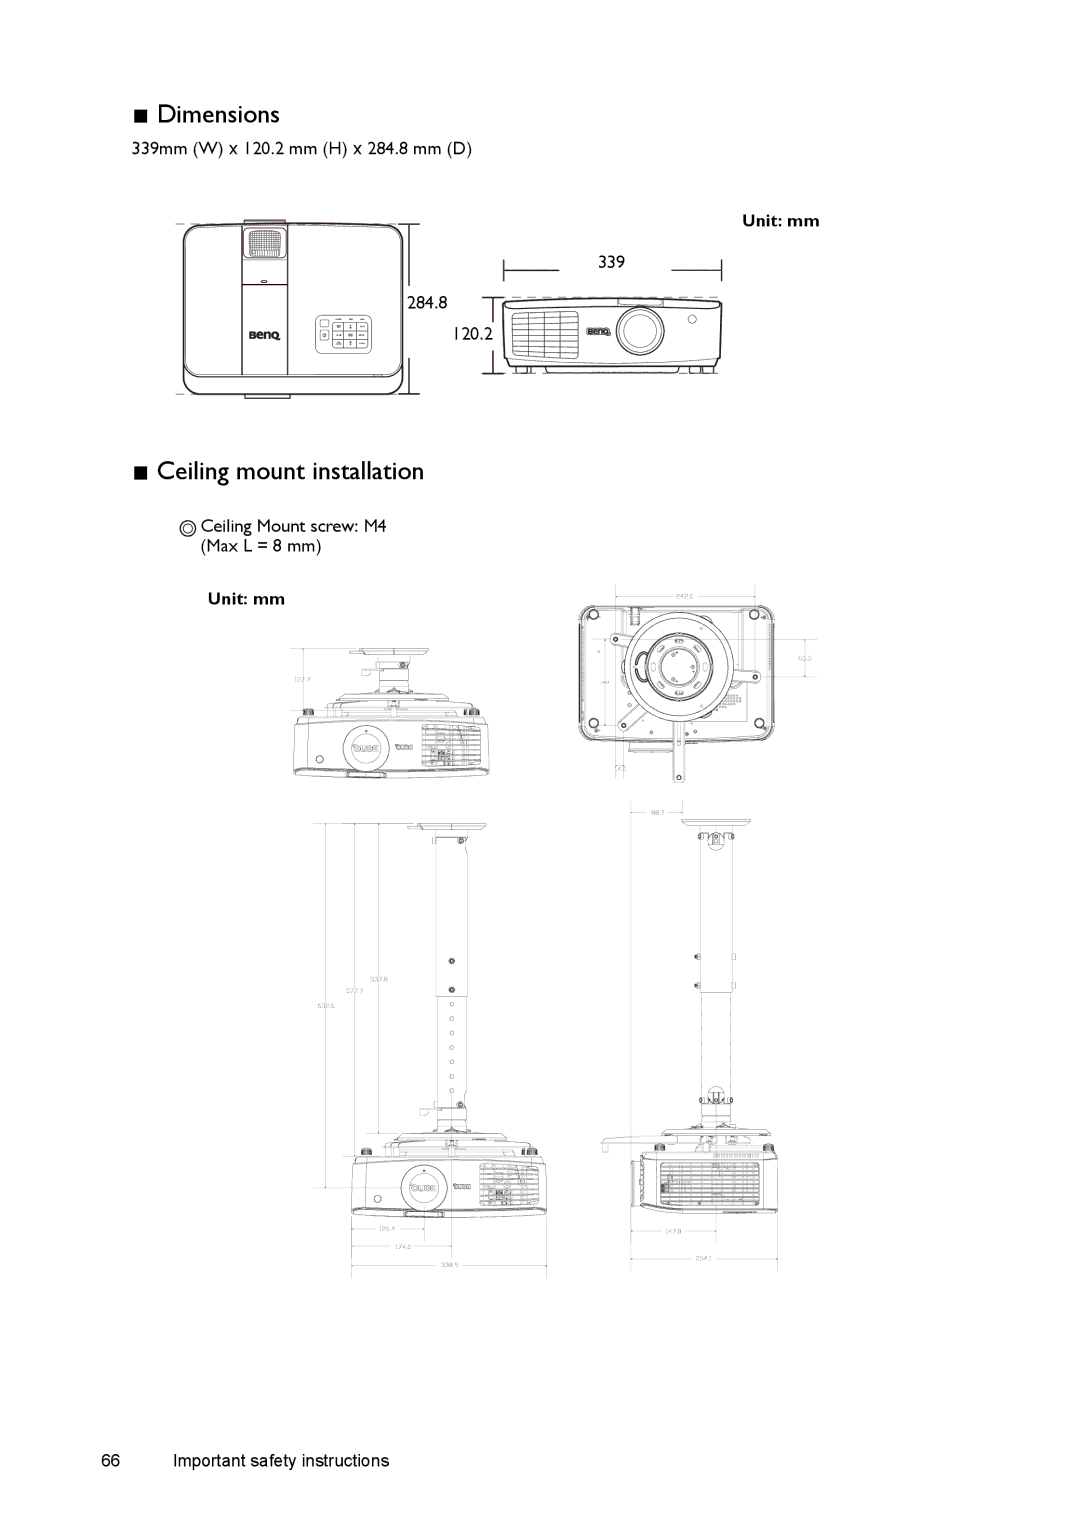
339mm (W) x 120.2 mm (H) x 284.8 mm (D)
Unit: mm
339
284.8
120.2
Ceiling mount installation
Ceiling Mount screw: M4 (Max L = 8 mm)
Unit: mm
66 Important safety instructions
Page 65
Page 67
Page 66
Image 66
Page 65
Page 67
Contents
W1500 Digital Projector Home Cinema Series
User Manual
Using the Wireless
Table of contents
Connecting with video
Important safety instructions
Warranty and Copyright information
Table of contents
4 Table of contents
Important safety instructions
Do not cover the projector with any item
Disposal
Moisture condensation
Avoid volatile liquids
Lead, which is contained in solder Mercury, which is used in the lamp
Optional accessories
Shipping contents
Standard accessories
Overview
Replacing the remote control batteries
Remote control effective range
Ceiling mounting the projector
10 Important safety instructions
Projector features
Front and upper side view
See Connecting with video equipment on page 21 for connection details
Projector exterior view
Rear and lower side view
Controls and functions
Control panel
Remote control
Positioning your projector
Choosing a location
How to determine the recommended screen size for a given distance
Obtaining a preferred projected image size
Important safety instructions
Diagonal
Projection dimensions
Installation for a 169 ratio screen
Height
Installation for a 43 ratio screen
The screen aspect ratio is 43 and the projected picture is
Shifting the projection lens vertically
To use the lens shift lever
Terminal
Connecting with video equipment
Preparations
Picture quality
Connecting HDMI devices
Connecting HDMI devices to the projector with HDMI cables
Connecting HDMI devices to the projector wirelessly
tuner, etc
Connecting component-video devices
Connecting S-Video or video devices
Component video cable
Connecting a computer
Connect the projector to a computer with a VGA cable
Supported timing for wireless HDMI input timing
Using the Wireless Transmitter
Product specification
Source
Resolution
Power indicator
Message and meaning
Mode
Wireless transmitter synchronization
5. Set Wireless Sync to On
8. In the Settings menu, select Add New Video Source
10. When the message Adding BENQ Tx displays, and select OK
12. Restart the projector to reset the settings
28 Important safety instructions
Using the projector
Turning the projector on
Selecting an input source
ENTER
Using the menus
Using a security cable lock
Securing the projector
Utilizing the password function
Setting a password
If you forget the password
Disabling the password function
Entering the password recall procedure
Changing the password
RECALL PASSWORD
Adjusting the projected image
Adjusting the projection angle
Correcting picture distortion
Fine-tuning the selected picture mode
Using the preset and user modes
Selecting a preset mode
Setting the User 1/User 2/User 3 mode
Adjusting Brightness
Fine-tuning the picture quality
Resetting the picture mode
Adjusting Contrast
Adjusting Sharpness
Adjusting Color
Adjusting Tint
Adjusting Flesh Tone
Advanced picture quality controls
Setting Black Level
Setting a preferred color temperature
Controlling image clarity
Selecting a Gamma setting
Adjusting Brilliant Color
Color Management
Setting Film Mode
Setting 3D Comb Filter
Switching the left/right audio channels
Adjusting the sound
Adjusting the sound level
Turning off the Power On/Off Ring Tone
Selecting the aspect ratio
About the aspect ratio
Magnifying and searching for details
Using the test pattern
Freezing the image
OSD menus can be displayed on those unused black areas
Operating in a high altitude environment
To activate High Altitude Mode
Displaying more than one image source simultaneously
To display the PIP window Using the remote control
Using the OSD menu
Watching 3D content
Connecting 3D video devices
Using the 3D menus
Personalizing the projector menu display
Locking control keys
Turning the projector off
Preset Mode
On-Screen Display OSD menus
On-Screen Display OSD structure
Cinema/Dynamic/Standard/User 1/User 2/User 3/3D/ISF Day/ISF Night
System Setup Auto Off
50 Important safety instructions
Display
Setup
Advanced
Information
Picture -- Basic menu
Function
Description
See Switching the left/right audio channels on page 41 for details
Audio Setup menu
See Adjusting the sound on page 41 for details
See Turning off the Power On/Off Ring Tone on page 41 for details
Display menu
System Setup menu
Advanced Setup menu
See Utilizing the password function on page 32 for details
Closed Caption Enable
Change Password
Power On Lock
Shows the native resolution of the input source
Information menu
Shows the current signal source
Shows the current 3D mode
Additional information
Cleaning the lens
Cleaning the projector case
Care of the projector
Lamp information
Getting to know the lamp hour
Extending lamp life
until the next hour lamp warning appears
Timing of replacing the lamp
Install a new lamp for optimal performance. If the projector is
Press MODE/ENTER to dismiss the message
whole lamp housing, as illustrated
Replacing the lamp
Shift lamp housing slightly to the left to allow space for the
Do not turn on the power with lamp cover removed
Resetting the lamp timer
8. Carefully lower the new lamp housing to slide it from left to
right into the lamp compartment, as illustrated
Powering up
Indicators
Stand-by mode
Normal power-down cooling
ring. See page
Troubleshooting
switched on. See page
necessary. See page
Electrical
Specifications
Optical
Mechanical
66 Important safety instructions
Dimensions
Ceiling mount installation
339mm W x 120.2 mm H x 284.8 mm D
BenQ Notebook
Timing chart
BenQ Notebook
WXGA60
Mode
Resolution
68 Important safety instructions
Refresh rate
WXGA60
BenQ Notebook
BenQ Notebook
WXGA75
Supported timing for 3D signal with Frame Sequential format
Supported timing for 3D signal with Side-by-Side format
Supported timing for Video and S-Video inputs
Copyright
Warranty and Copyright information
Warranty
Disclaimer