Getting Ready Embroidery Appendix
Important Safety Instructions
For Users in the UK, EIRE, Malta and Cyprus only
Contents
Appendix
Introduction
Machine Features
Included accessories
Accessories
75/11 3 needles 90/14 1 needle
Following are available as optional accessories
Optional accessories
Front view
Names of Machine Parts and Their Functions
Right-side/rear view
Needle and embroidery foot section
Start/stop button
Operation buttons
Previous page key
Operation panel
Page
Getting Ready
Installing the bobbin Upper Threading
Basic steps for embroidery are as follows
Embroidery Step by Step
Attaching the Embroidery Unit
Embroidery unit precautions Attaching the embroidery unit
Barm
CTurn on the machine
Remove the embroidery frame
Removing the embroidery unit
Press , and then press
CTurn off the machine
Embroidery unit separates from the machine
Turning the Machine On/Off
Power supply precautions
Unplug the power supply cord from the power supply jack
CUnplug the power supply cord from the electrical outlet
Turning on the machine
Turning off the machine
Viewing the LCD
LCD Liquid Crystal Display Operation
Pattern type selection screen
Details
Changing the machine settings
DWhenkey. settings are complete, press Back
BPresspanel. Settings key on the operation
Turn on the machine
CPress the item to be set
DPressnext page. Next page key to switch to
Checking machine operating procedures
Press Help key on the operation panel
CPress the item to be displayed
Bobbin precautions
Winding/Installing the Bobbin
Winding the bobbin
BOpen the top cover
GSlide the spool cap onto the spool pin
Place the spool of thread for the bobbin onto the spool pin
Make sure that the thread passes under the pretension disk
Guide slit in bobbin winder seat with built-in cutter
Slide the bobbin cover latch to the right
Installing the bobbin
GReattach the bobbin cover
About the spool of thread
Upper Threading
Threading the upper thread
DOpen the top cover
Upper Threading
Threading the needle
CLower the presser foot lever to lower the embroidery foot
BLower the presser foot lever
AThreadguide. the machine to the needle bar thread
Replacing the Needle
Needle precautions
Checking the needle
Replacing the needle
Needle stopper
Getting Ready
Sold separately Embroidering
Removing the embroidery frame Selecting Embroidery Patterns
Editing and Saving Patterns
Resewing
What to prepare
Embroidering Neatly
Fabric
Stabilizer material
Other
Needle
Preparing the Fabric
† When it cannot be ironed or placed in the hoop
Attaching a stabilizer material to the fabric
Embroidery frame large
Setting the fabric in the embroidery frame
Embroidery frame mediumoption
Embroidery frame smalloption
CPressfabric.the inner frame in from the top
BPlace the embroidery sheet on the inner frame
Using embroidery sheets
ERemove the embroidery sheet
We recommend stabilizer material for all embroidery
Attaching the embroidery frame
Attaching the Embroidery Frame
Raise the presser foot lever
Removing the embroidery frame
Copyright information
Selecting Embroidery Patterns
Embroidery pattern types
Alphabet patterns
Operation keys
LCD liquid crystal display operation
LCD button
† Example Welcome
Selecting characters
Embroidery patterns
Selecting an embroidery pattern
Press the frame pattern
Selecting a frame pattern
BSelect the frame shape
CSelect the stitch
Select a pattern
Using an embroidery card sold separately
Embroidering attractive finishes
Embroidering
Thread Upper thread
Bobbin thread
Prepareon the screen.embroidery thread of the color shown c
Embroidering a pattern
DPress Start/stop button
CLower the presser foot lever
After progressing 5-6 stitches, press
GPress Start/stop button again
Select an appliqué pattern
Appliquéing
ILower the presser foot lever, and press Start/stop button
CCheck and adjust the layout
Adjusting the layout
Editing and Saving Patterns
After.selecting the embroidery pattern, press
Press Back key to return to the previous screen
DPress Back key to return to the original screen
Storing patterns
Storing a pattern
AAfter selecting the pattern to be stored, press Memory key
Adjusting the thread tension
Thread runs out partway through a design
Resewing
Restart the embroidery
CPress Embroidery key
Stopping while embroidering
DPress
Turn off the machine
KRestart the embroidery
Embroidery
Appendix
Cleaning the machine surface
Care and Maintenance
Cleaning the race
Remove the bobbin case
Care and Maintenance
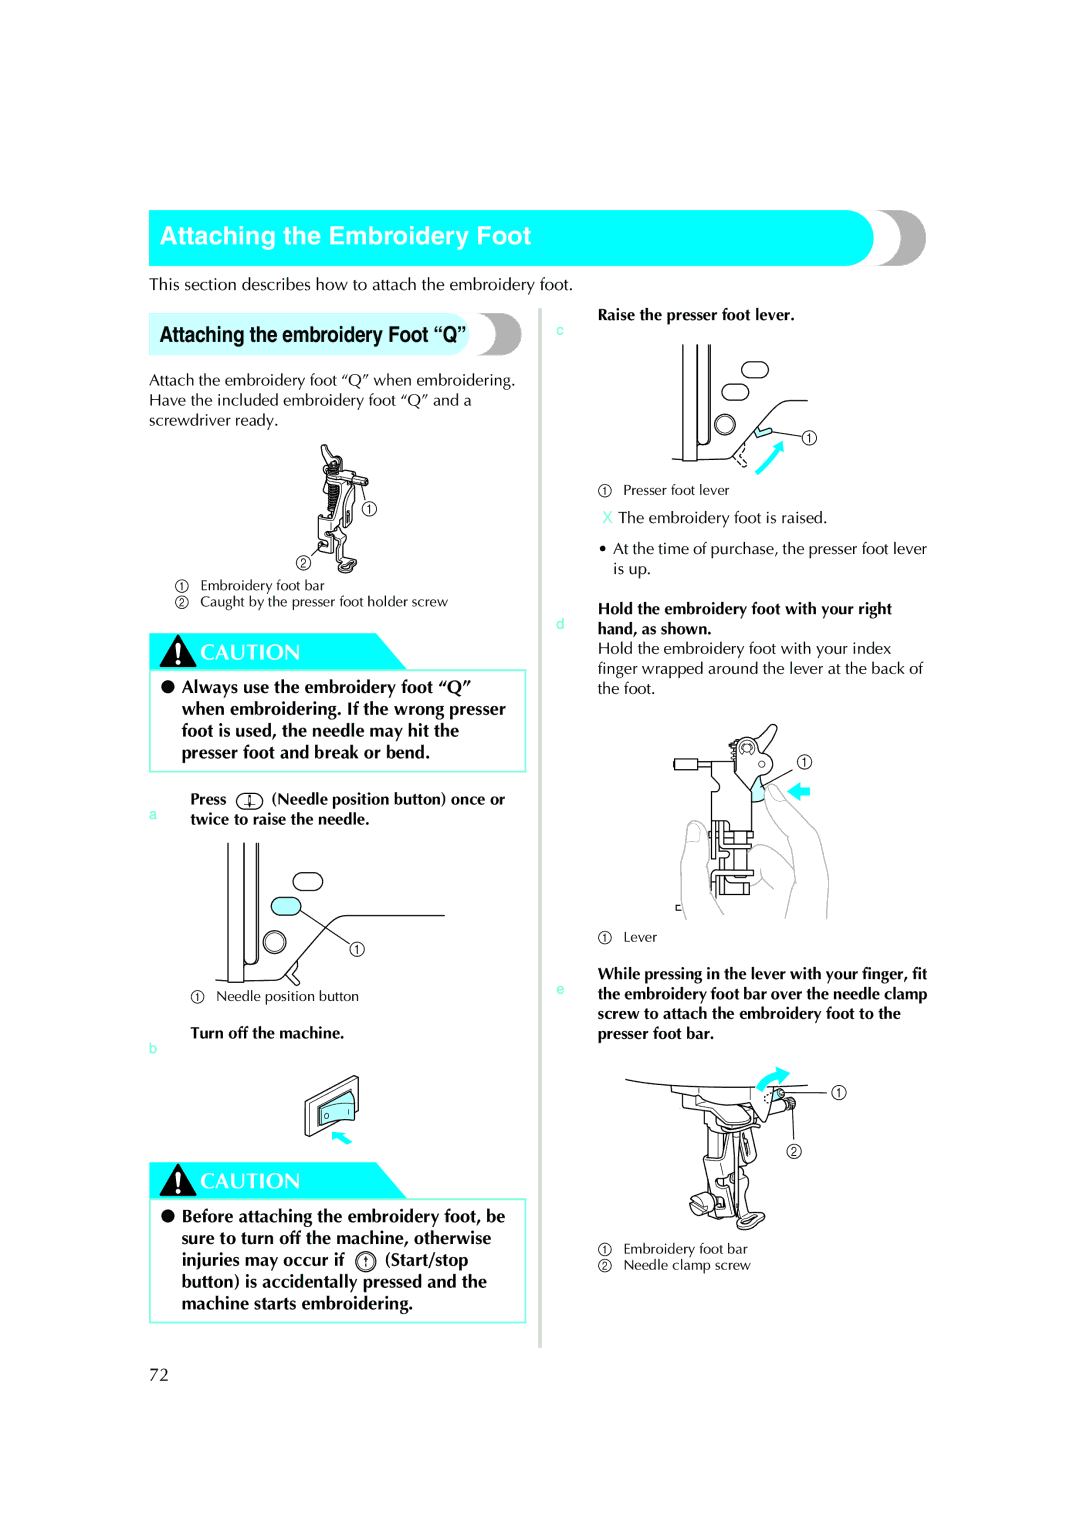
Attaching the embroidery Foot Q
Attaching the Embroidery Foot
CRaise the presser foot lever
DHold the embroidery foot with your right hand, as shown
Attaching the Embroidery Foot
Not operate
Troubleshooting
Is tangled or
Troubleshooting
Skipped
Carriage or embroidery frame Place objects within the range
Error Message Probable Cause
Error messages
Refer to
Error Message Probable Cause
Operation beep
Adjusting the LCD
CPress or DTurn off the machine, then turn it on again
Canceling the operation beep
Index
Settings key
English 882-U30 XD1628-051