Setup & Operation Guide
Declaration of Conformity
Contents
„Symbols Used in this Manual
General Infomation
„Compilation and Publication Notice
„Trademarks
Safety precautions
„To use the machine safely
„The Printer
„Power Cord
„Installation/Storage
„Cutter
„DK Roll DK Label, DK Tape
General Precautions
„Cutter unit
Cutter unit contains a very sharp blade. To
„DK Roll DK Label and DK Tape
„CD-ROM and Software
Unpacking Your QL-560
CD-ROM
Parts Description
Main Printing Unit
LED Lamp
„Front„Rear
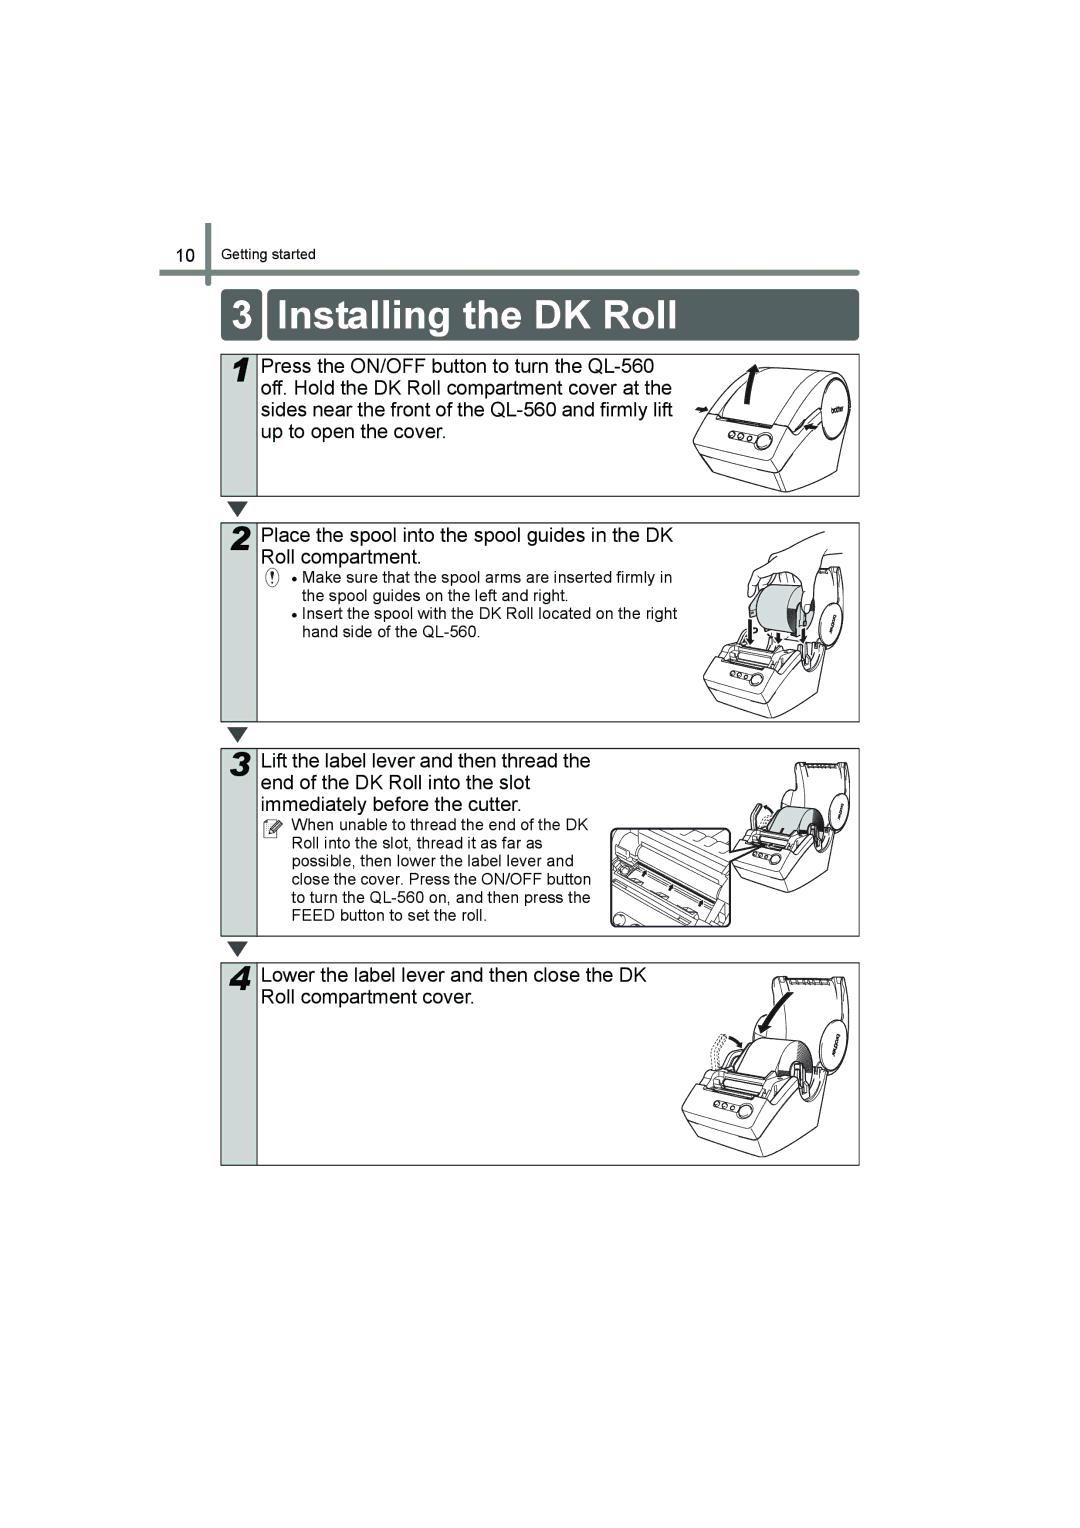
Installing the DK Roll
Installing the paper guide
Connecting to the power supply
Your QL-560 comes with a paper
Installing the software
Click Standard Installation
Start up the PC and put the CD-ROM into the CD-ROM drive
Customer Information screen is displayed
If you are happy with your settings, click Next
Enter your user name and company name, then click Next
Click Next
Check the box for each Microsoft
Starting up the installed software
Select if you want to register your printer and then Next
Click Finish
When using Mac OS X10.2~10.4.9
Check the content and click Next Click Next
Click Install
When the installation is complete, click Done
Check the content and click Continue
When continuing the installation, click Agree
Was successfully installed is displayed, click Restart
Press the ON/OFF button on the printer to turn on the power
Connect the USB cable to the USB port of the Mac
Click Add Add Printer
You can start using your Brother QL-560
Label Creation Outline
Choose the type of label you want to create
Select the DK Roll
Edit the label data
Print the label
Print the label from the Brother QL-560
Creating an Address Label using the P-touch Editor
Start P-touch Editor and create a new label layout
Select the label size
Enter the text
Add a frame to the label
Completed label
Peel the printed label from the backing and apply the label
Copy text
Verify the copied data
Format the text
Copy text from Microsoft Word and create an address label
Position the text box
Peel the printed label from backing and apply the label
Contents. To change the Style, click
Copy the text from Microsoft Outlook Contacts
Select a Layout style for Microsoft Outlook
Click
Verify the Layout
Creating a Banner Label
Insert the DK Roll
Select the Tape Length
Enter the text
Start the Auto Format Wizard
Select a category
Select a template
Auto Format Wizard dialog box appears
Peel the printed label from the backing and apply the label
Maintenance
Print head maintenance
Roller maintenance
Label outlet maintenance
Replacing the cutter unit
Maintenance and Troubleshooting
Troubleshooting
Potential types of problems
Page
Installations- und Bedienungsanleitung
Konformitätserklärung
Inhaltsverzeichnis
„Symbole in diesem Handbuch
Allgemeine Information
„Zu diesem Handbuch
„Warenzeichen
Sicherheitshinweise
„Hinweise zur sicheren Verwendung des Gerätes
„Der Drucker
Obligatorische Maßnahme Ausstecken Stromschlaggefahr
„Netzkabel
„Installation/Aufbewahren
„Schneideeinheit
„DK-Rollen DK-Einzel-Etiketten und DK-Endlos-Etiketten
Allgemeine Vorsichtmaßnahmen
Die Schneideeinheit enthält eine sehr scharfe
Kleben Sie Etiketten nicht auf Haut, Pflanzen oder Tiere
„CD-ROM und Software
QL-560 auspacken
Bedienungselemente
Etikettendrucker
LED-Leuchte
„Vorderansicht„Rückansicht
DK-Etikettenrolle einlegen
Rung vorn in die passende Aussparung greift
Etikettenablage befestigen
Stromversorgung herstellen
Software installieren
Klicken Sie auf Standard Installation
Touch Editor Touch Address Book Druckertreiber und
Klicken Sie auf Weiter
Sie können nun die installierte Software wie folgt starten
Klicken Sie auf Fertig stellen
Registrierung wird angezeigt
Programme-Brother P-touch-P-touch Editor
Unter Mac OS X10.2~10.4.9
Lesen Sie die Informationen und klicken Sie auf Next
Klicken Sie auf Install
Installation fortgesetzt werden soll, klicken Sie auf Agree
Wählen Sie, wo der Treiber installiert
Doppelklicken Sie auf QL-560 Driver.pkg im Ordner Mac OS
Klicken Sie auf Add Add Printer
Wenn die Druckerliste angezeigt wird, klicken Sie auf Add
Klicken Sie auf USB, QL-560 und klicken Sie dann auf Add
Es erscheint wieder die Druckerliste
Sie können den Drucker nun verwenden
Gewünschte Etikettenart wählen
Passende DK-Rolle einlegen
Text eingeben
Etikett drucken
Drucken Sie das Etikett mit dem Brother QL-560 aus
Adress-Etikett mit dem P-touch Editor erstellen
Touch Editor starten und neues Layout öffnen
Etikettengröße einstellen
Text umrahmen
Fertig
Text kopieren
Text prüfen
Text formatieren
Etikett drucken
Kontaktdaten in Microsoft Outlook kopieren
Layoutstil für Microsoft Outlook wählen
Text und Layout prüfen
Banner erstellen
DK-Rolle einlegen
Bannerlänge wählen
ClipArt in das Banner einfügen
Etiketten drucken
Text eingeben
AutoFormat-Assistenten starten
Kategorie wählen
AutoFormat-Vorlage wählen
Sie auf
Ersetzen Sie den Beispieltext durch Ihren Text
Drucken und klicken Sie dann auf
Wartung und Pflege
Druckkopf reinigen
Transportrolle reinigen
Etikettenausgabe reinigen
Werfen Sie das Reinigungsblatt nach der
Reinigung fort
Schneideeinheit ersetzen
Vorsicht
Problemlösungen
Was tun, wenn
Guide de mise en œuvre et de Fonctionnement
Merci davoir choisi la QL-560
Déclaration de conformité
Table des matières
Description des pièces
Microsoft Word
Entretien
„Symboles utilisés dans le présent manuel
Informations générales
„Note sur la compilation et la publication
„Marques de commerce
„Utiliser l’appareil en toute sécurité
„L’imprimante
Il explique comment éviter dêtre blessé
Ne soit endommagée
„Cordon d’alimentation
„Installation/rangement
„Coupeuse
„Rouleau DK étiquette DK, ruban DK
Mesures préventives générales
„Unité de coupeuse
Le massicot contient une lame très affûtée. Pour
Éviter les blessures qui pourraient être
„Rouleau DK étiquette DK et ruban DK
„CD-ROM et logiciel
Désemballer votre QL-560
Description des pièces
Unité d’impression principale
Voyant DEL
„Devant„Derrière
Installation du rouleau DK
Installation du guidage de papier
Connexion au bloc d’alimentation
Installation du logiciel
Cliquer sur « Installation standard »
Chaque bouton sélectionne les Opérations suivantes
’écran Informations client s’affiche
’écran Choisir l’emplacement de destination s’affiche
Cliquer sur Suivant
’écran « Démarrer la copie des fichiers » s’affiche
Démarrage du logiciel installé
Cliquez sur Suivant
Cliquer sur Terminer
Si vous utilisez Mac OS X10.2~10.4.9
Démarrez le Mac puis insérez le CD-ROM dans son lecteur
Vérifiez le contenu puis cliquez sur Next Suivant
Vérifiez le contenu puis cliquez sur Next Cliquez sur Next
Cliquez sur Install Installer
Pour continuer l’installation, cliquez sur Agree daccord
’installation puis cliquez sur Continue
Double-cliquez sur QL-560 Driver.pkg dans le dossier
Cliquez sur Install
’écran de vérification de l’installation s’affiche
Cliquez sur Add Ajouter imprimante
Retirez l’étiquette davertissement
CliquezAdd. sur USB, « QL-560 », puis sur
’écran revient à l’affichage de la liste des imprimantes
Aperçu de la création d’étiquettes
Sélectionner le type d’étiquette désiré
Sélectionner le rouleau DK
Éditer les données de l’étiquette
Imprimer l’étiquette
Imprimer l’étiquette à l’aide de la Brother QL-560
Sélectionner la taille de l’étiquette
Saisir le texte
’étiquette achevée
Décollez l’étiquette du support et l’appliquer
Copier le texte
Vérifier les données copiées
Formater le texte
Imprimer l’étiquette
Copier le texte de Microsoft Outlook Contacts
Sélectionnez un Style de mise en
Sur
Vérifier la mise en
Création d’une étiquette bandeau
Introduire le Rouleau DK
Sélectionner Longueur ruban
Ajouter une image clipart au bandeau
Saisir le texte
Démarrer l’Assistent « Formatage Automatique »
Sélectionner une catégorie
Sélectionner un modèle
Puis cliquer sur
Modifier le texte dans le champ Saisie du modèle
Entretien
Entretien de la tête dimpression
Entretien du tambour
Entretien de la sortie d’étiquettes
Presser le bouton d’alimentation pendant plus d’une seconde
Remplacement de la coupeuse
Saisir la languette et faire sortir la coupeuse
Placer le nouveau massicot dans la position prescrite
Veiller à ne pas toucher la lame de la coupeuse
Ne pas toucher la lame de la coupeuse
Dépannage
Types de problèmes potentiels
Installatie- & Gebruikshandleiding
Hartelijk dank voor de aanschaf van een QL-560
Conformiteitsverklaring
De software installeren
Algemene informatie Veiligheidsmaatregelen
Uw QL-560 uitpakken Omschrijving van onderdelen
Automatische opmaak
„Symbolen die in deze handleiding worden gebruikt
De volgende symbolen worden gebruikt in deze handleiding
Algemene informatie
„Toelichting betreffende Samenstelling en Publicatie
Veiligheidsmaatregelen
„Veilig gebruik van de machine
„De printer
Vermijden
„Stroomkabel
„Installatie/Opslag
„Snijder
„DK-rol DK-label, DK-tape
Algemene voorzorgsmaatregelen
„Snijeenheid
De snij-eenheid bevat een zeer scherp zaagblad
Om verwonding door een gebroken snijblad te vermijden
Voor Mac Voor Windows
„Cd-rom & Software
Uw QL-560 uitpakken
Reinigingsvel
Omschrijving van onderdelen
Hoofdprinteenheid
LED-lampje
„Voorkant„Achterkant
De DK-rol installeren
De papiergeleider installeren
Aansluiten op de voeding
De software installeren
Klik op Standard Installation Standaardinstallatie
Als voorbeeld is de installatie voor Windows XP gebruikt
Het klanteninformatiescherm verschijnt
Klik op Volgende
Het scherm Bestemmingslocatie kiezen verschijnt
Het scherm Kopiëren van bestanden starten verschijnt
Het starten van de geïnstalleerde software
Bij gebruik Mac OS X10.2~10.4.9
Controleer de inhoud en klik op Next Volgende
Controleer de inhoud en klik op Next Klik op Next
Installeren en klik op Continue
Klik op Continue Ga verder
Klik op Continue
Controleer de inhoud en klik op Continue
Klik op Install
De installatie begint
Klik op Add
Klik op USB, QL-560 en dan op Add
Stap
Overzicht labels maken
Selecteer het type label dat u wilt maken
De DK-rol selecteren
De labelgegevens bewerken
Het label afdrukken
Druk het label af met de Brother QL-560
Een adreslabel maken met P-touch Editor
Selecteer de labelgrootte
Voer de tekst
Druk het label af
Afgewerkt label
Kopieer de tekst
Controleer de gekopieerde gegevens
Maak de tekst op
Kopieer tekst van Microsoft Word en maak een adreslabel
Plaats het tekstvak op de gewenste positie
Klik op Het vak met de Afdrukeigenschappen
Een adreslabel maken met Microsoft Outlook Add-In
Select een lay-outstijl voor Microsoft Outlook
Controleer de lay-out
Een vaandellabel maken
Plaats de DK-rol
Selecteer de tapelengte
Voeg clipart toe aan het vaandel
Een tekstvak te maken en voer de tekst
Het deelvenster om het te openen
Start de wizard voor de automatische opmaak
Selecteer een categorie
Selecteer een sjabloon
Vervolgens op
Druk het label aan
Gebruik de knoppen
Onderhoud
Onderhoud aan printkop
Onderhoud aan rol
Onderhoud van labeluitvoer
Maar 8 mm
Gooi het reinigingsvel weg na gebruik
De snijeenheid vervangen
Houd het uitsteeksel vast en til de snijeenheid naar buiten
Zorg ervoor dat u het blad van de snijder niet aanraakt
Voor bijzonderheden, zie De DK-rol installeren op pagina
Mogelijke problemen
Storingen verhelpen