GETTING READY SEWING BASICS
Operation Manual
UTILITY STITCHES APPENDIX
Computerized Sewing Machine
Important Safety Instructions
7 For a longer service life
8 For repair or adjustment
FOR USERS IN AUSTRALIA AND NEW ZEALAND
FOR USERS IN THE UK, EIRE, MALTA AND CYPRUS ONLY
Contents
GETTING READY
SEWING BASICS
UTILITY STITCHES
Stitch Settings
APPENDIX
Care and Maintenance
Troubleshooting
Introduction
Sewing Machine Features
a Easy upper threading
b One-touch lower threading
Accessories
Included accessories
Accessories
Optional accessories
The following are available as optional accessories
Memo
Names of Machine Parts and Their Functions
Machine
Names of Machine Parts and Their Functions
Operation buttons
Needle and presser foot section
Operation panel
Stitch mode keys h-j
@ A C
Page
1 GETTING READY
When you are away from the machine After using the machine
Power supply precautions
When the power fails during use
Use only the power cord included with this machine
Turning on the machine
Turning off the machine
Turning the Machine On/Off
a Presser foot that should be used b Stitch mode
Understanding the LCD Screens
c Twin needle/needle stop position
d Automatic reverse/reinforcement stitches e Selected stitch
Changing the settings
Changing the Machine Settings
Various sewing machine operations and sewing settings can be changed
Changing the Machine Settings
Attribute
List of stitch or machine attributes
Icon
Details
Adjusting the brightness of the LCD
Bobbin precautions
Winding/Installing the Bobbin
Winding the bobbin
Actual size
Winding/Installing the Bobbin
a Notch b Bobbin winder shaft spring
a Spool pin b Spool cap
If the spool net is too long, fold it to fit the size of the spool
mPress start/stop button once
Installing the bobbin
hReattach the bobbin cover
Threading the upper thread
Upper Threading
Upper Threading
GETTING READY
Threading the needle
X The thread is passed through the eye of the needle
Threading the needle manually without using the needle threader
Using the twin needle
dInsert the extra spool pin into the end of the bobbin winder shaft
When changing the sewing direction
Pulling up the bobbin thread
a Insert the bobbin into the bobbin case
fReattach the bobbin cover
Needle precautions
Replacing the Needle
Replacing the Needle
Needle types and their uses
Weight
Thread
Checking the needle
Replacing the needle
machine starts sewing
Install the twin needle in the same way
a Needle clamp screw b Screwdriver
a Needle stopper
Replacing the Presser Foot
Presser foot precautions
Replacing the presser foot
The presser foot presses down on the fabric
d Press the black button at the back of the presser foot holder
Removing the presser foot holder
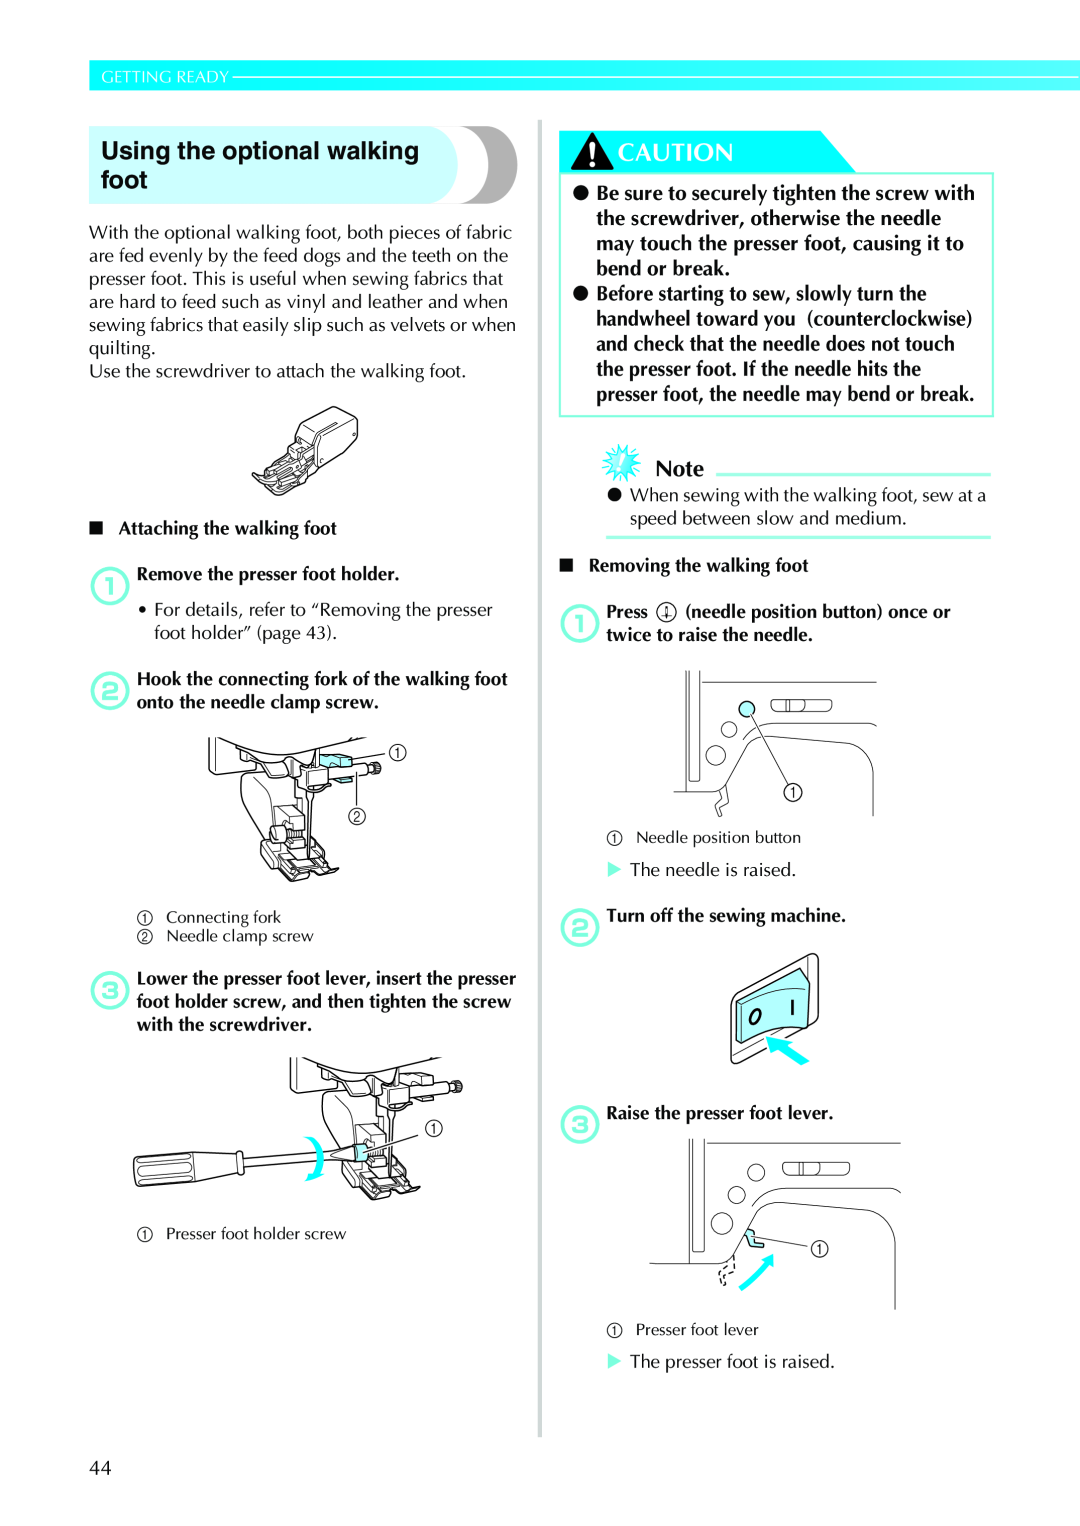
Using the optional walking foot
eAttach the presser foot holder
Sewing Cylindrical or Large Pieces
Stitching cylindrical pieces
Sewing large pieces of fabric
Sewing Cylindrical or Large Pieces
GETTING READY
Adjusting the stitch length
Adjusting the stitch width
SEWING BASICS
The necessary preparations for sewing are described in this chapter
Sewing
General sewing procedure
Sewing
Positioning the fabric
Using the operation buttons
Starting to sew
Using the foot controller
bPress start/stop button once
cTurn on the sewing machine
Securing the stitching
ePress start/stop button, or press down on the foot controller
Cutting the thread
Adjusting the Thread Tension
Adjusting the Thread Tension
Changing the tension of the upper thread
Adjusting the stitch width
Adjusting the Stitch Width and Length
Adjusting the Stitch Width and Length
Adjusting the stitch length
Changing the needle stop position
Useful Functions
Functions useful in improving sewing efficiency are described below
Automatically sewing reverse/ reinforcement stitches
dPosition the fabric under the presser foot, and
Useful Functions
then press start/stop button once
once
Trial sewing
Useful Sewing Tips
Changing the sewing direction
Sewing curves
Sewing stretch fabrics
Sewing thin fabrics
Useful Sewing Tips
foot will return to its normal position
Aligning the fabric with the presser foot
Sewing an even seam allowance
using the optional side cutter
using overcasting foot “G”
Satin stitching using the sewing
3 UTILITY STITCHES
Selecting Stitching
Preset utility stitch
Selecting stitch types and
patterns
† Character stitches No.01-55
Selecting stitching
† Utility decorative stitches No.01-62
Selecting Stitching
With number selection
With direct selection
Preset utility stitch
Saved patterns
To select a different stitch
† To select a stitch in a different mode as the current one
Sewing overcasting stitches using overcasting foot “G”
Overcasting Stitches
Overcasting Stitches
Sewing overcasting stitches using zigzag foot “J”
2-point
3-point
a Remove the presser foot
Sewing overcasting stitches using the optional side cutter
b Lower the presser foot lever, and then manually thread the needle
c Raise the presser foot lever
jPosition the fabric in the side cutter
hSelect a stitch
kLowersewing.the presser foot lever, and then start
a 2 cm 3/4 inch
Basic Stitching
Basic stitching
Basic Stitching
3 4 5
For details, refer to “Adjusting the stitch width” page
Changing the needle position
Sew a blind hem according to the following procedure
Blind Hem Stitching
Blind Hem Stitching
If the needle catches too much of the hem fold
Buttonhole Stitching/Button Sewing
Buttonhole Stitching/Button Sewing
Buttonhole sewing
cAttach buttonhole foot “A”
If the button does not fit in the button guide plate
dSelect a stitch
fPullpossible.down the buttonhole lever as far as
Do not use the seam ripper in any other way than how it is intended
Changing the stitch width Adjust the stitch width
Button sewing
kWhen you are finished attaching the button
Zipper Insertion
Inserting a centered zipper
A zipper can be sewn in place
Zipper Insertion
b Bastefabric.the two pieces up to the edge of the
Inserting a side zipper
hAttach the presser foot holder to the right pin of zipper foot “I”
o Remove the basting stitching
Stretch stitching
Sewing Stretch Fabrics and Elastic Tape
Elastic attaching
Stretch fabrics can be sewn and elastic tape can be attached
dAttach zigzag foot “J”
Appliqué, Patchwork and Quilt Stitching
Appliqué, Patchwork and Quilt Stitching
Appliqué stitching
Patchwork crazy quilt stitching
Piecing
a 6.5 mm 1/4 inch
Quilting
Free-motion quilting
aTurn off the sewing machine
bholder
Satin stitching using the sewing speed controller
fPress. or Stitch width keys to select
gPresskey. OK key or Cancel/clear
hSelect stitch
a Narrower b Wider
Reinforcement Stitching
Triple stretch stitching
Bar tack stitching
Reinforcement Stitching
Eyelet Stitching
Decorative Stitching
Various decorative stitches can be sewn with this sewing machine
Decorative Stitching
Fagoting
Scallop stitching
Smocking
of the upper thread” page
Shell tuck stitching
Heirloom stitching
Joining
a Wrong side of fabric b 6.5 mm 1/4 inch seam allowance
c Straight stitch
UTILITY STITCHES
a 4 mm 3/16 inch
Sewing the Various Built-In Decorative Patterns
Sewing beautiful patterns
Sewing patterns
Combining patterns
Sewing the Various Built-In Decorative Patterns
aSelect the first pattern
Repeat sewing patterns
Checking the selected pattern
a Single b Repeated
dPresskey. OK key or Cancel/clear
Mirror imaging the pattern
aSelect a stitch
bPress
a Normal b Mirror-imaged
Saving patterns
Retrieving a pattern
Realigning the pattern
hPress or Stitch width keys
UTILITY STITCHES
4 APPENDIX
Utility stitches
Stitch Settings
APPENDIX
Left
Stitch Name
Stitch Settings
Hem stitching Buttonhole stitch
Rick-rack stitch Decorative stitch Serpentine stitch Hem stitching
Presser Foot
Twin Needle
Walking Foot
APPENDIX
Other stitches
1 Pattern for making adjustment
2 Use monogramming foot “N” when combined with other pattern
Left/Right Flipping
Cleaning the machine surface
Care and Maintenance
Cleaning the race
Simple sewing machine maintenance operations are described below
Removing the needle plate
Care and Maintenance
Troubleshooting
The upper thread
Troubleshooting
breaks
The lower thread is
The thread tension
skipped
is incorrect
The fabric is
the LCD
Error messages
Troubleshooting
Nothing appears in the LCD
Cancelling the operation beep
Operation beep
For a correct operation One beep is sounded
ePress Cancel/clear key or OK key
Index
Numerics
Index
utility decorative stitches
English 885-V14 XE2408-0012 Printed in China