Manual DE Instrucciones
Important Safety Instructions
Importantes Instrucciones DE Seguridad
Connecting Plugs and Main Power / Sewing Light Switch
Model PS-2500, PS-2400, PS-2300 STAR140E, STAR130E, STAR120E
Page
Table of Contents
Cortahilos automático
Elementos principales Accesorios
Puntadas rectas Puntadas zigzag
Model PS-2500, PS-2400, PS-2300
Modelos PS-2500, PS-2400, PS-2300
Indicador DE Puntada
Principal parts Elementos principales
Model PS-2200, STAR110
Pulsador DE Retroceso
Selector DE Puntadas
Receptáculo DEL Pedal
Tornillo DE Ajuste Fino DE LOS Ojales Indicador DE Puntada
X59370-051 XA3811-051
XA3812-052
XA4973-051 X59375-051 Zipper Foot 1 pc
Pata de cremalleras 1 pza
Código del prensatelas para la puntada
Modelos PS-2200 y Star
Nota
El contenido de los accesorios depende del modelo
Conexión de los enchufes
Connecting Plugs
Atencion
Main Power and Sewing Light Switches
This switch turns the main power and sewing light on or off
Foot Controller
Pedal
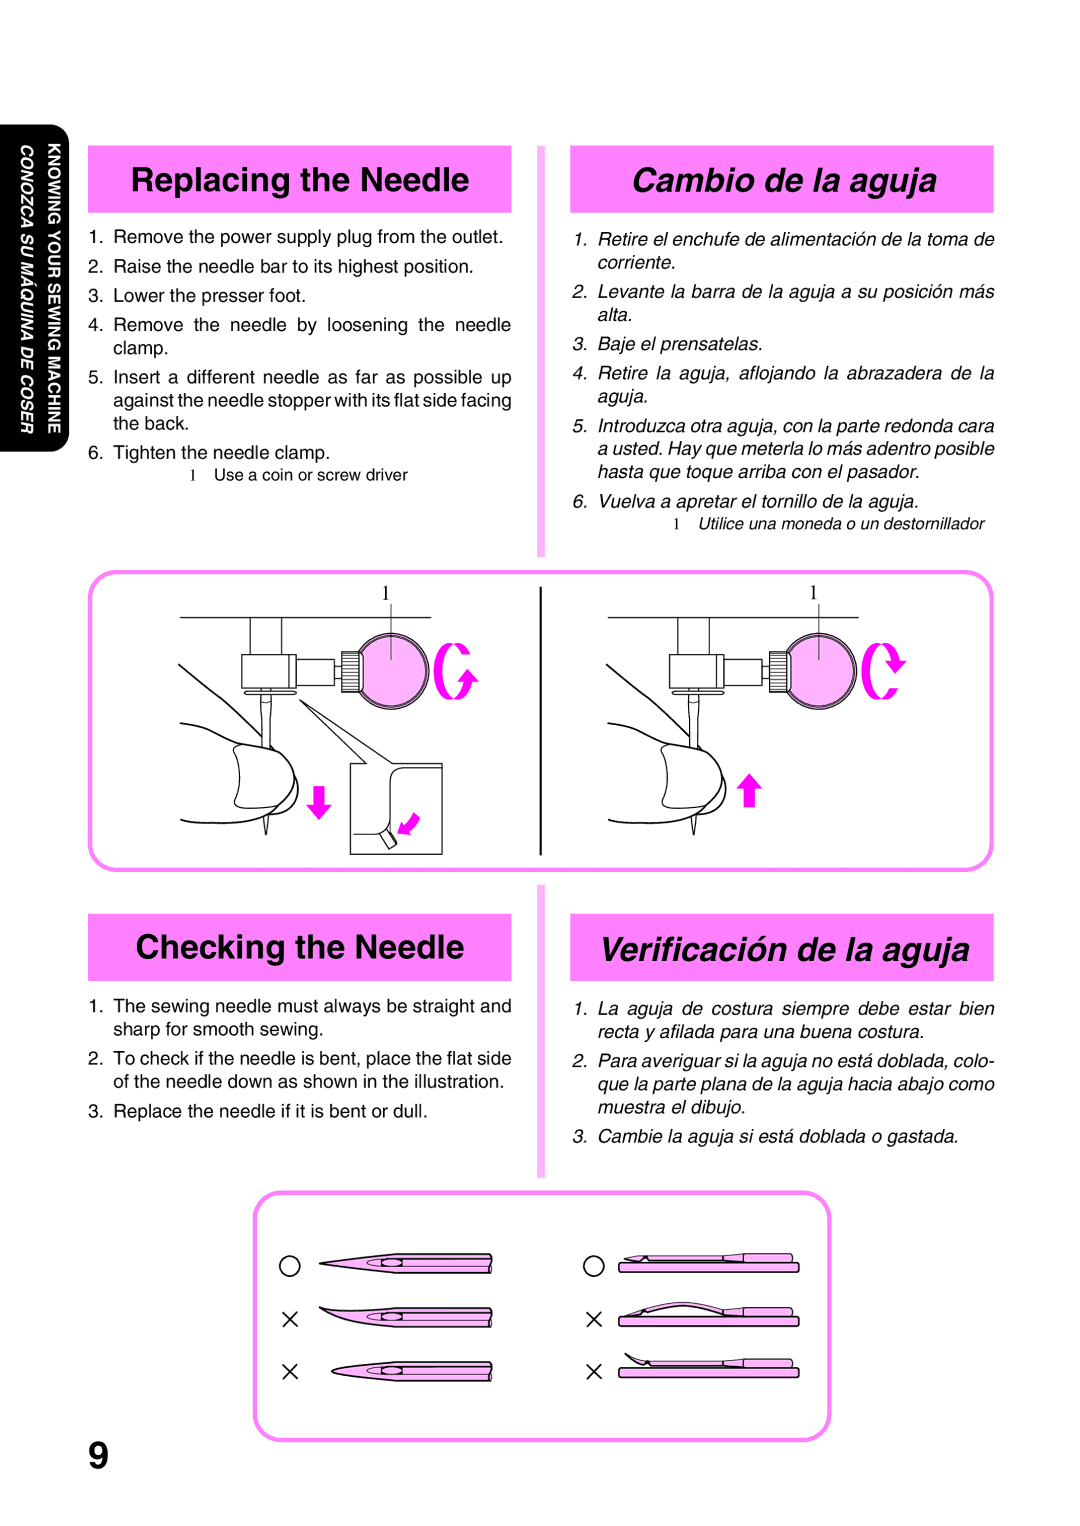
Replacing the Needle
Cambio de la aguja
Checking the Needle
Verificación de la aguja
Extension Table Accessories
Changing the Presser Foot
Cambio del prensatelas
Soporte de accesorios Mesita extensible
Pattern Selection Dial
Selector de puntadas
STAR140E STAR130E
STAR120E
Pattern Stitch Name
Recommended Instruction
64-5/32
1/4 64-1/16
Ancho Largo Página DEL Putada Nombre
Anchos y largos recomendados para cada puntada
Mm pulgadas
Stitch Length Dial
Selector de largo de Puntada
Stitch Width Dial
Selector de ancho de Puntada
Reverse Sewing Button
Pulsador de retroceso
Drop Feed Lever
Palanca de los alimentadores
START/STOP Button
Pulsador de puesta en Marcha/parada
Palanca de control de Zona de velocidad
Controls the speed range
Case the foot controller is used, you can control
Control lever should be set at right fastest
Cortahilos automático
Automatic Thread Cutter
Modelo PS-2500, STAR140E
Converting to Free-arm Style
Conversión en modalidad De brazo libre
Winding the Bobbin
Bobinado de la canilla
Alinee el surco de la canilla con el resorte del eje
Corte el hilo con el cortador
Be sure to use the specified bobbin. Replacement part code
Using a different bobbin may result in injuries or damage
Pulsador de puesta en marcha/parada para
Desconectar la máquina
Lower Threading
Enhebrado inferior
Raise the presser foot lever
Slide the button and open the cover
Raise the presser foot using the Presser Foot Lever
Upper Threading
Enhebrado superior
Levante el prensatelas con la palanca correspon- diente
Place thread behind the guide above the needle
Incorrectly feeding the thread may cause sewing problems
Coloque el hilo detrás de la guía, arriba de la aguja
Using Needle Threader
Uso del enhebrador
Manually Drawing Up Lower Thread
Levantar manualmente el Hilo inferior
Pull on the upper thread to draw up the lower thread
Presser foot
Twin Needle Sewing
Costura con aguja doble
Para introducir la aguja doble
Nota Modelo PS-2500, STAR140E
Thread Tension Control
Control de la tensión de los hilos
Tensión de los hilos
Thread Tension
La tensión del hilo superior es insuficiente
Cause puckers on your fabric
Too little tension will weaken your seams or
Tensión correcta
Sewing Fabrics Needle Size Thread Sizes
Tabla de relación entre tejidos, hilos y agujas
Tejidos Tamaño de aguja Tamaño de hilo
Puntadas rectas
Straight Stitching
Para empezar a coser
Stitch to the end of the seam and stop
Cambio de sentido de costura
Para terminar las costuras
Para retirar el tejido de la máquina
Stop the machine
Hacia la parte posterior de la máquina
Puntadas en derecho y tejidos elásticos
Zigzag Stitching
Puntadas zigzag
Puntadas zigzag
Puntada de realce
Blind Hem Stitching
Puntadas invisibles
Shell Tuck Stitching
Puntada ondas
Elastic Stitching
Puntada elástica
Remiendos
Insercion DE Gomas Elasticas
Double Action Stitching
Puntada de acción doble
Scallop Stitching
Ondas decorativas
Decorative Stitching
Puntadas decorativas
Patchwork
Patchwork
Overedge Stitching
Puntada por encima de la Orilla
Feather Stitching
Puntada pluma
Triple Zigzag Stretch Stitching
Triple puntada zigzag Elástica
Making a Buttonhole
Para coser ojales
Making a Buttonhole
Cosido DEL Ojal
En la figura C, ya que cosería un ojal de tamaño incorrecto
Example
Ejemplo
Buttonhole Fine Adjustment
Ajuste fino de los ojales
Securing the Stitching and Cutting the Buttonhole
Para completar las puntadas y cortar el ojal
This adjustment allows both sides of the buttonhole
After obtaining a satisfactory feeding on the right
If the left side is too coarse, turn the screw with
To appear uniform
Nota
Costura de botones
Button Sewing
Change the foot to the button sewing foot
Zipper Insertion
Inserción de cremalleras
Gathering
Fruncido
Darning
Zurcido
Appliques
Aplicaciones
Monogramming Embroidering
Monogramas y bordados
Preparing for Monogramming and EM- Broidering
Preparación para monogramas y bordados
Monogramming
Embroidering
Monogramas
Bordado
Parts Name
Denominación DE LAS Partes
Nota
Please sew in slow to medium speed
Cosa a una velocidad entre baja y media
Sitúe el selector de puntada en puntada recta
Quilting design Line
Using the 1/4 Seam Guide Foot
Coloque el pie-guía para costuras
Para hacer una anchura de la costura correcta
Cosido rápido de un acolchado
Changing the Bulb
Cambio de la bombilla
Mantenimiento Maintenance
Cleaning
Limpieza
No Lubricar
Automatic Thread Cutting
Corrección de problemas en El cortahilos automático
Cut
Cortar los hilos
Si empieza a coser con el cortador móvil situado
La derecha, los hilos volverán a enredarse
Performance Checklist
Listado de posibles Incidencias
Too tight
Upper thread is Tangled
Threading is not
Correct
EL Tejido
Da fuerte
Página 26 No
Página 25 No La canilla no está Bien enhebrada En el garfio
Outlet
70 No
Despacio
Está
Automatic
Thread CUT
TER does not
Work
Modelo PS-2500,STAR140E
Cortahilos
Automático
No Funciona
Repacking the Machine
Embalaje de la máquina
Guía de localización de errores
Decorative Stitch
Needle
Aguja
Scallop Stitch Sewing Light Switch
Shuttle Race Cleaning Slant Overlock Stitch
Troubleshooting Twin Needle Sewing Upper Threading
Overedging Parallelogram Stitch Patchwork
Overedging Parallelogram Stitch Patchwork
English