312A

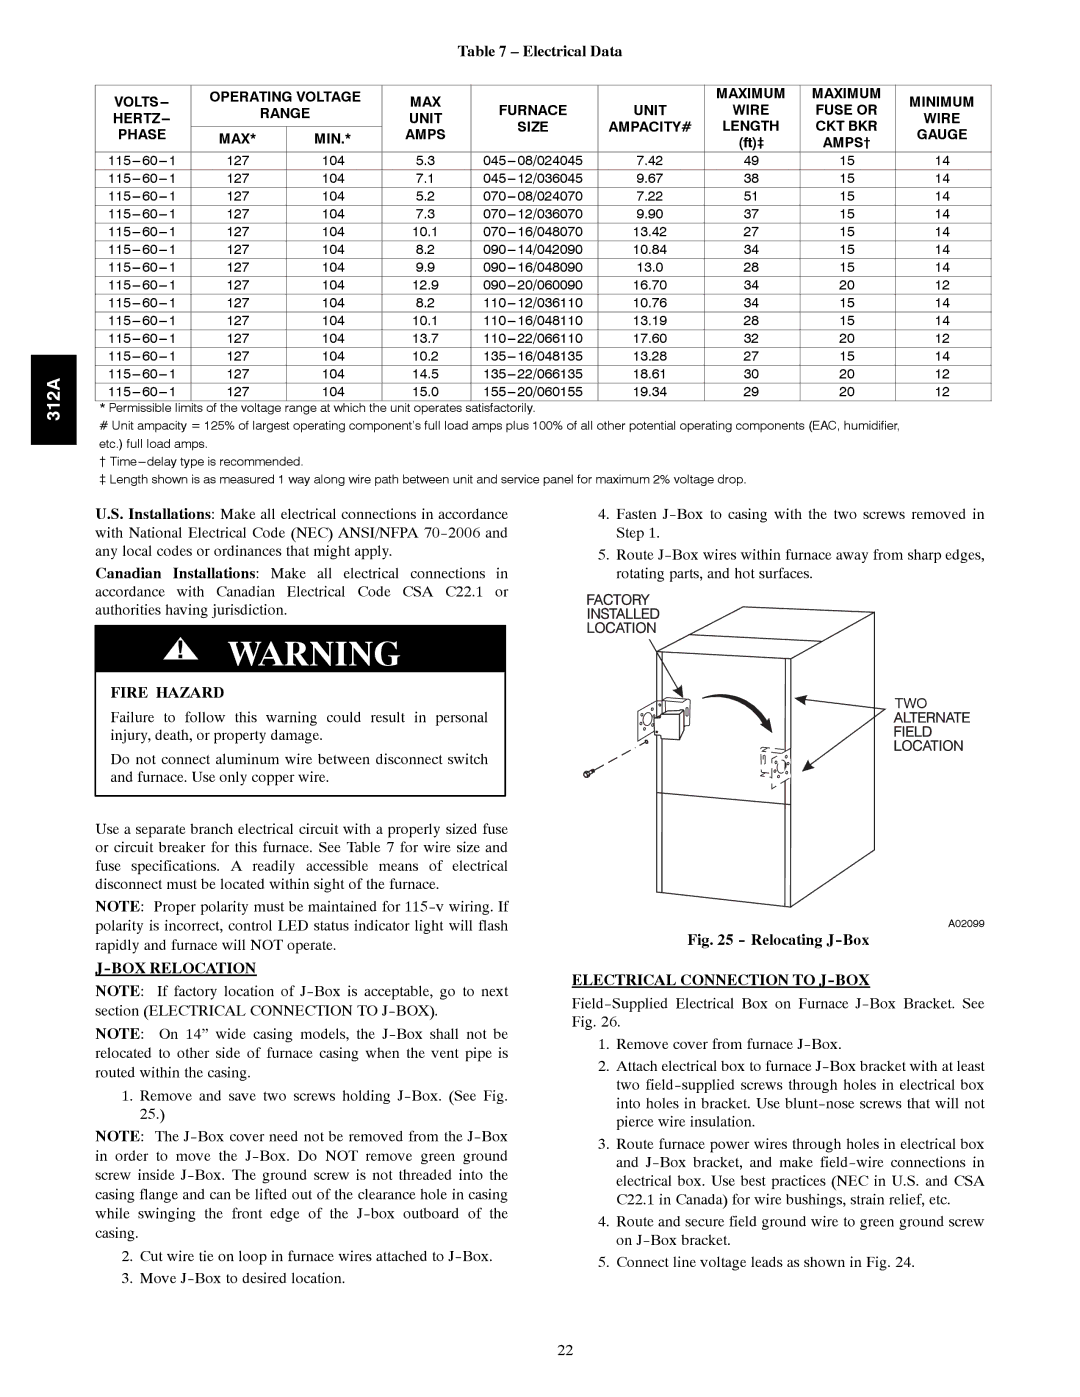
Table 7 – Electrical Data

VOLTS


OPERATING VOLTAGE

MAX


MAXIMUM

MAXIMUM

MINIMUM


RANGE

FURNACE

UNIT

WIRE

FUSE OR

HERTZ


UNIT

WIRE


SIZE

AMPACITY#

LENGTH

CKT BKR

PHASE


MAX*

MIN.*

AMPS


GAUGE


(ft)‡

AMPS†

115---

60---

1

127

104

5.3

045---

08/024045

7.42

49

15

14

115---

60---

1

127

104

7.1

045---

12/036045

9.67

38

15

14

115---

60---

1

127

104

5.2

070---

08/024070

7.22

51

15

14

115---

60---

1

127

104

7.3

070---

12/036070

9.90

37

15

14

115---

60---

1

127

104

10.1

070---

16/048070

13.42

27

15

14

115---

60---

1

127

104

8.2

090---

14/042090

10.84

34

15

14

115---

60---

1

127

104

9.9

090---

16/048090

13.0

28

15

14

115---

60---

1

127

104

12.9

090---

20/060090

16.70

34

20

12

115---

60---

1

127

104

8.2

110---

12/036110

10.76

34

15

14

115---

60---

1

127

104

10.1

110---

16/048110

13.19

28

15

14

115---

60---

1

127

104

13.7

110---

22/066110

17.60

32

20

12

115---

60---

1

127

104

10.2

135---

16/048135

13.28

27

15

14

115---

60---

1

127

104

14.5

135---

22/066135

18.61

30

20

12

115---

60---

1

127

104

15.0

155---

20/060155

19.34

29

20

12

* Permissible limits of the voltage range at which the unit operates satisfactorily.

#Unit ampacity = 125% of largest operating component’s full load amps plus 100% of all other potential operating components (EAC, humidifier, etc.) full load amps.

{ Time---delay type is recommended.

} Length shown is as measured 1 way along wire path between unit and service panel for maximum 2% voltage drop.

U.S. Installations: Make all electrical connections in accordance with National Electrical Code (NEC) ANSI/NFPA 70-2006 and any local codes or ordinances that might apply.

Canadian Installations: Make all electrical connections in accordance with Canadian Electrical Code CSA C22.1 or authorities having jurisdiction.

!WARNING

FIRE HAZARD

Failure to follow this warning could result in personal injury, death, or property damage.

Do not connect aluminum wire between disconnect switch and furnace. Use only copper wire.

Use a separate branch electrical circuit with a properly sized fuse or circuit breaker for this furnace. See Table 7 for wire size and fuse specifications. A readily accessible means of electrical disconnect must be located within sight of the furnace.

NOTE: Proper polarity must be maintained for 115-v wiring. If polarity is incorrect, control LED status indicator light will flash rapidly and furnace will NOT operate.

J-BOX RELOCATION

NOTE: If factory location of J-Box is acceptable, go to next section (ELECTRICAL CONNECTION TO J-BOX).

NOTE: On 14” wide casing models, the J-Box shall not be relocated to other side of furnace casing when the vent pipe is routed within the casing.

1.Remove and save two screws holding J-Box. (See Fig. 25.)

NOTE: The J-Box cover need not be removed from the J-Box in order to move the J-Box. Do NOT remove green ground screw inside J-Box. The ground screw is not threaded into the casing flange and can be lifted out of the clearance hole in casing while swinging the front edge of the J-box outboard of the casing.

2.Cut wire tie on loop in furnace wires attached to J-Box.

3.Move J-Box to desired location.

4.Fasten J-Box to casing with the two screws removed in Step 1.

5.Route J-Box wires within furnace away from sharp edges, rotating parts, and hot surfaces.

TWO

A02099

Fig. 25 - Relocating J-Box

ELECTRICAL CONNECTION TO J-BOX

Field-Supplied Electrical Box on Furnace J-Box Bracket. See Fig. 26.

1.Remove cover from furnace J-Box.

2.Attach electrical box to furnace J-Box bracket with at least two field-supplied screws through holes in electrical box into holes in bracket. Use blunt-nose screws that will not pierce wire insulation.

3.Route furnace power wires through holes in electrical box and J-Box bracket, and make field-wire connections in electrical box. Use best practices (NEC in U.S. and CSA C22.1 in Canada) for wire bushings, strain relief, etc.

4.Route and secure field ground wire to green ground screw on J-Box bracket.

5.Connect line voltage leads as shown in Fig. 24.

22

Page 22
Image 22
Bryant 120 instruction manual Electrical Data, BOX Relocation, Electrical Connection to J-BOX

120 specifications

The Bryant 120 is a remarkable system designed for residential and commercial heating and cooling needs, showcasing an impressive blend of efficiency, reliability, and advanced technology. As a part of Bryant's extensive line of HVAC solutions, the Bryant 120 stands out with its features and performance, making it an ideal choice for those seeking comfort year-round.

One of the main features of the Bryant 120 is its exceptional energy efficiency. It boasts a high Seasonal Energy Efficiency Ratio (SEER) rating, enabling homeowners to save on energy costs while enjoying consistent temperature control. This efficiency is aided by its variable-speed compressor, which allows the system to adjust its output based on current requirements, optimizing both energy consumption and comfort.

In terms of technology, the Bryant 120 incorporates advanced controls that enhance user experience and system performance. The system comes equipped with smart thermostats that allow homeowners to monitor and adjust their environment remotely. These thermostats not only provide convenience but also help in optimizing energy usage by learning the household's heating and cooling patterns.

Another characteristic of the Bryant 120 is its durable construction. The unit is built to withstand various weather conditions, featuring a robust cabinet and components designed for longevity. This durability ensures that homeowners can rely on the system for years without the need for frequent repairs or replacements.

Noise levels are also a critical consideration in HVAC systems, and the Bryant 120 addresses this with its quiet operation. The system is designed to minimize sound output, making it suitable for residential areas where noise can be a concern. This is particularly beneficial for nighttime use, providing a comfortable sleeping environment.

Additionally, the Bryant 120 supports eco-friendly refrigerants that comply with environmental standards, contributing to a reduction in greenhouse gas emissions. This commitment to sustainability reflects Bryant's dedication to creating products that are not only effective but also responsible.

Overall, the Bryant 120 encapsulates a harmonious balance of efficiency, advanced technology, durability, and quiet operation. Whether for a new installation or a replacement, the Bryant 120 presents an ideal solution to meet diverse heating and cooling requirements, enhancing comfort while prioritizing energy savings and environmental responsibility.