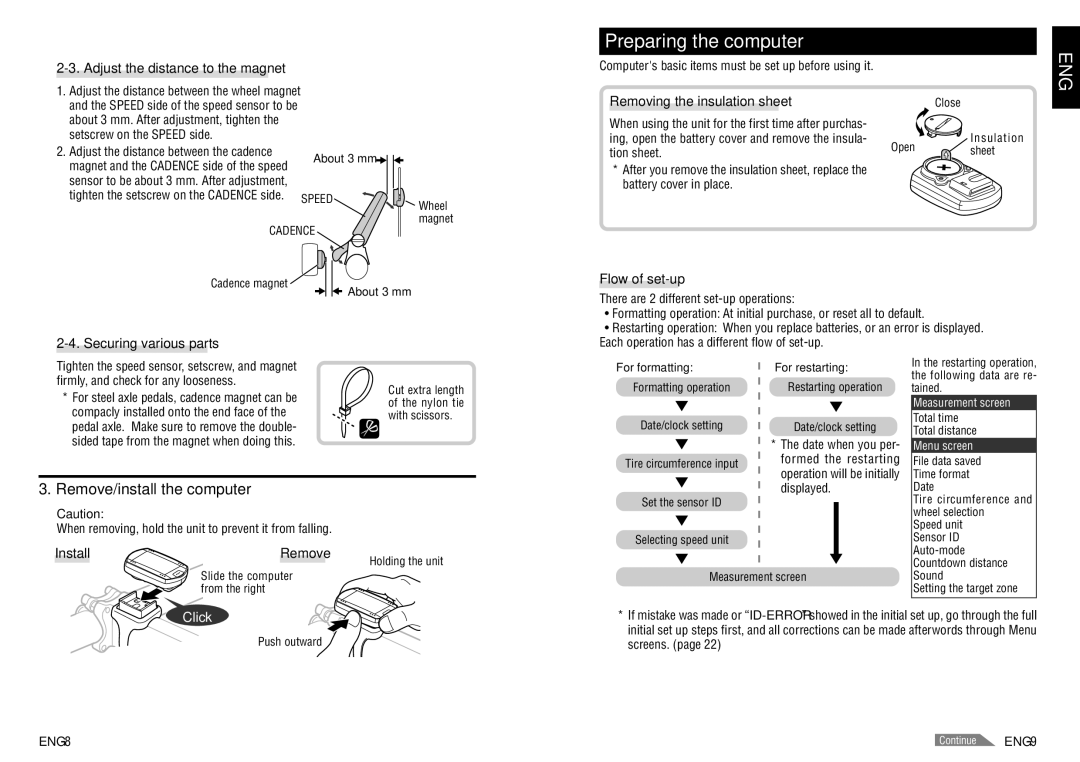
2-3. Adjust the distance to the magnet
1. Adjust the distance between the wheel magnet and the SPEED side of the speed sensor to be about 3 mm. After adjustment, tighten the setscrew on the SPEED side.
2. Adjust the distance between the cadence | About 3 mm |
|
magnet and the CADENCE side of the speed |
| |
|
| |
sensor to be about 3 mm. After adjustment, |
|
|
tighten the setscrew on the CADENCE side. SPEED | Wheel | |
CADENCE | magnet | |
| ||
Cadence magnet | About 3 mm |
|
|
| |
Preparing the computer
Computer's basic items must be set up before using it. |
|
|
Removing the insulation sheet |
| Close |
When using the unit for the first time after purchas- |
| Insulation |
ing, open the battery cover and remove the insula- | Open | |
tion sheet. | sheet |
* After you remove the insulation sheet, replace the battery cover in place.
Flow of set-up
There are 2 different
•Formatting operation: At initial purchase, or reset all to default.
•Restarting operation: When you replace batteries, or an error is displayed. Each operation has a different flow of
ENG
Tighten the speed sensor, setscrew, and magnet firmly, and check for any looseness.
*For steel axle pedals, cadence magnet can be compacly installed onto the end face of the pedal axle. Make sure to remove the double- sided tape from the magnet when doing this.
Cut extra length of the nylon tie with scissors.
For formatting:
Formatting operation
Date/clock setting
Tire circumference input
For restarting:
Restarting operation
Date/clock setting
* The date when you per- |
formed the restarting |
operation will be initially |
In the restarting operation, the following data are re- tained.
Measurement screen
Total time
Total distance
Menu screen
File data saved
Time format
3. Remove/install the computer
Caution:
When removing, hold the unit to prevent it from falling.
Install | Remove | Holding the unit |
|
|
Set the sensor ID
Selecting speed unit
displayed. |
Date
Tire circumference and wheel selection
Speed unit Sensor ID
Slide the computer from the right
Measurement screen
Sound
Setting the target zone
Click
Push outward
*If mistake was made or
Continue |