3. CONTROLS /
4. NOMENCLATURE
When the display open
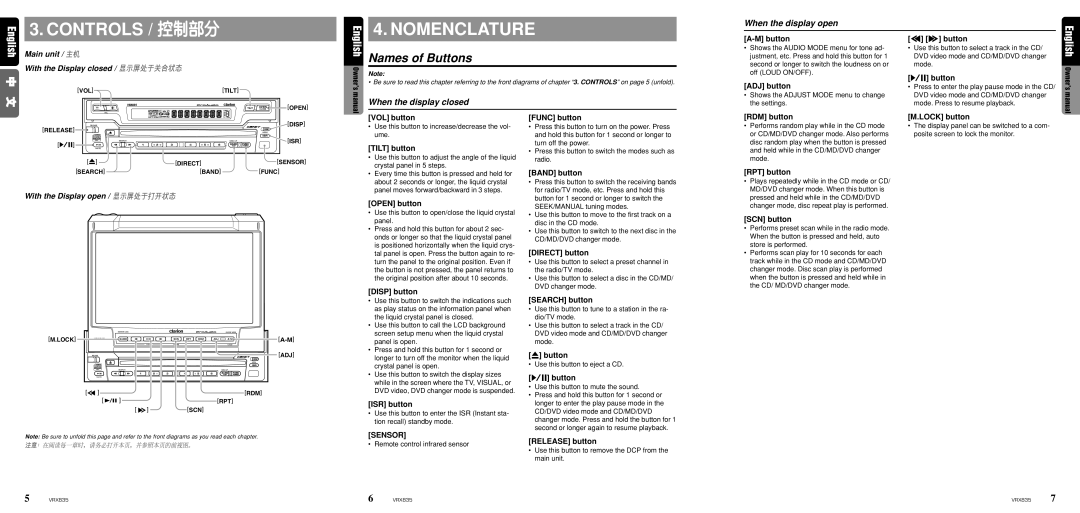
Main unit / ![]()
![]()
With the Display closed / ![]()
![]()
![]()
![]()
![]()
![]()
[VOL] | [TILT] |
| [OPEN] |
English
Owner’s manual
Names of Buttons
Note:
•Be sure to read this chapter referring to the front diagrams of chapter “3. CONTROLS” on page 5 (unfold).
When the display closed
[A-M] button
•Shows the AUDIO MODE menu for tone ad- justment, etc. Press and hold this button for 1 second or longer to switch the loudness on or off (LOUD ON/OFF).
[ADJ] button
•Shows the ADJUST MODE menu to change the settings.
[a] [d] button
•Use this button to select a track in the CD/ DVD video mode and CD/MD/DVD changer mode.
[s] button
•Press to enter the play pause mode in the CD/ DVD video mode and CD/MD/DVD changer mode. Press to resume playback.
English
Owner’s manual
[RELEASE] |
| [DISP] |
|
| |
[s] |
| [ISR] |
|
| |
[Q] | [DIRECT] | [SENSOR] |
[SEARCH] | [BAND] | [FUNC] |
With the Display open / 


[M.LOCK] |
|
|
| |
|
|
|
| [ADJ] |
[ | ] |
|
| [RDM] |
| [ | ] |
| [RPT] |
|
| [ | ] | [SCN] |
[VOL] button
•Use this button to increase/decrease the vol- ume.
[TILT] button
•Use this button to adjust the angle of the liquid crystal panel in 5 steps.
•Every time this button is pressed and held for about 2 seconds or longer, the liquid crystal panel moves forward/backward in 3 steps.
[OPEN] button
•Use this button to open/close the liquid crystal panel.
•Press and hold this button for about 2 sec- onds or longer so that the liquid crystal panel is positioned horizontally when the liquid crys- tal panel is open. Press the button again to re- turn the panel to the original position. Even if the button is not pressed, the panel returns to the original position after about 10 seconds.
[DISP] button
•Use this button to switch the indications such as play status on the information panel when the liquid crystal panel is closed.
•Use this button to call the LCD background screen setup menu when the liquid crystal panel is open.
•Press and hold this button for 1 second or longer to turn off the monitor when the liquid crystal panel is open.
•Use this button to switch the display sizes while in the screen where the TV, VISUAL, or DVD video, DVD changer mode is suspended.
[ISR] button
•Use this button to enter the ISR (Instant sta- tion recall) standby mode.
[FUNC] button
•Press this button to turn on the power. Press and hold this button for 1 second or longer to turn off the power.
•Press this button to switch the modes such as radio.
[BAND] button
•Press this button to switch the receiving bands for radio/TV mode, etc. Press and hold this button for 1 second or longer to switch the SEEK/MANUAL tuning modes.
•Use this button to move to the first track on a disc in the CD mode.
•Use this button to switch to the next disc in the CD/MD/DVD changer mode.
[DIRECT] button
•Use this button to select a preset channel in the radio/TV mode.
•Use this button to select a disc in the CD/MD/ DVD changer mode.
[SEARCH] button
•Use this button to tune to a station in the ra- dio/TV mode.
•Use this button to select a track in the CD/ DVD video mode and CD/MD/DVD changer mode.
[Q] button
•Use this button to eject a CD.
[s] button
•Use this button to mute the sound.
•Press and hold this button for 1 second or longer to enter the play pause mode in the CD/DVD video mode and CD/MD/DVD changer mode. Press and hold the button for 1 second or longer again to resume playback.
[RDM] button
•Performs random play while in the CD mode or CD/MD/DVD changer mode. Also performs disc random play when the button is pressed and held while in the CD/MD/DVD changer mode.
[RPT] button
•Plays repeatedly while in the CD mode or CD/ MD/DVD changer mode. When this button is pressed and held while in the CD/MD/DVD changer mode, disc repeat play is performed.
[SCN] button
•Performs preset scan while in the radio mode. When the button is pressed and held, auto store is performed.
•Performs scan play for 10 seconds for each track while in the CD mode and CD/MD/DVD changer mode. Disc scan play is performed when the button is pressed and held while in the CD/ MD/DVD changer mode.
[M.LOCK] button
•The display panel can be switched to a com- posite screen to lock the monitor.
Note: Be sure to unfold this page and refer to the front diagrams as you read each chapter.
[SENSOR]
• Remote control infrared sensor | [RELEASE] button | |
• Use this button to remove the DCP from the | ||
| ||
| main unit. |
5 | VRX835 | 6 | VRX835 | VRX835 | 7 |
