Editing
DISC Initialize
•If you load a blank DVD+R(+RW) disc, it will be initialized (formatted to enable recording).
•Do not start recording until disc initialization is complete.
•If you load a DVD+RW that has already been used you can record a program immediately.
Disc Menu
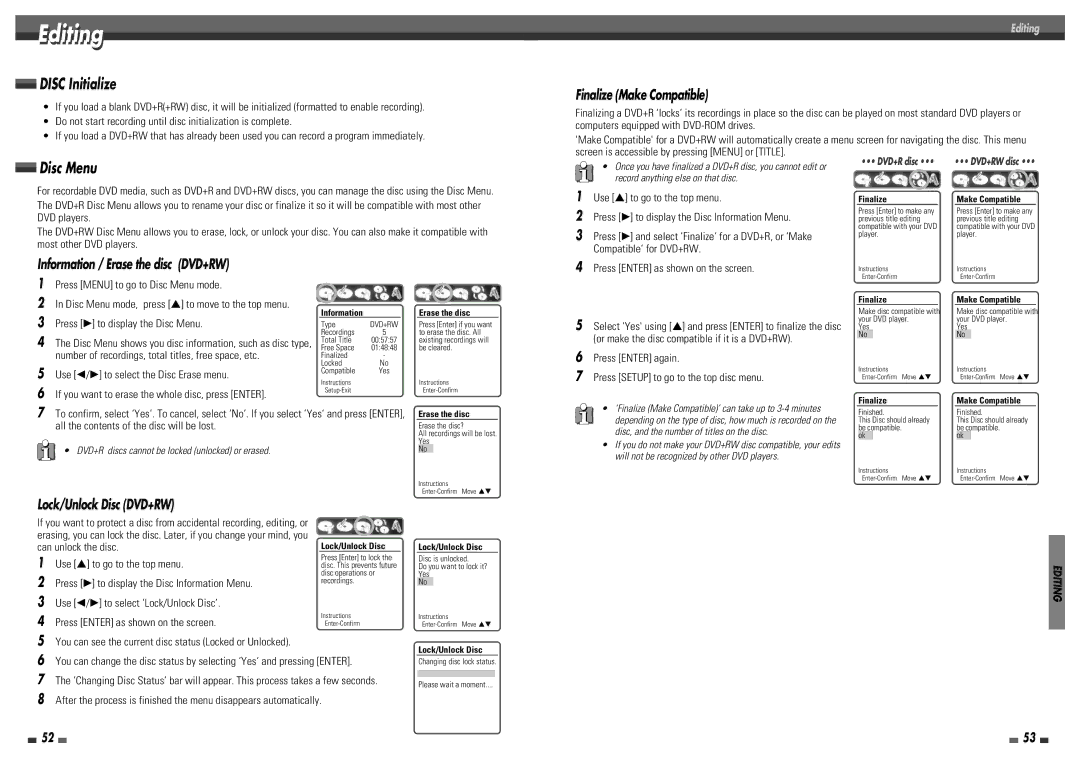
For recordable DVD media, such as DVD+R and DVD+RW discs, you can manage the disc using the Disc Menu.
The DVD+R Disc Menu allows you to rename your disc or finalize it so it will be compatible with most other DVD players.
The DVD+RW Disc Menu allows you to erase, lock, or unlock your disc. You can also make it compatible with most other DVD players.
Editing
Finalize (Make Compatible)
Finalizing a DVD+R ‘locks’ its recordings in place so the disc can be played on most standard DVD players or computers equipped with
'Make Compatible' for a DVD+RW will automatically create a menu screen for navigating the disc. This menu screen is accessible by pressing [MENU] or [TITLE].
• Once you have finalized a DVD+R disc, you cannot edit or | ••• DVD+R disc ••• | ••• DVD+RW disc ••• |
|
| |
record anything else on that disc. |
|
|
1 | Use […] to go to the top menu. | Finalize |
| Make Compatible |
2 | Press [√] to display the Disc Information Menu. | Press [Enter] to make any | Press [Enter] to make any | |
previous title editing | previous title editing | |||
3 |
| compatible with your DVD | compatible with your DVD | |
Press [√] and select ‘Finalize‘ for a DVD+R, or ‘Make | player. | player. | ||
| Compatible‘ for DVD+RW. |
|
|
|
Information / Erase the disc (DVD+RW)
1Press [MENU] to go to Disc Menu mode.
2In Disc Menu mode, press […] to move to the top menu.
3 | Press [√] to display the Disc Menu. | Information |
|
Type | DVD+RW | ||
4 |
| Recordings | 5 |
The Disc Menu shows you disc information, such as disc type, | Total Title | 00:57:57 | |
Free Space | 01:48:48 | ||
| number of recordings, total titles, free space, etc. | Finalized | - |
5 |
| Locked | No |
Use [œ/√] to select the Disc Erase menu. | Compatible | Yes | |
Instructions |
| ||
6 |
|
| |
If you want to erase the whole disc, press [ENTER]. |
| ||
|
|
7To confirm, select ‘Yes‘. To cancel, select ‘No‘. If you select ‘Yes‘ and press [ENTER], all the contents of the disc will be lost.
• DVD+R discs cannot be locked (unlocked) or erased.
Erase the disc
Press [Enter] if you want to erase the disc. All existing recordings will be cleared.
Instructions
Erase the disc
Erase the disc?
All recordings will be lost. Yes
No
4 Press [ENTER] as shown on the screen. | Instructions |
|
| Instructions |
|
| ||||
|
|
|
|
|
|
| ||||
|
| Finalize |
|
| Make Compatible |
| ||||
|
| Make disc compatible with | Make disc compatible with | |||||||
5 Select 'Yes' using […] and press [ENTER] to finalize the disc | your DVD player. | your DVD player. | ||||||||
Yes |
|
|
| Yes |
|
|
| |||
No |
|
| No |
|
| |||||
(or make the disc compatible if it is a DVD+RW). |
|
|
|
|
|
| ||||
|
|
|
|
|
|
|
|
| ||
6 Press [ENTER] again. | Instructions |
|
| Instructions |
|
| ||||
7 Press [SETUP] to go to the top disc menu. |
|
|
|
| ||||||
Move …† |
| Move …† | ||||||||
• ‘Finalize (Make Compatible)’ can take up to |
| Finalize |
|
| Make Compatible | |||||
| Finished. |
|
| Finished. |
|
| ||||
depending on the type of disc, how much is recorded on the | This Disc should already | This Disc should already | ||||||||
disc, and the number of titles on the disc. | be compatible. |
|
| be compatible. |
|
| ||||
ok |
|
|
|
| ok |
|
|
| ||
• If you do not make your DVD+RW disc compatible, your edits |
|
|
|
|
|
|
| |||
|
|
|
|
|
|
|
|
| ||
will not be recognized by other DVD players. |
|
|
|
|
|
|
|
|
| |
|
| Instructions |
|
| Instructions |
|
| |||
|
| Move …† |
| Move …† | ||||||
Instructions
Lock/Unlock Disc (DVD+RW)
If you want to protect a disc from accidental recording, editing, or |
| |
erasing, you can lock the disc. Later, if you change your mind, you | Lock/Unlock Disc | |
can unlock the disc. | ||
1 | Use […] to go to the top menu. | Press [Enter] to lock the |
disc. This prevents future | ||
2 |
| disc operations or |
Press [√] to display the Disc Information Menu. | recordings. | |
| ||
3Use [œ/√] to select ‘Lock/Unlock Disc’.
4 Press [ENTER] as shown on the screen. | Instructions |
5You can see the current disc status (Locked or Unlocked).
6You can change the disc status by selecting ‘Yes‘ and pressing [ENTER].
7The ‘Changing Disc Status’ bar will appear. This process takes a few seconds.
8After the process is finished the menu disappears automatically.
Lock/Unlock Disc
Disc is unlocked.
Do you want to lock it? Yes
No
Instructions
Lock/Unlock Disc
Changing disc lock status.
Please wait a moment....
EDITING
52 | 53 |
