f.On the Settings menu, select Drives, and select Drives on the sub-menu.

g.Disable the SATA port for the secondary hard drive (normally SATA1).

h.Click Apply, then Exit.

i.If the new primary hard drive is a bootable drive, skip the rest of this step.

j.Insert a bootable medium into a boot drive.

k.Reboot your computer and press F12 when prompted to enter the Boot Device Menu.

l.Select the drive with the bootable media and press Next.

m.Format and/or install bootable software on the primary hard drive.

Replacing a Hard Drive

If a single hard drive is installed, it may be a 3.5-inch or 2.5-inch hard drive. When installing a second hard drive, the hard drive being installed must be he same type (3.5-inch or 2.5-inch) as the drive in the chassis.

CAUTION: Before you begin any of the procedures in this section, read the safety information that shipped with your computer. For additional safety best practices information, see the Regulatory Compliance Homepage at www.dell.com/regulatory_compliance.

CAUTION: To guard against electrical shock, always unplug your computer from the electrical outlet before removing the computer cover.

NOTICE: To avoid damage to the drive, do not set it on a hard surface. Instead, set the drive on a surface, such as a foam pad, that will sufficiently cushion it.

NOTICE: If you are replacing a hard drive that contains data you want to keep, back up your files before you begin this procedure.

1.Perform the procedure Before Working on Your Computer.

2.Unpack the replacement hard drive, and prepare it for installation.

3.Check the documentation for the drive to verify that it is configured for your computer.

4.Remove the drive bay caddy for the drive to be installed. Primary hard drives must be installed in the upper drive bay. If a second 2.5-inch hard drive is installed, it is mounted on a 2.5-inch hard drive caddy with the primary drive in the upper drive bay.

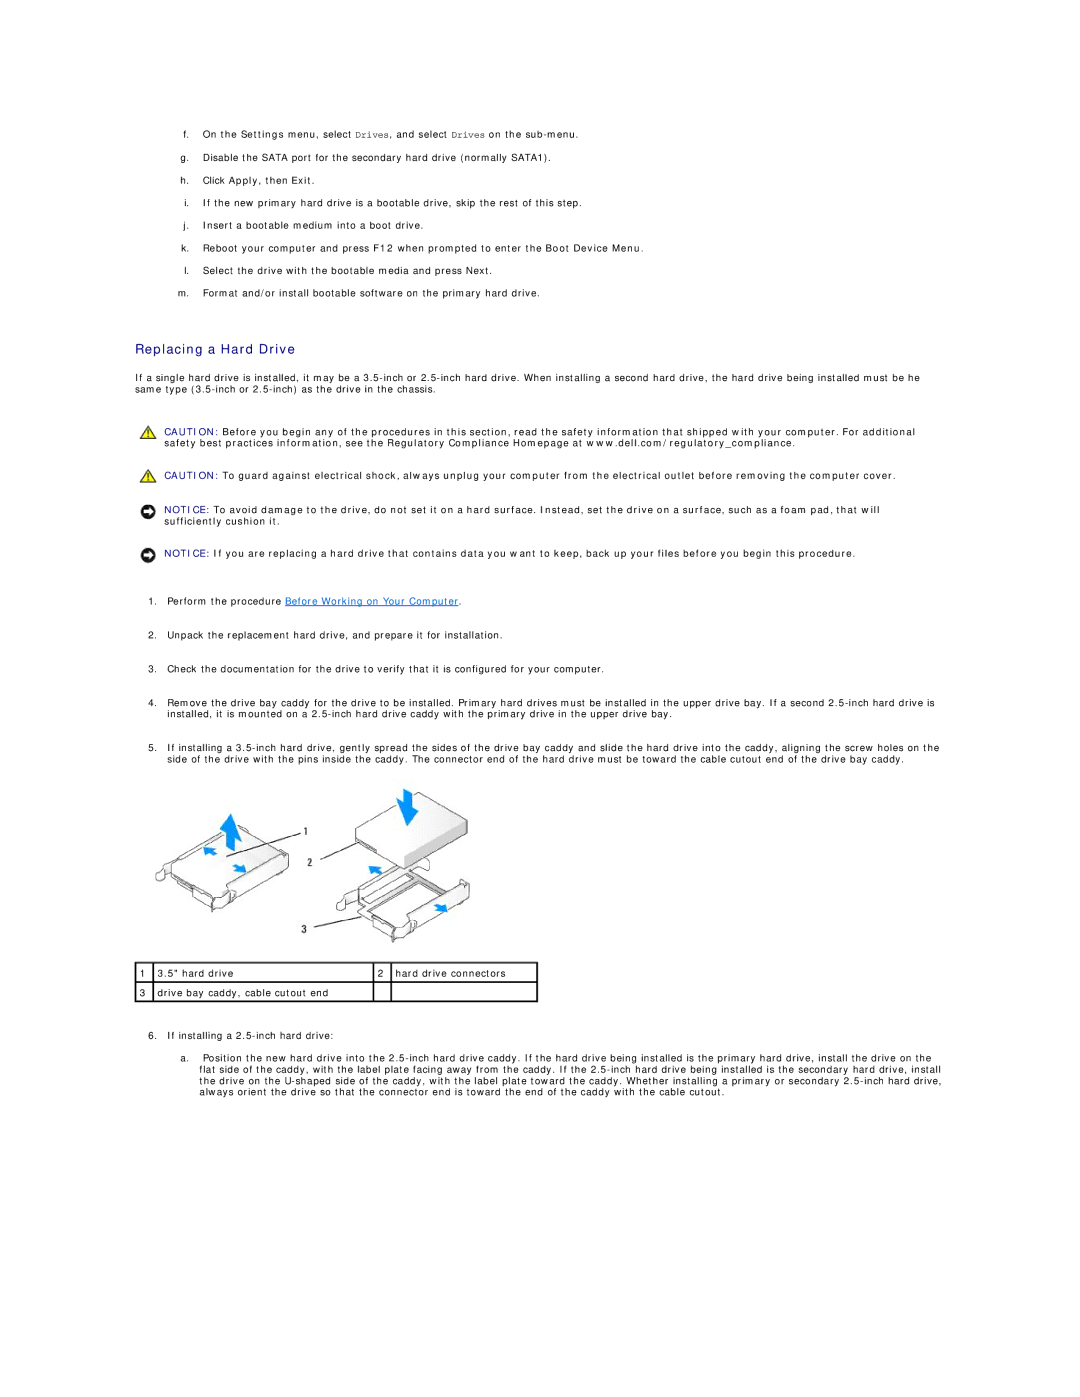
5.If installing a 3.5-inch hard drive, gently spread the sides of the drive bay caddy and slide the hard drive into the caddy, aligning the screw holes on the side of the drive with the pins inside the caddy. The connector end of the hard drive must be toward the cable cutout end of the drive bay caddy.

1 3.5" hard drive

2 hard drive connectors

3drive bay caddy, cable cutout end

6.If installing a 2.5-inch hard drive:

a. Position the new hard drive into the 2.5-inch hard drive caddy. If the hard drive being installed is the primary hard drive, install the drive on the flat side of the caddy, with the label plate facing away from the caddy. If the 2.5-inch hard drive being installed is the secondary hard drive, install the drive on the U-shaped side of the caddy, with the label plate toward the caddy. Whether installing a primary or secondary 2.5-inch hard drive, always orient the drive so that the connector end is toward the end of the caddy with the cable cutout.

Page 72
Image 72
Dell 960 manual Replacing a Hard Drive

960 specifications

The Dell 960 is a powerful and efficient desktop computer designed for business environments and professional users seeking reliability and performance. This model is part of Dell's OptiPlex line, which is known for its focus on security, manageability, and sustainability.

One of the standout features of the Dell 960 is its compact design, which enables it to fit comfortably in various office environments without occupying much space. This small form factor is not only convenient for limited desk space but also enhances the aesthetic appeal of professional settings.

In terms of performance, the Dell 960 is equipped with Intel Core 2 Duo processors, offering dual-core processing capabilities that optimize multitasking and enhance overall system responsiveness. This makes it well-suited for running multiple applications simultaneously, an essential requirement in many business operations.

Memory options are customizable, allowing users to equip the Dell 960 with up to 8 GB of RAM. This flexibility ensures that the system can handle demanding applications and workloads with ease. Additionally, the desktop features various hard drive configurations, including both traditional hard disk drives (HDD) and solid-state drives (SSD), providing choices that balance performance and storage capacity.

The Dell 960 also prioritizes energy efficiency and eco-friendliness. It is Energy Star certified, meaning it meets stringent energy efficiency guidelines set by the U.S. Environmental Protection Agency. This certification helps organizations reduce their energy costs and carbon footprint, contributing to more sustainable operations.

For connectivity, the Dell 960 comes with a variety of ports, including USB 2.0 ports, audio jacks, and Ethernet ports, ensuring seamless communication with peripherals and networks. The inclusion of integrated graphics offers sufficient performance for standard business applications, while expansion slots allow for graphics upgrades when necessary.

Security features are robust in the Dell 960, with optional hardware-based security systems that safeguard sensitive data. With features like Trusted Platform Module (TPM) support and lockable chassis options, businesses can protect their valuable information from unauthorized access.

In summary, the Dell 960 blends performance, compactness, and energy efficiency, making it a suitable choice for offices and professional environments. Its customizable features ensure that users can tailor the desktop to meet their specific needs, while its emphasis on security and sustainability aligns well with modern corporate values.