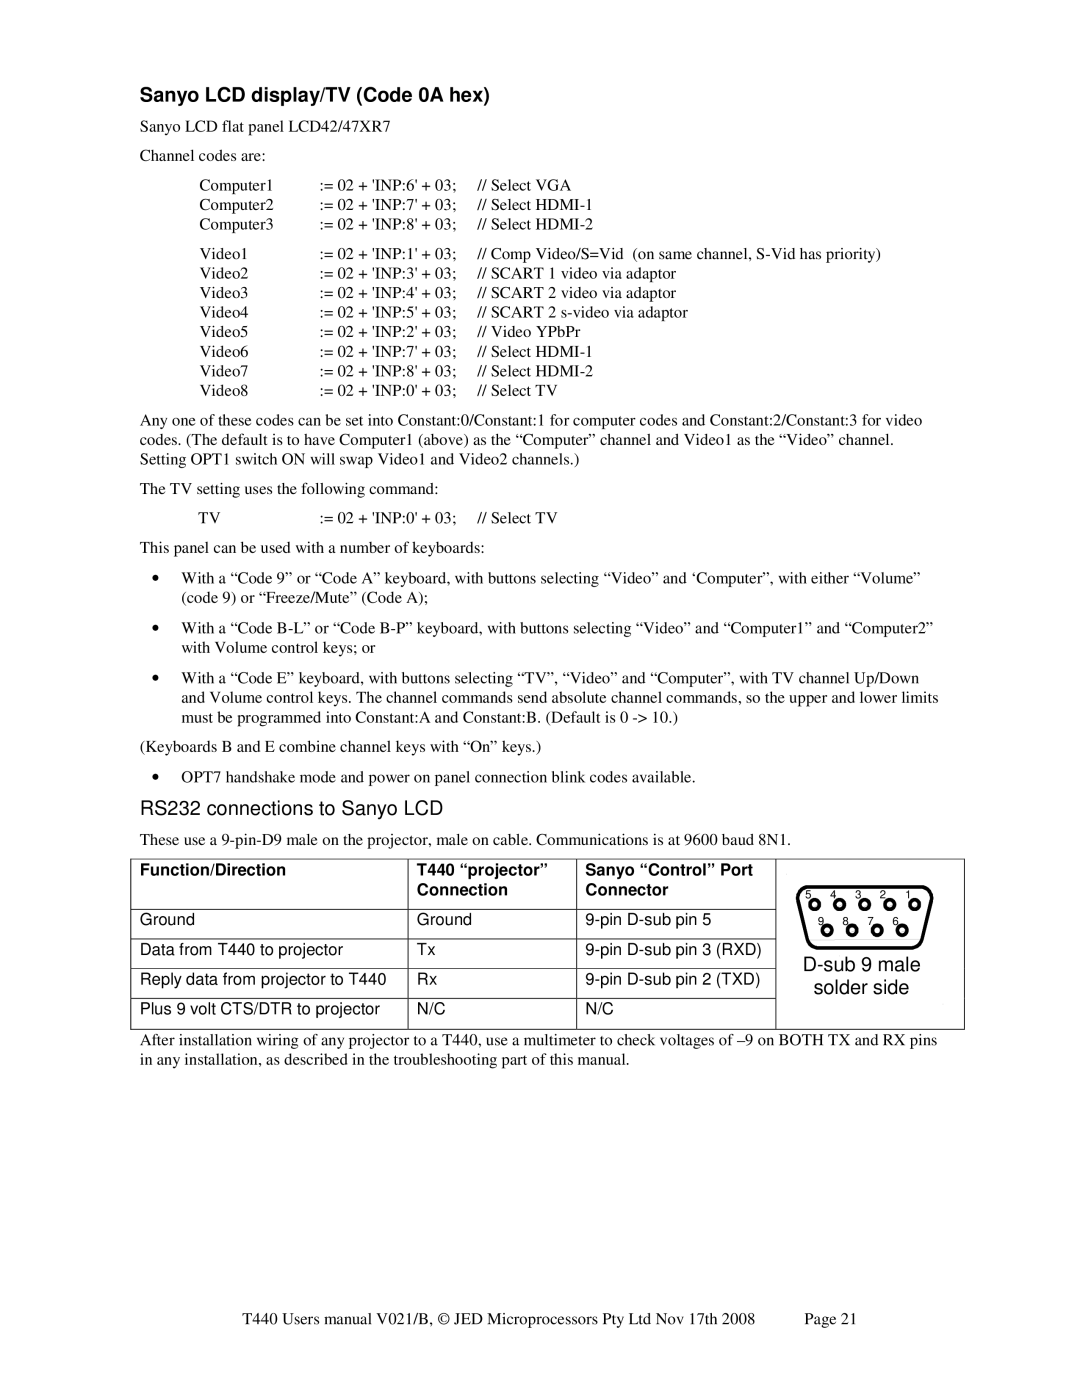
Sanyo LCD display/TV (Code 0A hex)
Sanyo LCD flat panel LCD42/47XR7
Channel codes are: |
|
|
Computer1 | := 02 + 'INP:6' + 03; | // Select VGA |
Computer2 | := 02 + 'INP:7' + 03; | // Select |
Computer3 | := 02 + 'INP:8' + 03; | // Select |
Video1 | := 02 + 'INP:1' + 03; | // Comp Video/S=Vid (on same channel, |
Video2 | := 02 + 'INP:3' + 03; // SCART 1 video via adaptor | |
Video3 | := 02 + 'INP:4' + 03; // SCART 2 video via adaptor | |
Video4 | := 02 + 'INP:5' + 03; // SCART 2 | |
Video5 | := 02 + 'INP:2' + 03; | // Video YPbPr |
Video6 | := 02 + 'INP:7' + 03; | // Select |
Video7 | := 02 + 'INP:8' + 03; | // Select |
Video8 | := 02 + 'INP:0' + 03; | // Select TV |
Any one of these codes can be set into Constant:0/Constant:1 for computer codes and Constant:2/Constant:3 for video codes. (The default is to have Computer1 (above) as the “Computer” channel and Video1 as the “Video” channel. Setting OPT1 switch ON will swap Video1 and Video2 channels.)
The TV setting uses the following command:
TV | := 02 + 'INP:0' + 03; // Select TV |
This panel can be used with a number of keyboards:
•With a “Code 9” or “Code A” keyboard, with buttons selecting “Video” and ‘Computer”, with either “Volume” (code 9) or “Freeze/Mute” (Code A);
•With a “Code
•With a “Code E” keyboard, with buttons selecting “TV”, “Video” and “Computer”, with TV channel Up/Down and Volume control keys. The channel commands send absolute channel commands, so the upper and lower limits must be programmed into Constant:A and Constant:B. (Default is 0
(Keyboards B and E combine channel keys with “On” keys.)
•OPT7 handshake mode and power on panel connection blink codes available.
RS232 connections to Sanyo LCD
These use a
Function/Direction
Ground
Data from T440 to projector
Reply data from projector to T440
Plus 9 volt CTS/DTR to projector
T440 “projector” Connection
Ground
Tx
Rx
N/C
Sanyo “Control” Port Connector
N/C
5 4 3 2 1
9 8 7 6
D-sub 9 male
solder side
After installation wiring of any projector to a T440, use a multimeter to check voltages of
T440 Users manual V021/B, © JED Microprocessors Pty Ltd Nov 17th 2008 | Page 21 |
