Operation
Front Panel Features
AUTO |
| 1 | 2 | INPUT | SIGNAL | ||
SWITCH | IR | EQ | |||||
|
| PRESENCE | |||||
|
|
|
| 1 | 2 |
| |
ACTIVE |
|
| HIGH | ON |
| ||
|
|
|
|
| 1 2 | ||
|
|
| LOW | 1 | 2 | ||
|
|
|
|
| |||
|
|
|
|
|
| SW2 DVI A | |
1 | 2 | 3 |
|
|
|
|
|
|
|
|
| 4 |
|
|
|
|
| 5 |
|
|
| |||||||
|
|
| SW2 DVI A front panel |
|
|
|
|
|
|
|
|
|
|
|
|
|
|
| ||||||||||
AUTO |
|
| 1 |
| 2 |
|
| 3 | 4 |
|
|
| INPUT |
| SIGNAL | |||||||||||||
SWITCH | IR |
|
|
|
|
|
|
|
| EQ |
|
|
|
| ||||||||||||||
|
|
|
|
|
|
|
|
|
|
|
|
| 1 |
| 2 | 3 |
| 4 |
|
|
| PRESENCE | ||||||
|
|
|
|
|
|
|
|
|
|
|
|
|
|
|
|
|
|
|
|
|
|
|
|
| ||||
ACTIVE |
|
|
|
|
|
|
|
|
|
|
|
|
| HIGH |
|
| ON |
|
|
|
|
|
|
|
| |||
|
|
|
|
|
|
|
|
|
|
|
|
| LOW |
| 1 |
| 2 | 3 |
| 4 |
|
|
| 1 2 3 4 |
| SW4 DVI A | ||
|
|
|
|
|
|
|
|
|
|
|
|
|
|
|
|
|
|
|
|
|
|
|
|
|
|
|
| |
|
|
|
|
|
|
|
|
|
|
|
|
|
|
|
|
|
|
|
|
|
|
|
|
|
|
|
| |
1 | 2 |
|
|
|
| 3 |
|
|
|
|
|
|
|
| 4 |
|
|
|
| 5 |
|
| ||||||
|
|
| SW4 DVI A front panel |
|
|
|
|
|
|
|
|
|
|
|
|
|
|
| ||||||||||
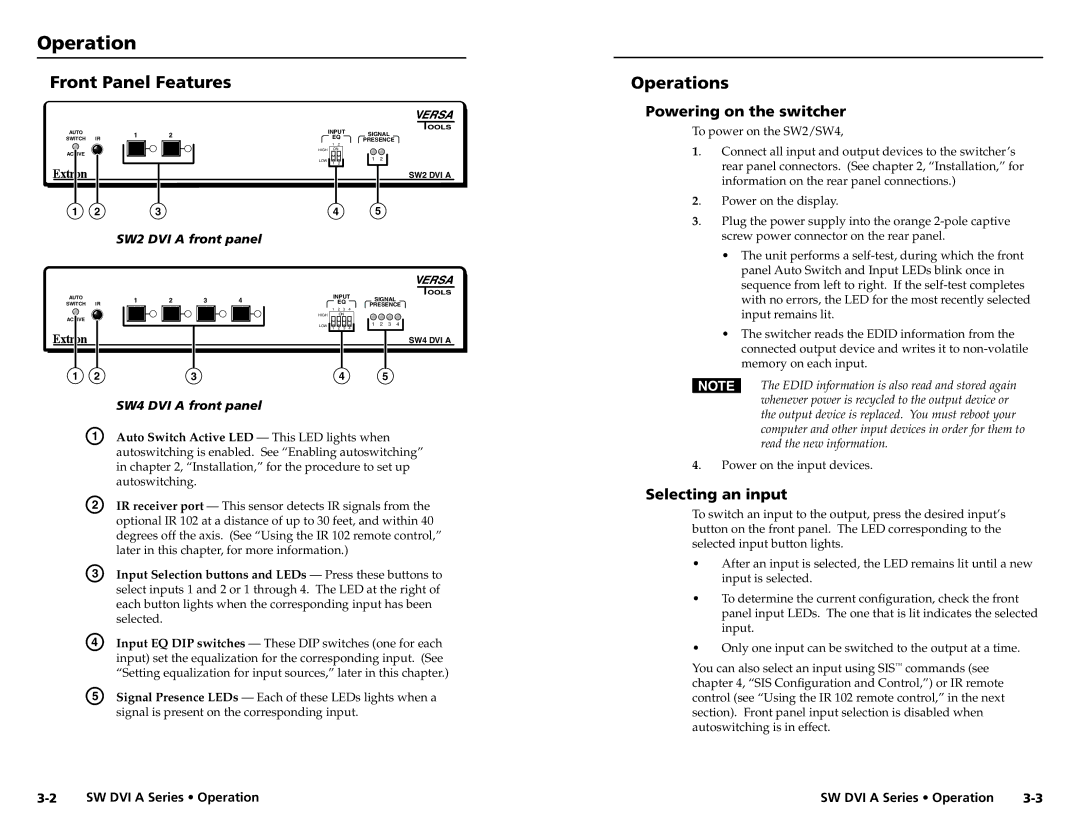
A | Auto Switch Active LED — This LED lights when | |||||||||||||||||||||||||||
|
|
| autoswitching is enabled. See “Enabling autoswitching” | |||||||||||||||||||||||||
|
|
| in chapter 2, “Installation,” for the procedure to set up | |||||||||||||||||||||||||
|
|
| autoswitching. |
|
|
|
|
|
|
|
|
|
|
|
|
|
|
|
|
|
|
| ||||||
B | IR receiver port — This sensor detects IR signals from the | |||||||||||||||||||||||||||
|
|
| optional IR 102 at a distance of up to 30 feet, and within 40 | |||||||||||||||||||||||||
|
|
| degrees off the axis. (See “Using the IR 102 remote control,” | |||||||||||||||||||||||||
|
|
| later in this chapter, for more information.) |
|
|
|
|
|
|
|
| |||||||||||||||||
C | Input Selection buttons and LEDs — Press these buttons to | |||||||||||||||||||||||||||
|
|
| select inputs 1 and 2 or 1 through 4. The LED at the right of | |||||||||||||||||||||||||
|
|
| each button lights when the corresponding input has been | |||||||||||||||||||||||||
|
|
| selected. |
|
|
|
|
|
|
|
|
|
|
|
|
|
|
|
|
|
|
|
|
|
| |||
D | Input EQ DIP switches — These DIP switches (one for each | |||||||||||||||||||||||||||
|
|
| input) set the equalization for the corresponding input. (See | |||||||||||||||||||||||||
|
|
| “Setting equalization for input sources,” later in this chapter.) | |||||||||||||||||||||||||
E | Signal Presence LEDs — Each of these LEDs lights when a | |||||||||||||||||||||||||||
|
|
| signal is present on the corresponding input. |
|
|
|
|
| ||||||||||||||||||||
Operations
Powering on the switcher
To power on the SW2/SW4,
1. Connect all input and output devices to the switcher’s rear panel connectors. (See chapter 2, “Installation,” for information on the rear panel connections.)
2. Power on the display.
3. Plug the power supply into the orange
•The unit performs a
•The switcher reads the EDID information from the connected output device and writes it to
NThe EDID information is also read and stored again whenever power is recycled to the output device or the output device is replaced. You must reboot your computer and other input devices in order for them to read the new information.
4. Power on the input devices.
Selecting an input
To switch an input to the output, press the desired input’s button on the front panel. The LED corresponding to the selected input button lights.
•After an input is selected, the LED remains lit until a new input is selected.
•To determine the current configuration, check the front panel input LEDs. The one that is lit indicates the selected input.
•Only one input can be switched to the output at a time.
You can also select an input using SIS™ commands (see chapter 4, “SIS Configuration and Control,”) or IR remote control (see “Using the IR 102 remote control,” in the next section). Front panel input selection is disabled when autoswitching is in effect.
SW DVI A Series • Operation | SW DVI A Series • Operation |