User’s Guide
Series.book Page 2 Friday, May 19, 2006 300 PM
Declaration of Conformity
Copyright and Trademark Information
B5FJ-0041-01EN-00
For Authorized Repair Technicians Only
Important Safety Instructions
System Disposal
Table of Contents
Caring for Your Lifebook Notebook
System Specifications
Series.book Page 8 Friday, May 19, 2006 300 PM
Preface
Series.book Page 2 Friday, May 19, 2006 300 PM
Preface
Warranty
About this Guide
Fujitsu Contact Information
F e B o o k B 6 2 0 0 S e r i e s S e c t i o n O n e
Getting to Know Your LifeBook
F e B o o k B 6 2 0 0 S e r i e s
Unpacking
Overview
TOP and Front Components
LEFT-SIDE Panel Components
RIGHT-SIDE Panel Components
Bottom Components
Rear Panel Components
Wireless LAN/Bluetooth On/Off Switch
External Video Port
LAN RJ-45 Jack
Power Indicator
Status Indicator Panel
AC Adapter Indicator
Battery Level Indicators
Wireless LAN/BLUETOOTH Device Access Indicator
Battery Charging Indicator
PC Card Access Indicators
Compact Flash CF Card Access Indicators
Keyboard
Series.book Page 16 Friday, May 19, 2006 300 PM
Clicking
DOUBLE-CLICKING
Dragging
Touchpad Control Adjustment
Touch Screen
Removing the Stylus
Dragging
Double-Clicking
Right-clicking
Calibrating the Touch Screen
Controlling the Volume
Volume Control
Passwords
Setting UP Your Security Panel
LifeBook Security Application Panel
Enter
Microsoft Windows XP Professional Edition
Uninstalling the Security Panel Application
Precautions
Operating Your Lifebook SECURITY/ Application Panel
Configuring your LifeBook Application Panel
Reinstalling the Security/Application Panel
User
Supervisor
Deactivating and Activating LifeBook Application Panel
Series.book Page 26 Friday, May 19, 2006 300 PM
Getting Started
F e B o o k B 6 2 0 0 S e r i e s S e c t i o n T h r e e
Connecting the Power Adapters
Power Sources
Connecting the Optional Auto/Airline Adapter
Connecting the AC Adapter
Display Panel
Adjusting Display Panel Brightness
Opening the Display Panel
Closing the Display Panel
Boot Sequence
Power on
Bios Setup Utility
Starting Your LifeBook Notebook
Bios Guide
Booting the System
Registering Your Lifebook Tablet PC
Registering Windows with Microsoft
Standby Mode
Power Management
SUSPEND/RESUME Button
Display Timeout
Hibernate Mode
Hard Disk Timeout
Windows Power Management
Click OK. Your notebook will shut down and then reboot
Power OFF
Series.book Page 36 Friday, May 19, 2006 300 PM
User-Installable Features
F e B o o k B 6 2 0 0 S e r i e s S e c t i o n F o u r
Low Battery State
Lithium ion Battery
Recharging the Batteries
Shorted Batteries
Replacing the Battery
Cold-swapping Batteries
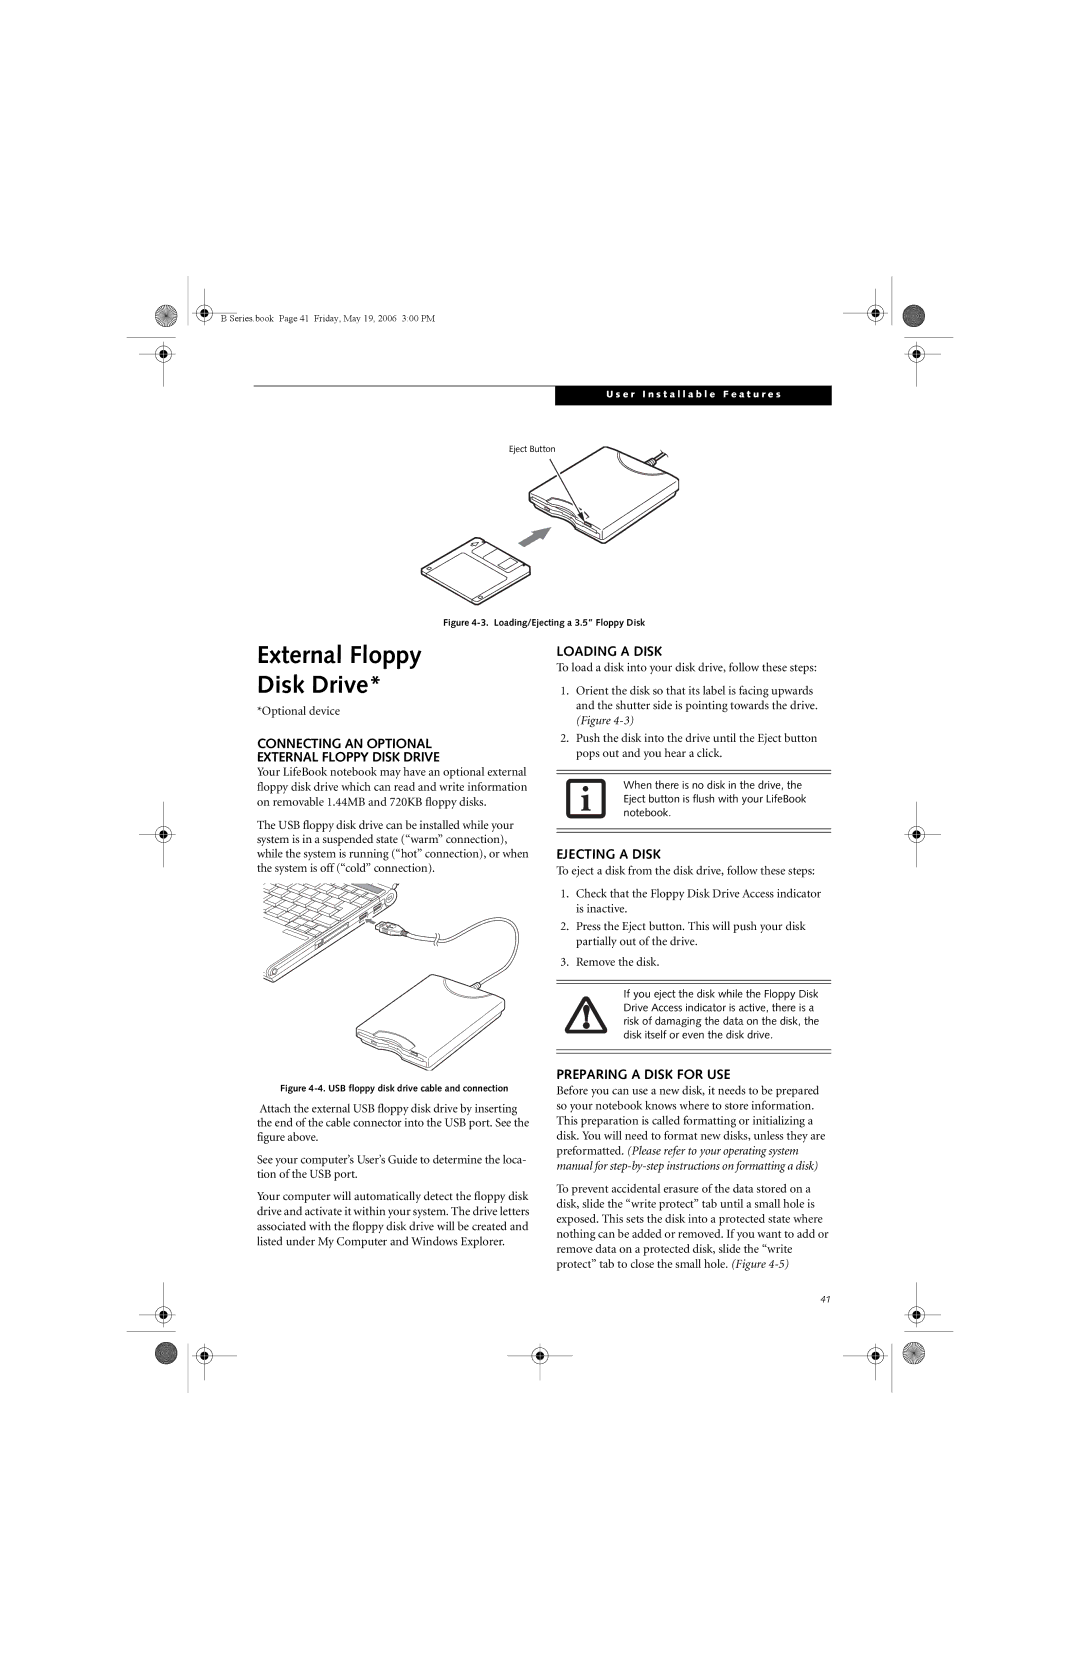
External Floppy Disk Drive
Connecting AN Optional External Floppy Disk Drive
Loading a Disk
Ejecting a Disk
Floppy Disk Write Protect
Inserting PC Cards
PC Cards
Removing PC Cards
Smart Card Reader
Inserting Compact Flash Cards
Compact Flash Cards
To remove a Compact Flash Card, follow these easy Steps
Removing Compact Flash Cards
Removing a Memory Module
Installing a Memory Module
Replace the cover and the screws
Checking the Computer Recognition NEW Memory Capacity
USB 2.0 Ports Qty
Port Replicator
Docking Port
Port Replicator Release Latch
15. Unlatching the Port Replicator
Device Ports
External Video Port
Series.book Page 52 Friday, May 19, 2006 300 PM
Troubleshooting
Series.book Page 54 Friday, May 19, 2006 300 PM
Identifying the Problem
Troubleshooting
Specific Problems
Using the Troubleshooting Table
Problem
Troubleshooting Table
Audio Problems
Port Replicator Problems
Memory Problems
Keyboard or Mouse Problems
Modem Problems
USB Device Problems
Power Failures
PC/CF Card Problems
Device does not seem to Work properly
Shutdown and Startup Problems
Resume button. See Power Sources on
See the Power On Self Test Post messages to
An error message is
Video Problems
Contact your support representative
Miscellaneous Problems
Power management time
Submenu, located within the Advanced menu
Your external monitor is not
Power on Self Test Messages
Modem Result Codes
Have been un-installed or corrupted
Re-Installing Individual Drivers and Applications
Boot Priority Change
Restoring the Factory Image
Procedure
Automatically Downloading Driver Updates
Check for updates now
About Fujitsu Driver Update
Series.book Page 66 Friday, May 19, 2006 300 PM
Care and Maintenance
F e B o o k B 6 2 0 0 S e r i e s S e c t i o n S i
Lifebook Notebook
Care and Maintenance
Batteries
Keyboard
Floppy Disks and Drives
Caring for your CDs
PC/CF Cards
Caring for your CD-ROM Drive
Caring for the Card Slots
Series.book Page 72 Friday, May 19, 2006 300 PM
Specifications
F e B o o k B 6 2 0 0 S e r i e s S e c t i o n S e v e n
Specifications
Power
Security Features
Dimensions and Weight
Popular Accessories
Learning about Your Software
PRE-INSTALLED Software
Series.book Page 78 Friday, May 19, 2006 300 PM
Glossary
F e B o o k B 6 2 0 0 S e r i e s S e c t i o n E i g h t
Glossary
Disk
Default Value
Disk Drive
Diskette
Ieee
Lithium ion Battery
Infrared
Infrastructure
Operating System
Reset
Partition
Peripheral Device
Wi-Fi Compatible
Status Indicator
Standby
Stereo audio
FCC Notices
Regulatory Information
Avis Aux Utilisateurs Du Réseau Téléphonique Canadien
Series.book Page 88 Friday, May 19, 2006 300 PM
Appendix a
Series.book Page 90 Friday, May 19, 2006 300 PM
FCC Regulatory Information
Wireless LAN Modes Using this Device
Before Using the Wireless LAN
Deactivating the Wlan Device
Wireless Network Considerations
Activating the Wlan Device
Configuration Using Atheros Client Utility Software
Configuration of the Wlan Device
Procedure
Flow of Operations
Setting TCP/IP
Setting the network
Connection to the Network
Confirming the computer and work group names
Setting the Microsoft network-sharing service
Setting the sharing function
Setting the file-sharing function
Confirming connection
Setting the printer-sharing function
Confirming the status of the radio
Unavailable
Troubleshooting the Wlan
Network
Connection
Glossary
Wireless LAN Glossary
Wi-Fi
Ssid Service Set Identifier
Subnet mask
TCP/IP Transmission Control Protocol/Internet Protocol
About IP Addresses
IP address information
Specification
What is Bluetooth
Using the Bluetooth Device
Where to Find Information About Bluetooth
Warranty
F e B o o k B 6 2 0 0 S e r i e s a p p e n d i x a 104
Appendix B
F e B o o k B 6 2 0 0 S e r i e s a p p e n d i x B 106
Installing the OmniPass Application
Installing Omnipass
Introducing Fingerprint Sensor Device
Getting Started
Master Password Concept
Uninstalling OmniPass
User Enrollment
Verifying Information about OmniPass
Password Replacement
Using Omnipass
OmniPass Authentication Toolbar
Remembering a Password
Logging in to a Remembered Site
Password Management
Identities and Password Management
Configuring Omnipass
OmniPass User Identities
Exporting and Importing Users
Omnipass Control Center
System Settings
Troubleshooting
Installing the TPM Applications
Trusted Platform Module Installation
Enabling the Security Chip in Bios
Getting Help
Boot Sequence Built-in Microphone CapsLock Indicator
Battery Pack Latches
LAN RJ-45 Jack LifeBook
Hard Disk Drive
Mass Storage Device Options
PC Card
Power Management Power On Self Test Power Specifications
Power
Port Video Volume control
Wireless LAN
F e B o o k B 6 2 0 0 S e r i e s I n d e 118
119
F e B o o k B 6 2 0 0 S e r i e s I n d e 120