Manuals
/
GE
/
Kitchen Appliance
/
Range
GE
49-8779, 164D3333P033
manual
Anti-Tip Bracket Installation, Leveling the Range, Final Check
Models:
164D3333P033
49-8779
1
52
60
60
Download
60 pages
19.36 Kb
49
50
51
52
53
54
55
56
Troubleshooting
Install
Timer On/Off
Indicator Lights
Note Aluminum Wiring
Warranty
Problem
Parts and Accessories
To Adjust the Thermostat
Oven Control Settings
Page 52
Image 52
Page 51
Page 53
Page 52
Image 52
Page 51
Page 53
Contents
GE Appliances
GE Answer Center
Owner’s Manual
JBP90 JBP95
Staple sales slip or cancelled check here
Congratulations You Are Now Part of the GE Family
Write the model and serial numbers here # #
drawer
GE & You A Service Partnership
Troubleshooting Tips
If You Need Service
Safety Information
IMPORTANT SAFETY NOTICE
IMPORTANT SAFETY INFORMATION. READ ALL INSTRUCTIONS BEFORE USING
or using a ventilation fan or hood
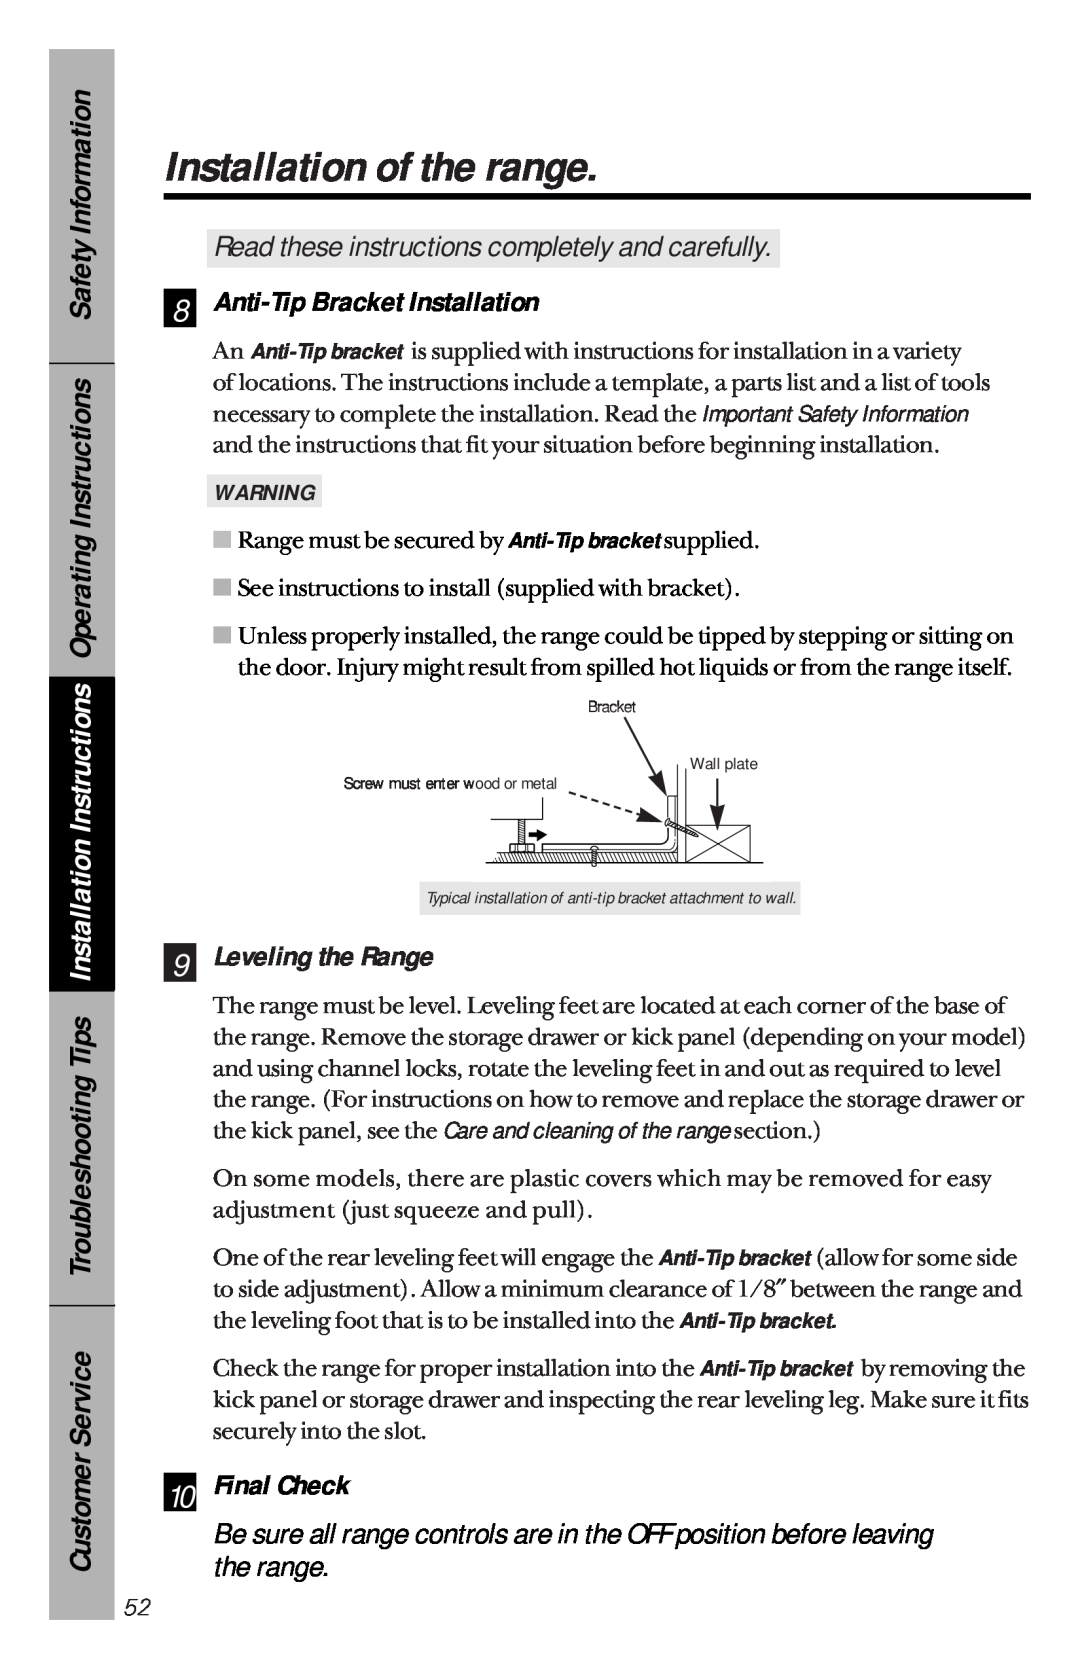
WARNING ANTI-TIP DEVICE
SAFETY PRECAUTIONS
Safety Information Operating
Safety Information
WHEN COOKING PORK…
Safety Information Operating Instructions Installation
OVEN
SELF-CLEANING OVEN
Instructions Safety Information
HALOGEN/RADIANT SURFACE UNITS
Always turn the surface units off before removing cookware
Customer Service
Instructions Safety Information
Cleaning the glass cooktop section
HALOGEN/RADIANT SURFACE UNITS
Using the surface units
Safety
How to Set
Indicator Lights
Instructions Operating Instructions Safety Information
Dual Surface Unit Switch
Differences Between Halogen and Radiant Units
Temperature Limiter
Selecting types of cookware
Stainless Steel
Aluminum
Copper Bottom
Using the oven controls
TIMER ON/OFF
STOP TIME
CLOCK
Oven Control Settings
AUTO SELF CLEAN
BROIL HI/LO Pad
CONV. ROAST Pad
Using the oven
Safety Information
D C B A
Operating Instructions
Preheating and Pan Placement
Safety Information Operating Instructions Installation Instructions
How to Set the Oven for Broiling
Aluminum Foil
Broiling guide
Shelf
First Side
Food
Using the clock and timer
Installation
To Set the Timer
To Reset the Timer
Using the timed baking and roasting features
How to Set an Immediate Start and Automatic Stop
How to Set a Delay Start and Automatic Stop
Make sure the oven clock shows the correct time of day
Using the probe
Instructions Safety
Information
Do not store the probe in the oven
How to set the oven for roasting when using the probe
You can use the timer even though you cannot use
Insert the probe into the meat
timed oven operations
Using the convection oven
The convection oven fan shuts off when the oven door is opened
Convection Bake
Convection Roast
Adapting Recipes…
Cookware for Convection Cooking
Paper and Plastic
Metal and Glass
Multi-Shelf Baking
How to Set the Oven for Convection Baking or Roasting
Troubleshooting
How to Set the Oven for Convection Roasting when Using the Probe
Convection roasting guide
Meats
Beef
Pork
Using the timed features for convection baking
Using the timed features for convection baking
Press the CLEAR/OFF pad to clear the display if
To Adjust the Thermostat
Adjust the oven thermostat-Do it yourself
Using the self-cleaning oven
Before a Clean Cycle
How to Set the Oven for Cleaning
Press the AUTO SELF CLEAN pad
How to Delay the Start of Cleaning
After a Clean Cycle
Care and cleaning of the range
or any reason, be sure the anti-tip device is
tipping of the range and cause injury
Control Panel and Knobs
Lift-Off Oven Door
To clean the inside of the door
To clean the outside of the door
Do not lift the door by the handle
Oven Light Replacement
Oven Heating Elements
the main fuse or circuit breaker panel
disconnect the electrical power to the range at
Panel to Clean Under the Range
Broiler Pan & Grid
How to Remove the Storage Drawer or Kick
To remove the storage drawer
Cooktop Surface Light
Sure Grip Handle
To remove
To replace
Cleaning the glass cooktop
Daily Cleaning
For heavy, burned-on soil
National Parts Center
Special Care
Installation of the range
Installation Instructions for future use
BEFORE BEGINNING INSTALLATION
Before You Begin
1 Prepare the Opening
install in either rear corner
Not less than the width
30 ″
2 Prepare for Electrical Connection
Flooring Under the Range
When moving the range on this type of flooring, it should be installed on a 1/4″ thick sheet of plywood or similar material as follows
3 Power Cord Strain Relief Installation
Connector block Neutral terminal Ground strap Power cord
4 3-Wire Power Cord Installation
Do NOT remove ground strap connection
Before
5 4-Wire Power Cord Installation
After
NOTE ALUMINUM WIRING
6 3-Wire Conduit Installation
a Do not connect aluminum wire to the connector block
7 4-Wire Conduit Installation
9 Leveling the Range
8 Anti-Tip Bracket Installation
10 Final Check
Before you call for service…
Troubleshooting Tips
Problem
Customer Service
See the Using the
See the Broiling guide
See the Adjust the oven
the Broiling guide
See the Using the clock
and timer section
Oven not clean
after a clean cycle
Excessive smoking
Oven door will
Before you call for service…
GE Electric Range Warranty
Troubleshooting Tips
We Will Replace, At No Charge To You
What GE Will Not Cover
Service Telephone Numbers
In-Home Repair Service 800-GE-CARES
TDD 800-TDD-GEAC
Special Needs Service
Top
Page
Image
Contents