Manuals
/
GE
/
Kitchen Appliance
/
Refrigerator
GE
PFSS6SMXSS Instructions Operating Instructions, Safety, Photos, Installation
Models:
PFSS6SMXSS
1
7
140
140
Download
140 pages
52.43 Kb
4
5
6
7
8
9
10
11
Troubleshooting
Specs
Install
Door Alarm
Warranty
Dimension
para configurar la temperatura
Problem
debe resetearse
access to the icemaker
Page 7
Image 7
Page 6
Page 8
Page 7
Image 7
Page 6
Page 8
Contents
Manuel d’utilisation et d’installation
Installation Instructions
Troubleshooting Tips
Owner’s Manual and Installation Instructions
Installation
IMPORTANT SAFETY INFORMATION READ ALL INSTRUCTIONS BEFORE USING
SAFETY PRECAUTIONS
Safety Instructions
Safety Instructions
HOW TO CONNECT ELECTRICITY
READ AND FOLLOW THIS SAFETY INFORMATION CAREFULLY
Troubleshooting Tips Consumer Support
Consumer
Operating Instructions Safety Instructions
Support Troubleshooting Tips
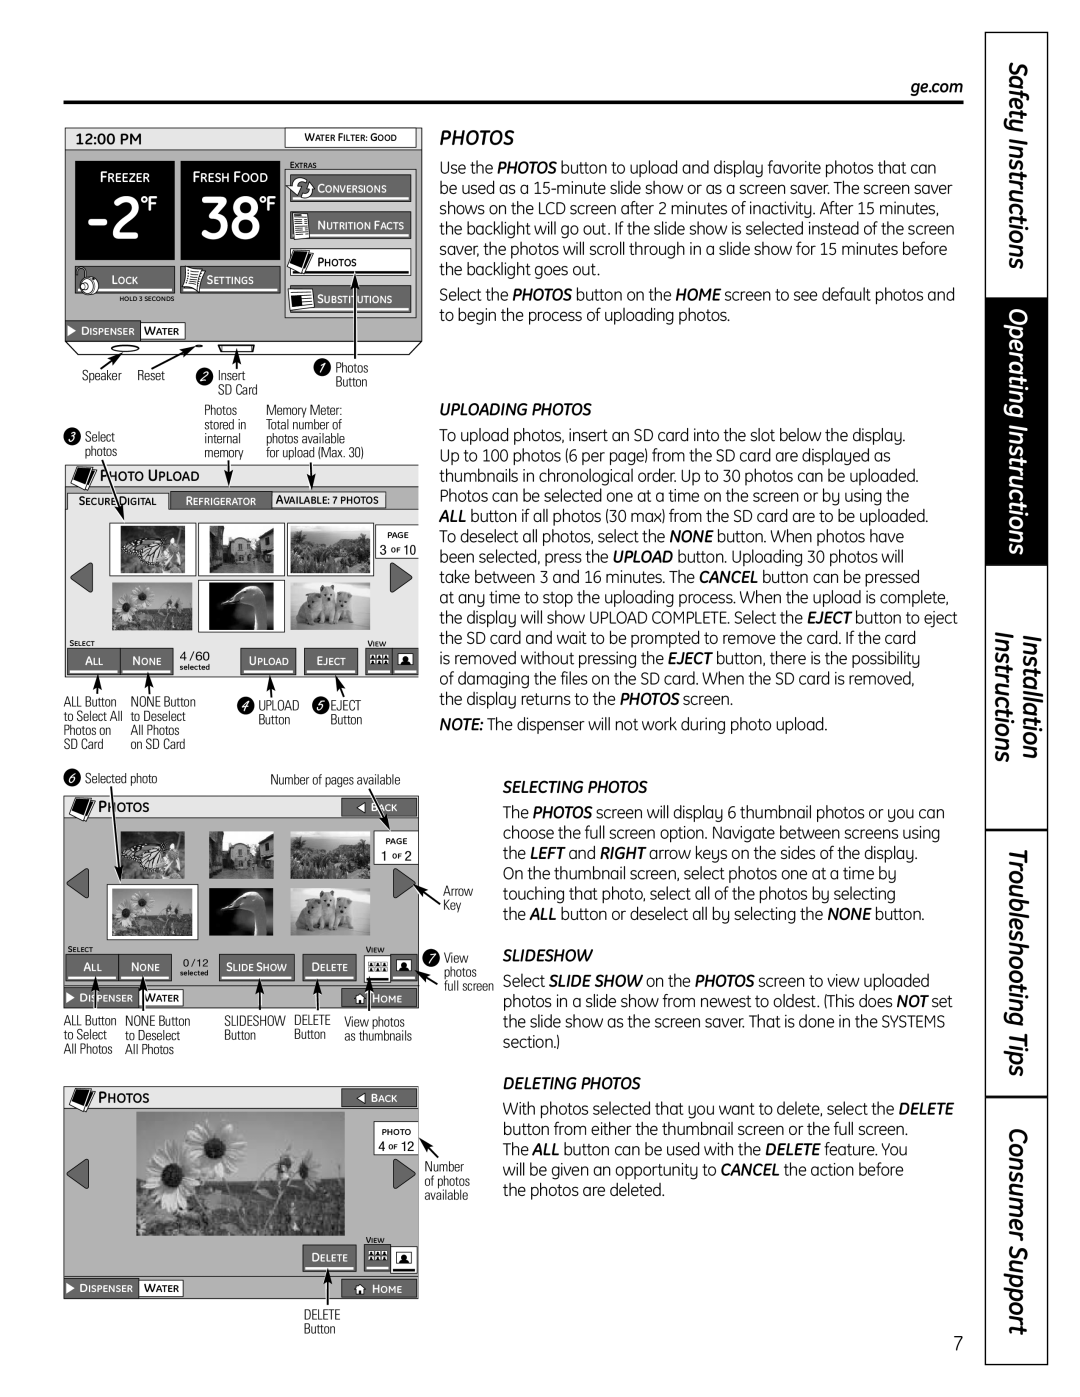
About the 7″ control panel for LCD models
Screen functions
Safety
A 2 F
38 S
NUTRITION FACTS
11/2
Instructions
CONVERSIONS
Instructions Operating Instructions
Safety
PHOTOS
SUBSTITUTIONS
Operating Instructions Safety
Troubleshooting Tips
SETTINGS
Tips Consumer Support
SETTINGS cont
Instructions Operating
Instructions
SYSTEM
B ACK SETTINGS cont
DOOR ALARM
Screen functions
DEFAULT
Troubleshooting Tips Consumer
Support
Instructions Safety
About the control with temperature settings for non-LCD models
Operating
Changing the Temperature
How it Works
Troubleshooting Tips Consumer Support
About TurboCool and TurboFreeze. Non-LCD models Only
Instructions
Tips
Troubleshooting
About Door Alarm
About the dispenser. Non-LCD models Only
Water Filter Cartridge
When to Replace the Filter
Installing the Filter Cartridge
About the water filter
Quick Space Shelf
About the fresh food storage options
Rearranging the Shelves
Spillproof Shelves
Non-Adjustable Bins on the Door
Safety Instructions Operating Instructions
Non-Adjustable Dairy Bin
Adjustable Bins on the Door
How to Remove and Replace Drawer Divider
Safety Instructions
Adjustable Deli/Produce Drawer
How to Remove and Replace the Adjustable Deli/Produce Drawer
Basket Removal
Non-Adjustable Bin in the Freezer
About the freezer
Freezer Basket and Drawer
Automatic Icemaker
About the automatic icemaker
ICE OFF LOCK
Instructions Operating Instructions
Care and cleaning of the refrigerator
Cleaning the Outside
Cleaning the Inside
Preparing for Vacation
Instructions Safety
Operating
Behind the Refrigerator
Freezer Light
Replacing the light bulbs
Operating Instructions
Refrigerator Lights
PREPARATION
Refrigerator
Profile Model
BEFORE YOU BEGIN
to Top of Hinge
Installation Instructions
DIMENSIONS
Overall Height
CLEARANCES
INSTALLING THE REFRIGERATOR
TWO PEOPLE move and complete this installation
REFRIGERATOR LOCATION
4 ATTACH THE FREEZER DOOR HANDLE
3 ATTACH THE FRESH FOOD DOOR HANDLE
Stainless steel handle
5 REMOVE THE REFRIGERATOR DOORS
Installation Instructions INSTALLING THE REFRIGERATOR cont
6 REPLACING THE REFRIGERATOR DOORS
D E F G H
REMOVE THE FREEZER DOOR
REPLACING THE REFRIGERATOR DOORS
cont
ATTACH AND SECURE THE DRAWER FRONT TO THE SLIDES
7 REMOVE THE FREEZER DOOR cont
8 REPLACING THE FREEZER DOOR
8 REPLACING THE FREEZER DOOR cont
11 PLUG IN THE REFRIGERATOR
9 CONNECTING THE REFRIGERATOR TO THE HOUSE WATER LINE
9 CONNECTING THE REFRIGERATOR TO THE HOUSE WATER LINE cont
10 TURN ON THE WATER SUPPLY
the refrigerator, counterclockwise to lower it
12 LEVEL THE REFRIGERATOR
13 LEVEL THE REFRIGERATOR DOORS
The leveling legs have 2 purposes
16 REMOVE PACKAGING
14 LEVEL THE FREEZER DOOR
14 LEVEL THE FREEZER DOOR cont
15 SET THE CONTROLS
WHAT YOU WILL NEED
Installation Instructions INSTALLING THE WATER LINE
For Non-LCD Models If the refrigerator
2 CHOOSE THE VALVE LOCATION
Power drill 1/2″ or adjustable wrench
WHAT YOU WILL NEED CONT
1 SHUT OFF THE MAIN WATER SUPPLY
5 TIGHTEN THE PIPE CLAMP
Installation Instructions INSTALLING THE WATER LINE CONT
4 FASTEN THE SHUTOFF VALVE
7 CONNECT THE TUBING TO THE VALVE
Modern refrigerators have more features and use newer technology
Before you call for service…
Safety Instructions Operating Instructions
Troubleshooting Tips Consumer Support
set at the coldest setting
Consumer Support Troubleshooting Tips
Normal when refrigerator
Often occurs when large
Problem
Operating Instructions Safety Instructions
Problem
Troubleshooting Tips
With Service Protection Plus you can expect
GE Service Protection Plus
Warranty Registration Department P.O. Box Louisville, KY
General Electric Company
Serial Number
Follow these three steps to protect your new appliance investment
Model Number
Serial Number
Veuillez mettre dans une enveloppe et envoyez à
OWNERSHIP REGISTRATION P.O. BOX MISSISSAUGA, ONTARIO L4Y 4G1
FOR CANADIAN CONSUMERS ONLY
Please place in envelope and mail to
Page
Troubleshooting
Refrigerator Warranty. For customers in the United States
All warranty service provided by our Factory Service Centers
calling for service
WHAT IS NOT COVERED
CUSTOMER WARRANTY
TERMS AND CONDITIONS
Special Notices
Performance Data Sheet
Operating Specifications
General Installation/Operation/Maintenance Requirements
State of California
Department of Health Services
Certificate Number
Water Treatment Device
Soutien au consommateur
Mesures de sécurité Fonctionnement Installation
Installation
Fonctionnement
DANGER! RISQUES POUR LES ENFANTS
Fonctionnement Installation
COMMENT VOUS DÉBARRASSER CONVENABLEMENT DE VOTRE ANCIEN RÉFRIGÉRATEUR
AVERTISSEMENT
Fonctionnement
RACCORDEMENT ÉLECTRIQUE
VEUILLEZ LIRE ET SUIVRE ATTENTIVEMENT CES MESURES DE SÉCURITÉ
CONSERVEZ CES DIRECTIVES
1247 PM
Fonctionnement Mesures de sécurité Installation dépannage
Au sujet du panneau de contrôle 18 cm 7 po pour les modèles ACL
L’écran Home écran principal
congélateur
Fonctions de l’écran
Mesures
Écran Home écran principal
Conseils de dépannage
sécurité
Mesures de
Fonctionnement
DIAPORAMA
Mesures de sécurité Fonctionnement Installation Conseils de dépannage
CHARGEMENT DE PHOTOS
SÉLECTION DES PHOTOS
RÉGLAGES
Fonctions d’écran
Fonctionnement Mesures de
Conseils de dépannage consommateur
RÉGLAGES suite
de sécurité Fonctionnement
Conseils de
Fonctions de l’écran
sécurité
Mesures
de sécurité Fonctionnement
Conseils de dépannage
Changement de la température
Installation
de sécurité
Fonctionnement Mesures
Modèles sans ACL uniquement
Au sujet de TurboCool et TurboFreeze
Fonctionnement
Soutien au consommateur
Alarme de porte
MISE EN GARDE
Au sujet du distributeur. Modèles sans ACL uniquement
MISE EN GARDE S’il y
Remplacement du filtre
Installation de la cartouche du filtre à eau
Le filtre à eau
Clayettes anti-déversement
Fonctionnement Mesures de sécurité Installation
À propos des options de conservation du réfrigérateur
Mise en place des clayettes
Remise en place ou changement de place
Bac non réglable à produits laitiers
Bacs réglables de porte
Bacs non-réglables de porte
Conseils de
Bacs à rangement et bacs à légume
Fonctionnement Mesures de sécurité
dépannage
Conseils de dépannage
Congélateur
AVERTISSEMENT Faites
Mesures de sécurité
une livraison de glaçons
Machine à glaçons automatique
du modèle ne comportant pas d’écran ACL
Nettoyage de l’extérieur
Entretien et nettoyage de votre réfrigérateur
Nettoyage de l’intérieur
Déménagement
Fonctionnement Mesures de
Derrière le réfrigérateur
Départ en vacances
Lumières du compartiment réfrigération
Remplacement des ampoules
MISE EN GARDE
Fonctionnement
Profile Modèle
Niveau de compétence - L’installation
DÉPLACEMENT DU RÉFRIGÉRATEUR À L’INTÉRIEUR DE LA MAISON
Réfrigérateur
de la charnière
Instructions d’installation
Hauteur hors tout
jusqu’au-dessus
DÉGAGEMENTS
Instructions d’installation INSTALLATION DU RÉFRIGÉRATEUR
EMPLACEMENT DU RÉFRIGÉRATEUR
1 ENLEVEZ LA POIGNÉE DE PORTE
Poignées en acier inoxydable et en matière plastique
3 FIXEZ LA POIGNÉE DE LA PORTE
DU COMPARTIMENT ALIMENTS FRAIS
4 FIXEZ LA POIGNÉE DE LA PORTE DU COMPARTIMENT CONGÉLATION
6 REMONTAGE DES PORTES DU RÉFRIGÉRATEUR
Instructions d’installation INSTALLATION DU RÉFRIGÉRATEUR suite
5 DÉMONTAGE DES PORTES DU RÉFRIGÉRATEUR
5 DÉMONTAGE DES PORTES DU RÉFRIGÉRATEUR suite
Rebranchez les deux connecteurs de chaque côté
REMONTAGE DES PORTES DU RÉFRIGÉRATEUR suite
7 DÉMONTAGE DE LA PORTE DU CONGÉLATEUR
Insérez la broche de la charnière supérieure dans
8 REMONTAGE DE LA PORTE DU CONGÉLATEUR
MISE EN GARDE Assurez-vous
FIXEZ ET SERREZ L’AVANT DU TIROIR AUX GLISSIÈRES
7 DÉMONTAGE DE LA PORTE DU CONGÉLATEUR suite
REMISE EN PLACE DU BAC DE CONGÉLATEUR
10 OUVREZ L’ALIMENTATION D’EAU
11 BRANCHEZ LE CORDON DU RÉFRIGÉRATEUR DANS LA PRISE
suite
13 NIVELLEMENT DES PORTES DU RÉFRIGÉRATEUR
MISE EN GARDE
12 METTEZ LE RÉFRIGÉRATEUR DE NIVEAU
Les pieds de nivellement jouent deux rôles
16 ENLEVEZ LES MATÉRIAUX D’EMBALLAGE
15 RÉGLEZ LES COMMANDES
14 NIVELLEMENT DE LA PORTE DU CONGÉLATEUR
14 NIVELLEMENT DE LA PORTE DU CONGÉLATEUR suite
Pour les modèles pourvus d’un écran ACL
Instructions d’installation INSTALLATION DE LA CONDUITE D’EAU
CE DONT VOUS AUREZ BESOIN
Pour les modèles non équipés d’un écran ACL
3 PERCEZ UN TROU POUR LE ROBINET
2 CHOISISSEZ L’EMPLACEMENT DU ROBINET
CE DONT VOUS AUREZ BESOIN suite
1 FERMEZ L’ALIMENTATION PRINCIPALE D’EAU
7 BRANCHEZ LE TUYAU AU ROBINET
Instructions d’installation INSTALLATION DE LA CONDUITE D’EAU SUITE
à l’étape 9 de la section Installation du réfrigérateur
4 FIXEZ LE ROBINET D’ARRÊT
CLICS et CLAQUEMENTS
Bruits de fonctionnement normaux
HUMMM
OUIR
Conseils de dépannage consommateur
Avant d’appeler un réparateur…
Problème
Mesures de sécurité Fonctionnement Installation
Problème
du filtre d’eau a changé
pour la clientèle au Canada
GARANTIE DU CLIENT
TERMES ET CONDITIONS
EXCLUSIONS DE LA GARANTIE
Avis spéciaux
Exigences générales d’installation/opération/entretien
Feuillet de données relatives à la performance
Spécifications d’opération
Studio de conception réaliste
Service de réparations
Pièces et accessoires
Soutien au consommateur
Instrucciones de instalación
Solucionar problemas Servicio al consumidor
Seguridad Operación Instalación
Información de seguridad . . . . . . 96 Instrucciones de operación
LEA PRIMERO TODAS LAS INSTRUCCIONES
¡ADVERTENCIA
¡PELIGRO! RIESGO DE QUE UN NIÑO PUEDA QUEDAR ATRAPADO
INFORMACIONES IMPORTANTES DE SEGURIDAD
Operación
COMO CONECTAR LA ELECTRICIDAD
FAVOR DE LEER Y SEGUIR CUIDADOSAMENTE LAS PRECAUCIONES DE SEGURIDAD
GUARDE ESTAS INSTRUCCIONES
Operación
Instalación problemas
Sobre el panel de control de 7” para modelos de LCD
Seguridad
Flechas para arriba y abajo
Funciones de la pantalla
Pantalla HOME Inicio
para configurar la temperatura
al consumidor
Solucionar problemas
CONVERSIONES
DATOS DE NUTRICIÓN
FOTOS
problemas Servicio
Solucionar
al consumidor
SUSTITUCIONES
Instalación Servicio al consumidor Solucionar problemas
CONFIGURACIONES
Seguridad
CONFIGURACIONES cont
problemas Servicio al consumidor
Solucionar
Operación
Solucionar problemas Servicio al consumidor
Instalación
Servicio al consumidor Solucionar problemas
Los controles con niveles
de temperaturas para modelos que no son de LCD
Cómo funciona
Acerca de TurboCool y TurboFreeze
Para trabar y destrabar el dispensador
Sobre la alarma de la puerta
El dispensador
PRECAUCIÓN
Instalar el cartucho del filtro
El filtro de agua
Cartucho del filtro
Reemplazar el filtro
Estante para espacio rápido
Sobre las opciones de almacenamiento de alimentos frescos
Reorganización de los estantes
Estantes a prueba de salpicaduras
Compartimientos ajustables en la puerta
Gaveta para lácteos no ajustable
Compartimientos no ajustables en la puerta
Gaveta preservadora de frutas y vegetales
problemas
Sobre las gavetas preservadoras y contenedores
PRECAUCIÓNNo guarde
Estantes y canastas del congelador
Solucionar problemas Servicio
Sobre el congelador
ADVERTENCIANo pierda
la sección Funciones de pantalla de
Servicio al consumidor Solucionar problemas
Sobre la máquina de hielo automática
Máquina de hielo automática
el acabado de pintura
Cuidado y limpieza del refrigerador
Limpiar el exterior
Limpiar el interior
Preparación para vacaciones
Atrás del refrigerador
En caso de mudanza
Las bombillas podrían estar calientes
Cómo reemplazar las bombillas
Luces del refrigerador
Luz del congelador
PREPARACIÓN
Refrigerador
Profile Modelo
ANTES DE INICIAR
70 ″ 177,8 cm
DIMENSIONES
Instrucciones para la instalación
Altura total hasta
PARA QUITAR LAS PUERTAS DEL REFRIGERADOR
Instrucciones para la instalación INSTALACIÓN DEL REFRIGERADOR
UBICACIÓN DEL REFRIGERADOR
ESPACIO LIBRE
3 SUJETE LA MANIJA DE LA PUERTA DE ALIMENTOS FRESCOS
4 SUJETE LA MANIJA DE LA PUERTA DEL CONGELADOR
5 CÓMO QUITAR LAS PUERTAS DEL REFRIGERADOR cont
Instrucciones para la instalación INSTALACIÓN DEL REFRIGERADOR cont
PRECAUCIÓN Cuando quita
5 CÓMO QUITAR LAS PUERTAS DEL REFRIGERADOR
de la bisagra superior
7 QUITE LA PUERTA DEL CONGELADOR
CÓMO VOLVER A COLOCAR LAS PUERTAS DEL REFRIGERADOR cont
Introduzca el perno de la bisagra superior dentro
CONECTE Y SUJETE EL FRENTE DEL CAJÓN A LOS DESLIZADORES
PRECAUCIÓNAsegúrese
7 QUITE LA PUERTA DEL CONGELADOR
8 CÓMO VOLVER A COLOCAR LA PUERTA DEL CONGELADOR cont
9 CÓMO CONECTAR EL REFRIGERADOR
A LA LÍNEA DE AGUA DE LA CASA
10 ACTIVE LA CONEXIÓN DE AGUA
11 CONECTE EL REFRIGERADOR
posibles lesiones personales o daños
PRECAUCIÓN Para evitar
12 CÓMO NIVELAR EL REFRIGERADOR
Las patas niveladoras tienen dos propósitos
16 RETIRE EL EMBALAJE INICIE LA MÁQUINA DE HIELO
15 AJUSTE LOS CONTROLES
14 CÓMO NIVELAR LA PUERTA DEL CONGELADOR
14 CÓMO NIVELAR LA PUERTA DEL CONGELADOR cont
el tiempo y causarán daños en su casa debido al agua
Instrucciones para la instalación INSTALACIÓN DE LA TUBERÍA DEL AGUA
QUÉ NECESITA
Kit de tubería de cobre para el refrigerador
3 PERFORE EL ORIFICIO PARA LA VÁLVULA
QUÉ NECESITA CONT
1 CIERRE EL SUMINISTRO PRINCIPAL DE AGUA
2 SELECCIONE LA UBICACIÓN DE LA VÁLVULA
5 APRIETE LA ABRAZADERA DEL TUBO
INSTALACIÓN DE LA TUBERÍA DEL AGUA cont
4 INSTALE LA VÁLVULA DE APAGADO
7 CONECTE LA TUBERÍA A LA VÁLVULA
Antes de solicitar un servicio…
Solucionar problemas
Problema
Sonidos normales de la operación
Espere 24 horas para que el refrigerador se enfríe
Las patas niveladoras
requieren un ajuste
Es normal cuando
Causas Posibles
Solucionar problemas Servicio al consumidor
Problema
Seguridad Operación Instalación
Seguridad Operación Instalación
El indicador de filtro de agua
debe resetearse
Esto es normal
Ver Sobre el filtro de agua para más información
Lo que GE no cubrirá
Servicio al consumidor Solucionar
Garantía del Refrigerador. Para consumidores en los EE.UU
Por el período de GE reemplazará
Factores de 100% incorporados para la utilización no medida
Especificaciones de Operación
Requerimientos Generales de Instalación/Operación/Mantenimiento
Avisos Especiales
Notas
Garantías ampliadas
Servicio al consumidor
Página Web de GE Appliances
Solicite una reparación
GE Appliances Website
Schedule Service
Parts and Accessories
Consumer Support
Top
Page
Image
Contents