A P P E N D I X
A
A D VA N C E D C O N N E C T I O N S
This Chapter will show you how to connect additional components,
such as a cable box, stereo, or satellite receiver, to your
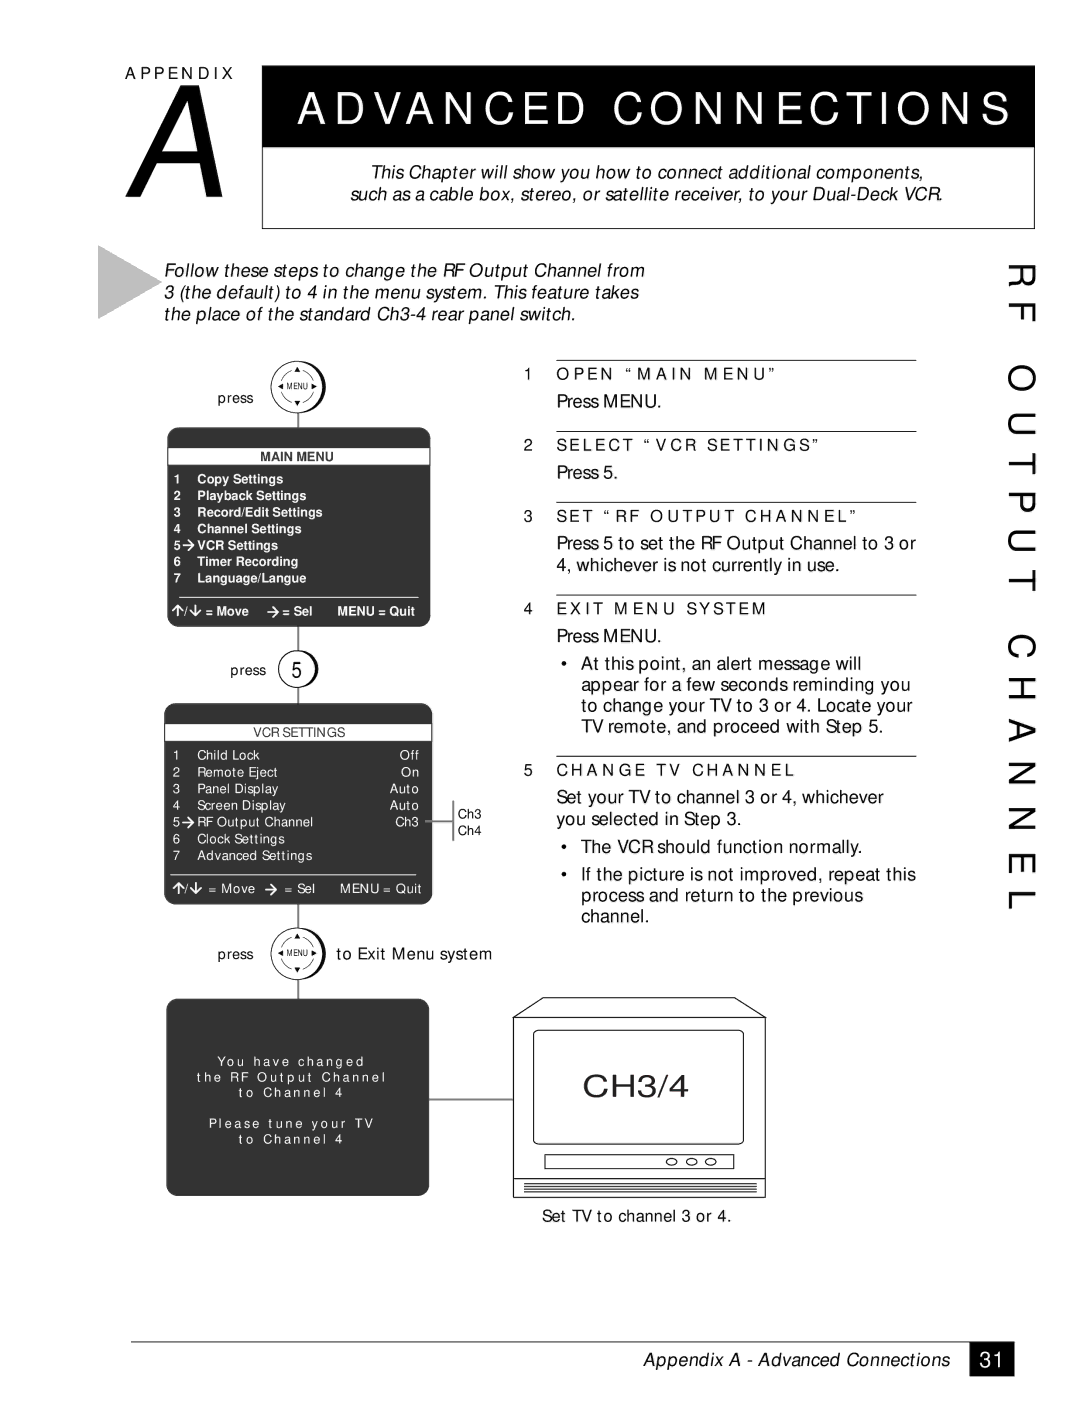
Follow these steps to change the RF Output Channel from 3 (the default) to 4 in the menu system. This feature takes the place of the standard
R F
![]() MENU
MENU ![]()
press
MAIN MENU
1 | Copy Settings |
| |
2 | Playback Settings |
| |
3 | Record/Edit Settings |
| |
4 | Channel Settings |
| |
5 | VCR Settings |
|
|
6 | Timer Recording |
| |
7 | Language/Langue |
| |
/ | = Move | = Sel | MENU = Quit |
| press | 5 |
|
VCR SETTINGS
1 | Child Lock |
| Off |
| |
2 | Remote Eject |
| On |
| |
3 | Panel Display |
| Auto |
| |
4 | Screen Display | Auto | Ch3 | ||
5 | RF Output Channel | Ch3 | |||
Ch4 | |||||
6 | Clock Settings |
|
| ||
|
|
| |||
7 | Advanced Settings |
|
| ||
/ | = Move | = Sel | MENU = Quit |
| |
| press | MENU | to Exit Menu system | ||
|
| ||||
| Yo u h a v e c h a n g e d |
| |||
| t h e R F O u t p u t C h a n n e l |
| |||
| t o C h a n n e l | 4 |
| ||
| P l e a s e t u n e y o u r T V |
| |||
| t o C h a n n e l | 4 |
| ||
1O P E N “ M A I N M E N U ”
Press MENU.
2S E L E C T “ V C R S E T T I N G S ”
Press 5.
3S E T “ R F O U T P U T C H A N N E L ”
Press 5 to set the RF Output Channel to 3 or 4, whichever is not currently in use.
4E X I T M E N U S Y S T E M
Press MENU.
•At this point, an alert message will appear for a few seconds reminding you to change your TV to 3 or 4. Locate your TV remote, and proceed with Step 5.
5C H A N G E T V C H A N N E L
Set your TV to channel 3 or 4, whichever you selected in Step 3.
•The VCR should function normally.
•If the picture is not improved, repeat this process and return to the previous channel.
CH3/4
O U T P U T C H A N N E L
Set TV to channel 3 or 4.
Appendix A - Advanced Connections
31