Troubleshooting
7 Troubleshooting
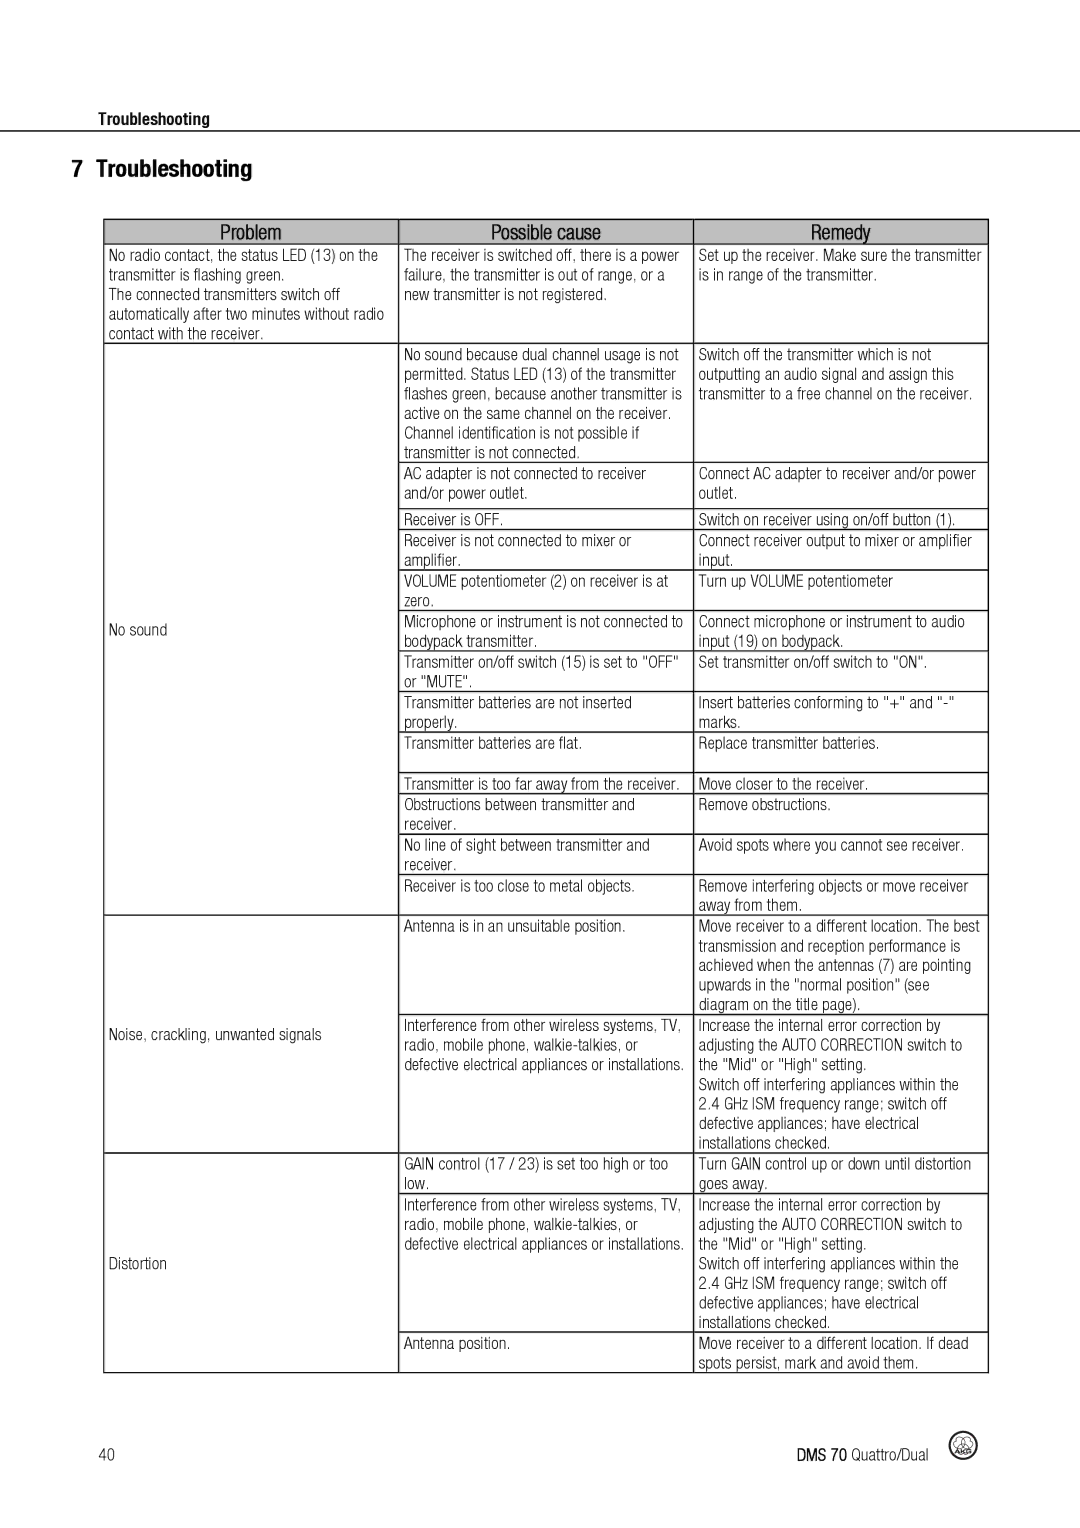
Problem | Possible cause | Remedy | |
No radio contact, the status LED (13) on the | The receiver is switched off, there is a power | Set up the receiver. Make sure the transmitter | |
transmitter is flashing green. | failure, the transmitter is out of range, or a | is in range of the transmitter. | |
The connected transmitters switch off | new transmitter is not registered. |
| |
automatically after two minutes without radio |
|
| |
contact with the receiver. |
|
| |
| No sound because dual channel usage is not | Switch off the transmitter which is not | |
| permitted. Status LED (13) of the transmitter | outputting an audio signal and assign this | |
| flashes green, because another transmitter is | transmitter to a free channel on the receiver. | |
| active on the same channel on the receiver. |
| |
| Channel identification is not possible if |
| |
| transmitter is not connected. |
| |
| AC adapter is not connected to receiver | Connect AC adapter to receiver and/or power | |
| and/or power outlet. | outlet. | |
|
|
| |
| Receiver is OFF. | Switch on receiver using on/off button (1). | |
| Receiver is not connected to mixer or | Connect receiver output to mixer or amplifier | |
| amplifier. | input. | |
| VOLUME potentiometer (2) on receiver is at | Turn up VOLUME potentiometer | |
| zero. |
| |
No sound | Microphone or instrument is not connected to | Connect microphone or instrument to audio | |
bodypack transmitter. | input (19) on bodypack. | ||
| |||
| Transmitter on/off switch (15) is set to "OFF" | Set transmitter on/off switch to "ON". | |
| or "MUTE". |
| |
| Transmitter batteries are not inserted | Insert batteries conforming to "+" and | |
| properly. | marks. | |
| Transmitter batteries are flat. | Replace transmitter batteries. | |
|
|
| |
| Transmitter is too far away from the receiver. | Move closer to the receiver. | |
| Obstructions between transmitter and | Remove obstructions. | |
| receiver. |
| |
| No line of sight between transmitter and | Avoid spots where you cannot see receiver. | |
| receiver. |
| |
| Receiver is too close to metal objects. | Remove interfering objects or move receiver | |
|
| away from them. | |
| Antenna is in an unsuitable position. | Move receiver to a different location. The best | |
|
| transmission and reception performance is | |
|
| achieved when the antennas (7) are pointing | |
|
| upwards in the "normal position" (see | |
|
| diagram on the title page). | |
Noise, crackling, unwanted signals | Interference from other wireless systems, TV, | Increase the internal error correction by | |
radio, mobile phone, | adjusting the AUTO CORRECTION switch to | ||
| |||
| defective electrical appliances or installations. | the "Mid" or "High" setting. | |
|
| Switch off interfering appliances within the | |
|
| 2.4 GHz ISM frequency range; switch off | |
|
| defective appliances; have electrical | |
|
| installations checked. | |
| GAIN control (17 / 23) is set too high or too | Turn GAIN control up or down until distortion | |
| low. | goes away. | |
| Interference from other wireless systems, TV, | Increase the internal error correction by | |
| radio, mobile phone, | adjusting the AUTO CORRECTION switch to | |
| defective electrical appliances or installations. | the "Mid" or "High" setting. | |
Distortion |
| Switch off interfering appliances within the | |
|
| 2.4 GHz ISM frequency range; switch off | |
|
| defective appliances; have electrical | |
|
| installations checked. | |
| Antenna position. | Move receiver to a different location. If dead | |
|
| spots persist, mark and avoid them. |
40 | DMS 70 Quattro/Dual |