H4D-60 H4D-50 MS H4D-40 H4D-31
N T E N T S
Flash /strobe 117
Welcome to Hasselblad
Medium Format digital capture advantage
H4D features in abundance
An impressive lens line
Two modes of operation and storage
True Focus
Accessories
Instant Approval Architecture
Hasselblad’s unique natural colors
Phocus
Computer system requirements
H4D models
Live Video functionality is not enabled
Temporary restrictions − Fall / Autumn
GB CF card holds 60 images on average
GB CF card holds 75 images on average
General overview
Controls and displays
ON.OFF PROFILES/ESC button
Drive Battery status
White balance IAA rating Storage medium
Optional
White balance
Daylight Centre weighted
Metering method setting
Shutter speed setting
Exposure method indication
Focus Assist LED Flash LED
See under Sensor unit − introduction
For details
Buttons and controls − details
Rear control wheel
Format button
AE-L button
UP button
Eyesight correction adjustment wheel
EV correction adjustment button
Audio feedback
EXP button
Saving settings changes on the grip
‘Quick save’ half- press shutter release button
Camera Body
Modular design
Rechargeable battery grip
Fitting and removing a battery
Battery charger
‘battery’ in this manual
Charging the battery
Rechargeable battery grip general
Reserve lithium-battery grip
Battery life 11, 12
Rechargeable battery grip precautions
Following precautions should be followed
Power
Battery status rechargeable battery only
Standby
Accessory connection
PC-connector
Viewfinder screen
Protective base plate
Viewfinder
Eyepiece adjustment
Parts and components - HVD 90x & HV 90x-II
Attaching and removing the viewfinder
Rubber eye cup
Nation with CF Adapter optional accessory
Lenses
Parts and components
Infrared focus settings
Stop down / depth-of-field
Focus assist 10, 11
HCD lenses were formulated for use with the smaller size
Manual focus mode
Autofocus override in Manual mode
Manual focus
Autofocus
Continuous
Autofocus mode setting
Manual override in autofocus mode
Focus setting is approximately 2.5m
True Focus and Absolute Position Lock
True Focus
Activated by shutter release button True Focus retained
Light Metering Exposure Control
Extremely accurate light metering
Press Save ISO/WB button to save the setting
Light metering and exposure control
ISO & White Balance button
Daylight, Shade, Cloudy, Flash, Fluorescent and Tungsten
Centre Weighted CentreSpot
Metering method
Exposure method
Selecting metering method
Manual Exposure M
Automatic Exposure A, S, P, Pv
‘+ 0.7’ above the scale in the display, as in illustration
See later section on Exposure compensation
Locked setting, the aperture and shutter speed become
AE- L button 3, 4, 5
section under Flash . The AE-Lbutton can
H4D
Exposure compensation/Quick Adjust
Exposure compensation facility, for both manual
Press the +/- button on the viewfinder
Profiles
Profiles
Making a profile
Using profiles
See section Image Info 4.2 for procedure details
Changing a profile name
Proceed as follows
Sensor unit
Introduction
Introduction
Optimize its use see later section for details
Parts, components & control panel buttons
Safety catch
FireWire connector
Databus connectors FireWire connector
Busy-light
Menu button will then confirm the new setting
Schematic view of sensor unit menu
Menu
Initial settings
General sensor unit overview
Setting the menu language
Getting started
Capture storage
Capture destination
H4D can store captures in two ways
Inserting a card
Removing a card
Formatting
Format on sensor unit menu
Select Main Menu Storage Format
Connecting to a computer
Tethered to a computer
Shooting with Phocus running
Photoshop, for example
Getting started
Settings check
White balance / Grey balance setting
To set the ISO on the grip
To set the ISO on the sensor unit
To select a preset white balance
To set the white balance on the grip
To set the white balance on the sensor unit
Changes are only displayed on the sensor unit when
3b4b
Button function list for details
Browsing images
Basic image browsing
Browsing
Zooming in and out
Zooming in for more detail
Thumbnail views
Browsing by IAA approval status
Viewing modes
Preview Modes
Choosing the Preview mode
Preview Modes
Histogram and full details
Histogram Mode
Using the histogram
Underexposure
Even exposure
Full Details Mode
Battery-Saver Mode
Full-Screen Mode
Overexposure indicator
IAA
Using Instant Approval Architecture
Standard Instant Approval workflow
Details
Interface Sound
Default approval status
Setting the default status
To change the default status assigned to each new image
Green approved
Browsing by approval status
Promoted to green or demoted red
There are two ways to set the browse filter
Deleting by approval status
File storage
Working with batches
Introductory overview
Navigating to batches and media
When you create a new batch, you assign a name to it
Using the Year/Month/Day convention
Organizing work with batches
Creating a new batch
To view batches using the browse controls
Navigating batches
Example nine-thumbnail view
Deleting images
H4D
Delete
Deleting single images
Select Main Menu Storage
Deleting several images from a batch
Deleting several images from a card
To delete several images from a selected batch
To delete several images at once
Transferring images
Transferring to a computer
Press to open the Delete Image dialog
Use and to select All Red, All Red & Yellow or All
Settings
Power Down
User Interface
User interface menu items
Language
Setting the options under the user interface menu
Default
To reset all settings
Camera
About
Custom Options
Selecting an option
Tilt sensor
Menu Ctrl
Use with view cameras
Model setting variations
Navigating the Camera settings
Use with view / large format cameras
Flash sync For use with view cameras
Setting Camera model and options
Shutter Delay
Options available for Pinhole and Flash Sync
Exposure Time
Press either + or to make an exposure time setting
Press either the + or button to select Pinhole
Before the first capture in the sequence
Capture in the sequence
Custom settings
Self timer options
Interval Settings options Options
Text setting
General overview of camera menu
Menu charts general
Symbols used in the illustrations
Obvious than the written explanation implies
By pressing AF button on grip
Self Timer
Self timer, Bracketing, Interval timer, Settings and Drive
Self timer setting
Mirror sequence Mirror Up / Mirror Goes Down
Mirror goes down =
Mirror raised =
Bracketing
Bracketing setting
Interval setting
Second 1 hour
Interval on’
Settings / 4.1 Custom Options
1 Custom options
Self Timer Bracketing Mirror up
10s 5s 15s 30s
Step
Clockwise Counter clockwise
No Yes
On Off
Half press Always Off
Ext flash Camera Off
All controls Wheels Off
Exit Stay
None 2s 10s 60s Interval time
Normal Light meter
‘light meter’ type
Ms 100 ms 200 ms None 25 ms
Customizable button function list
Press the Menu button
Text setting
Date & Time
Changing text an example
Turn the front control wheel to access System Status
4 System status
Follows
Press the Enter ISO/WB button on the grip
Camera active mode
Drive
Single and Continuous
Turn the front control wheel to Drive
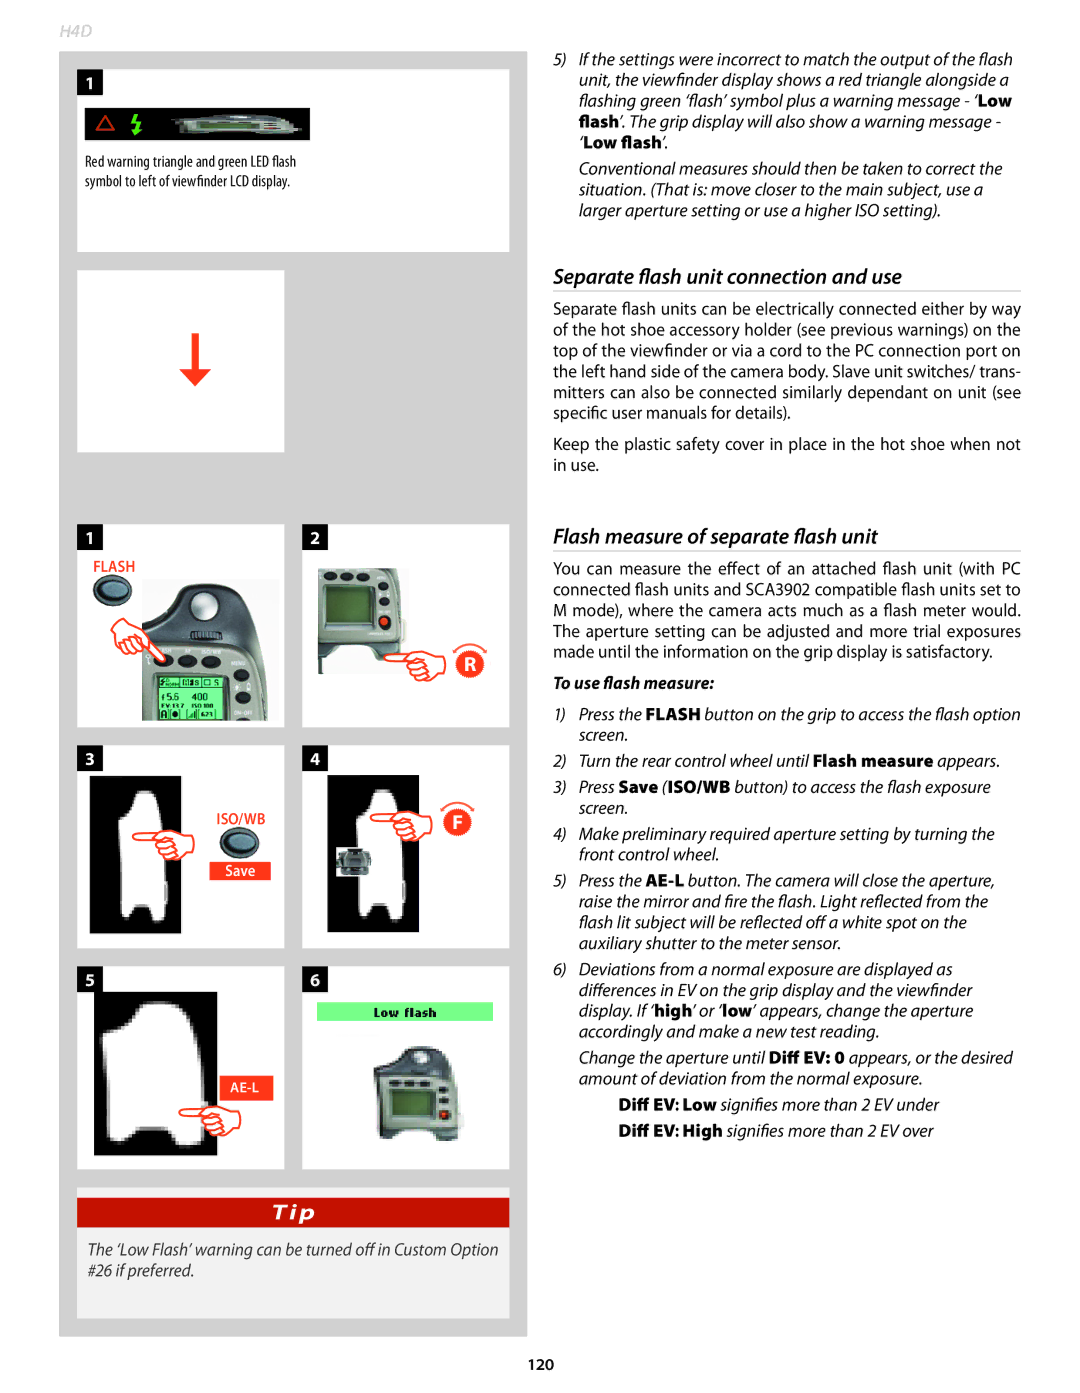
Flash / Strobe
General
To access the controls
Using the integral flash
Integral flash
Separate flash unit connection and use
Flash measure of separate flash unit
To use flash measure
Multi Shot
Shot mode
Multi-shot
Optional Accessories
Lens accessories
HVM waist level viewfinder
Proshade V/H 60
Proshade adapters
GIL Global Image Locator
HC lens accessories
HC lens range
Connectivity diagram
Problems, Equipment Care & Service
Appendix
True exposure
True exposure
Shutter position Open Closed T3 = T1
Time
Automatic exposure P & Pv Mode
Light metering method sensitivity distribution
Focusing
Interval timer
Focusing screen
Accessory connection
Sensor dimensions
Shooting mode
Operating temperature
Sensor size
Hasselblad Natural Color Solution
Mpixels 7304 x 5478 pixels Mpixels 4872 x 6496 pixels
33.1 x 44.2 mm
ISO 100, 200, 400, 800 ISO 50, 100, 200, 400
Default Settings Default profile
Care and maintenance of sensor unit
Cleaning the CCD Infrared Filter
Basic air-cleaning procedure / removing the sensor unit
Handling and storage
Cleaning using the Hama cleaning fluid and tissues
Cleaning with an E-Wipe
Cleaning the housings
Wipes are individually packed wet tissues
Problems, Equipment Care & Service
Equipment Care
I C K I N D E
H4D
140