CABLE ASSEMBLY
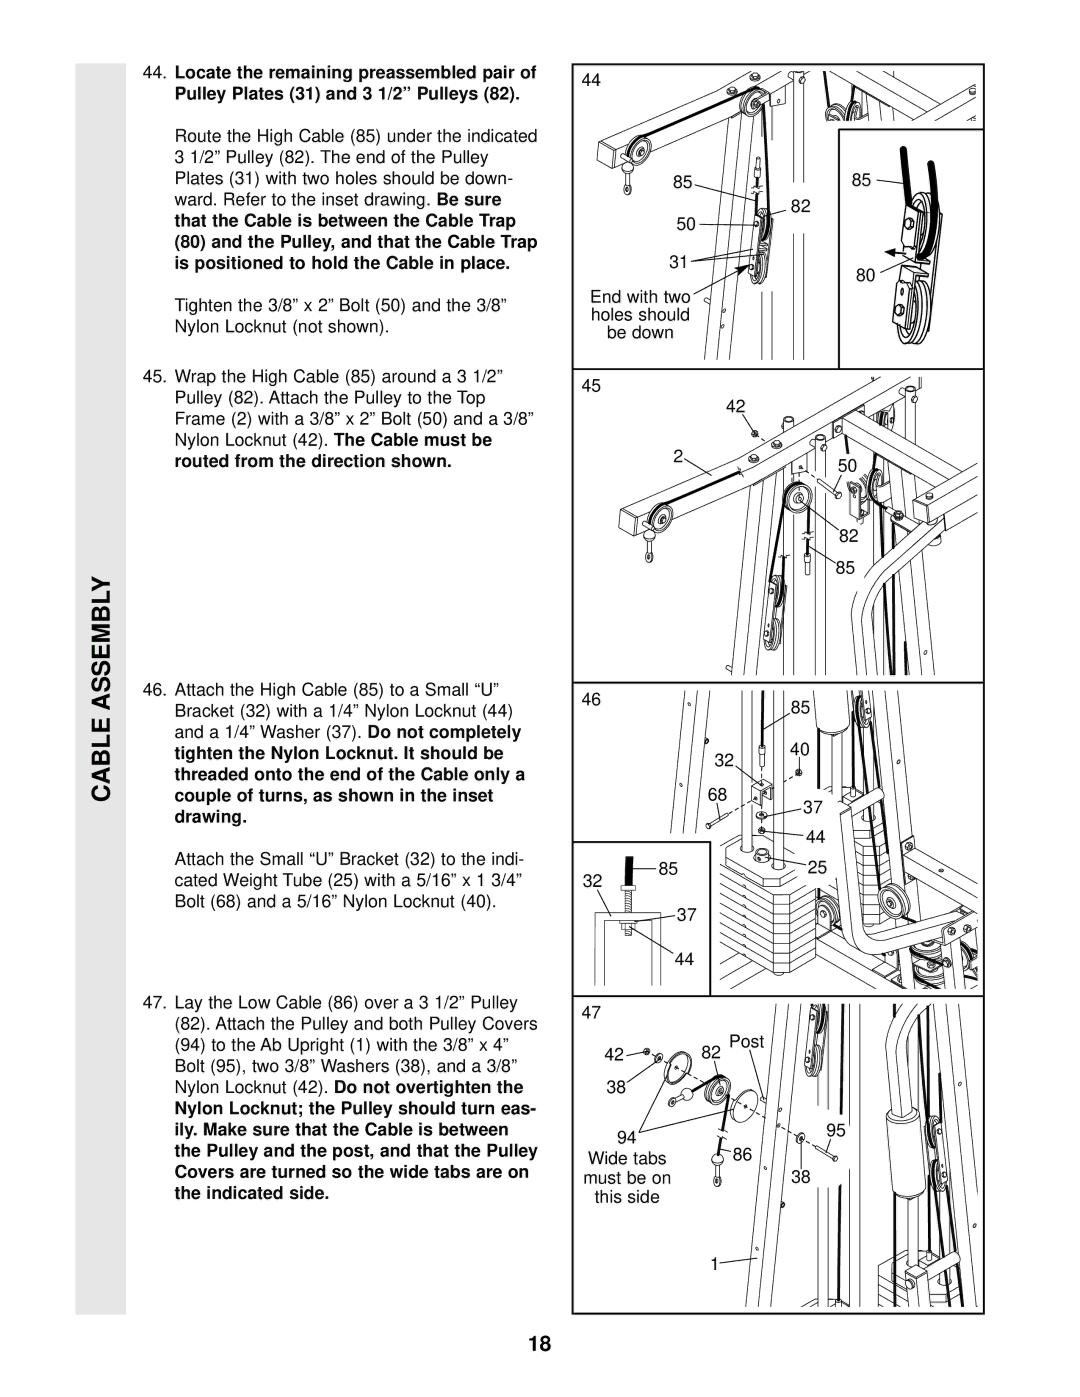
44.Locate the remaining preassembled pair of
Pulley Plates (31) and 3 1/2” Pulleys (82).
Route the High Cable (85) under the indicated |
|
3 1/2” Pulley (82). The end of the Pulley |
|
Plates (31) with two holes should be down- |
|
ward. Refer to the inset drawing. | Be sure |
that the Cable is between the Cable Trap |
|
(80)and the Pulley, and that the Cable Trap is positioned to hold the Cable in place.
Tighten the 3/8” x 2” Bolt (50) and the 3/8”
Nylon Locknut (not shown).
45.Wrap the High Cable (85) around a 3 1/2” Pulley (82). Attach the Pulley to the Top
Frame (2) with a 3/8” x 2” Bolt (50) and a 3/8”
Nylon Locknut (42). The Cable must be
routed from the direction shown.
46.Attach the High Cable (85) to a Small “U” Bracket (32) with a 1/4” Nylon Locknut (44)
and a 1/4” Washer (37). Do not completely
tighten the Nylon Locknut. It should be threaded onto the end of the Cable only a couple of turns, as shown in the inset drawing.
Attach the Small “U” Bracket (32) to the indi- cated Weight Tube (25) with a 5/16” x 1 3/4” Bolt (68) and a 5/16” Nylon Locknut (40).
47.Lay the Low Cable (86) over a 3 1/2” Pulley
(82).Attach the Pulley and both Pulley Covers
(94)to the Ab Upright (1) with the 3/8” x 4” Bolt (95), two 3/8” Washers (38), and a 3/8”
Nylon Locknut (42). Do not overtighten the
Nylon Locknut; the Pulley should turn eas- ily. Make sure that the Cable is between the Pulley and the post, and that the Pulley Covers are turned so the wide tabs are on
the indicated side.
18
44 |
|
|
85 |
| 85 |
50 |
| 82 |
|
| |
31 |
| 80 |
|
| |
End with two |
|
|
holes should |
|
|
be down |
|
|
45 |
|
|
| 42 |
|
2 |
| 50 |
|
| |
|
| 82 |
|
| 85 |
46 |
| 85 |
|
| |
| 32 | 40 |
|
| |
| 68 | 37 |
|
| |
|
| 44 |
85 |
| 25 |
32 |
|
|
37 |
|
|
44 |
|
|
47 |
|
|
42 | 82 Post |
|
38 |
|
|
94 |
| 95 |
86 |
| |
Wide tabs | 38 | |
must be on |
| |
this side |
|
|
| 1 |
|