HDC-401EX
See Using the Camera Quick Start Guide P
Appendix
Use of Symbols
Safety Precautions
What You Should Know
Copyrights
Trademarks
Maintenance
Data Error
Environment of Use
Trial Shots
Product Overview
Names of Parts
What You Will Find in the Package
Menu button
Mode Button
Control Panel
Menu Screen Operations
Still Image Capture Mode Capturing Still Images P27
Video Capture Mode Capturing Videos P33
Playback Mode Viewing Still Images/Videos P35
LCD Monitor Display
Press Menu in the Playback mode
Switching the LCD Monitor Display Mode
Pressing Menu saves the selection,
Then the camera exits Playback Menu
Setting the Batteries
Remaining Battery Power Display
Applicable Batteries
Power Off Time Function
Turning On/Off the Power Setting the Date and Time
Use【M】【N】to select the part of Date you
Use【M】【N】to select the part of Time you
Adjusting the Date and Time
Setup menu, select Date & Time
Using【M】【N】and then press
Insert a memory card
Using an SD Memory Card
Removing the Memory Card
Write-Protecting the Memory Card
Default Settings
Setting to the Default
Select Yes/No using 【M 】【N 】and then
Press
Capturing Still Images
Using the LCD Monitor or Viewfinder
Quick View
Capturing Images by Viewing the LCD Monitor
Using the Flash
Shooting Close-Up Shots Self-Portraits
Using the Zoom
Digital zoom Button
Date Imprint P63 cannot be used
Capturing Videos
Capture Mode using 【M 】【N 】and then
Capture Menu screen, select Video
Press
Zoom Playback
Video Playback
Index Playback
Select Yes/No using【M】【N】and then
Press Mode once to activate the Playback
Mode
Use 【O 】【P 】to select the image you want
Deleting All Images
Before Connecting to a TV
【M】【N】 and then select TV mode using 【O】【P】
Setup menu, select TV using
Once TV mode is set, press the power
Switch to turn off the camera
Setup menu, select Language using
Setting the Language
【M】【N】and then press
Pressing Menu exits the Capture Menu
Pressing Menu saves the selected setting,
Setting the Power Off Time
Min ., 5 min ., 10 min . or Off using 【 O 】【 P 】
Turning Sound On/Off
Press the power switch to turn on the power
Using the AC Adapter sold separately
Insert the AC adapter,s mini-plug into
DC input terminal on the camera
Pressing Menu saves the selected setting
Setting the Image Size
Setting the Image Quality
Camera exits the Capture Menu
Setting the Scene Mode
Setting the White Balance
Setting the Exposure Brightness
Setting the Sharpness Setting the Saturation
Setting the ISO Capture Sensitivity
Setting the Color Mode
ISO level using【O】【P】
Capture Menu screen, select ISO
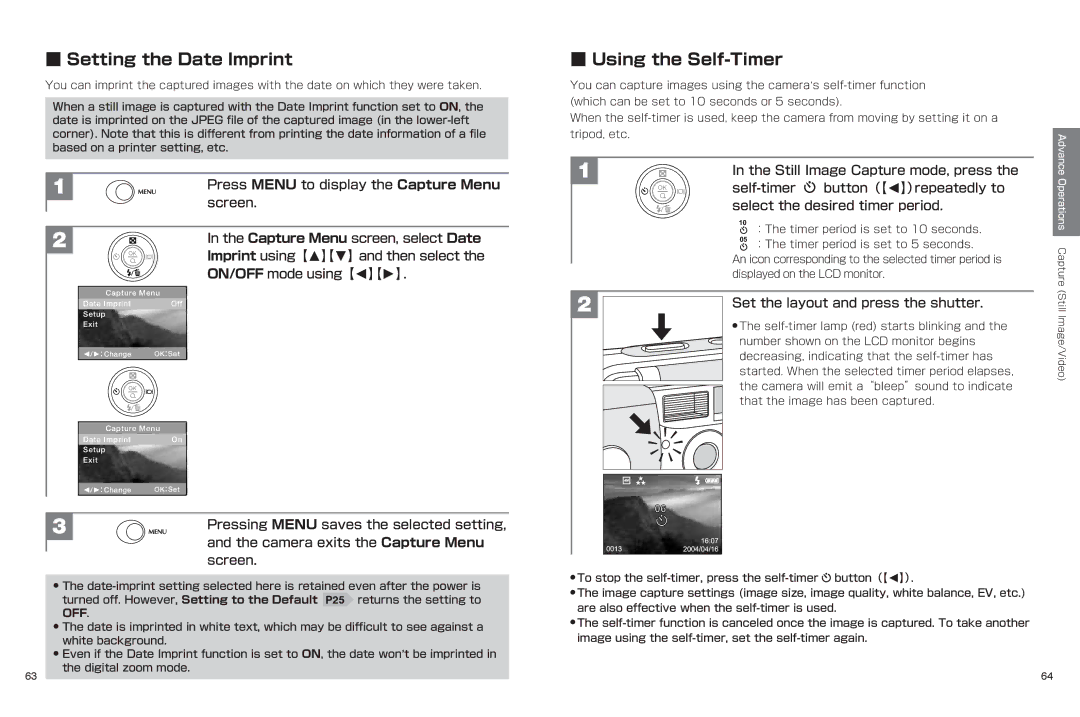
Using the Self-Timer
Setting the Date Imprint
Self-timer Button(【O】)repeatedly to
Select the desired timer period
Press Mode to activate the Playback mode
Playing a Slide Show
To protect
Protecting Images
Press Menu to display the Playback Menu
Pressing Menu saves the selection,
Protecting All Images
Setting the Startup Screen My Camera
Select Yes using【M】【N】and then press
Select Customize using 【M 】【N 】and then
Turned off or Setting to the Default P25 is executed
Formatting
Flow of Copying Image Files to a Computer
Select Format using【M】【N】and then press
Check the operating environment of the computer
Flow of Copying Image Files to a Computer
Check the operating environment of the computer
Windows 98/98SE
Click Install HDC-401EX Driver
Installing the HDC-401EX Driver in the Computer
When the The computer is ready to
When the Installation is completed screen
If the camera is still on, press the power switch
Check to see if the camera power is turned off
To turn off the power
Press the power switch to turn on the camera power
Computer Using the USB Cable P81
Drag and Drop
Folder/File Naming Rules
Removing the Camera
When the You can safely remove the device dialog box is
Displayed, click OK
Remove the camera
Uninstalling Deleting the HDC-401EX Driver
My Computer, double-click Control
Panel and then double-click Add or
Troubleshooting
Batteries/Power
Capturing Still Images/Videos
Viewing Still images/videos
Playback/Capture Using a TV
Deleting Images
Copying Image Files to a Computer
Others
P47
P32
Menu Items and Default Settings
Memo
Specifications
How to Set the Date and Time Setting the Date and Time P20
Press Mode once to activate the Playback mode
When the image has been captured, ableepsound will be heard
Set the layout so that you can see the subjects inside
102