Maintenance & Service Guide
Page
About This Book
Iv About This Book
Table of contents
Appendix a Computer F10 Setup
USB
102
HP 500B/505B
Product Description
Chassis Designations
Compaq 500B/505B, Compaq 510B/515B
Product Description
Removal and Replacement Procedures Microtower MT Chassis
Preparation for Disassembly
Access Panel
2Removing the Computer Access Panel
Page
Front Bezel
4Removing the Front Bezel
Page
Memory
DDR3-SDRAM DIMMs
Description Socket Color
Populating Dimm Sockets
1DIMM Socket Locations
Installing Memory Modules
8DIMM locations 500B shown Memory
Page
Item Description
Expansion Cards
2Expansion Slot Locations
PCI Express x1 expansion slot PCI expansion slot
14Removing the bracket cover Expansion Cards
Page
18Lifting the card from the computer Expansion Cards
Page
Page
Page
Connector Name Connector Color Description
Cable Management
Cable Connections
3Cable connections 500B/510B
4Cable connections 505B/515B
Installing Additional Drives
Drives
System Board Drive Connections
5System Board Drive Connections
Removing an Optical Drive
Page
Replacing an Optical Drive
Removing a Hard Drive
36Disconnecting the hard drive cables Drives
Page
Replacing a Hard Drive
Page
Front I/O and USB Panel Housing Assembly
Power Switch/LED Assembly
Remove the optical drive Removing an Optical Drive on
System Fan
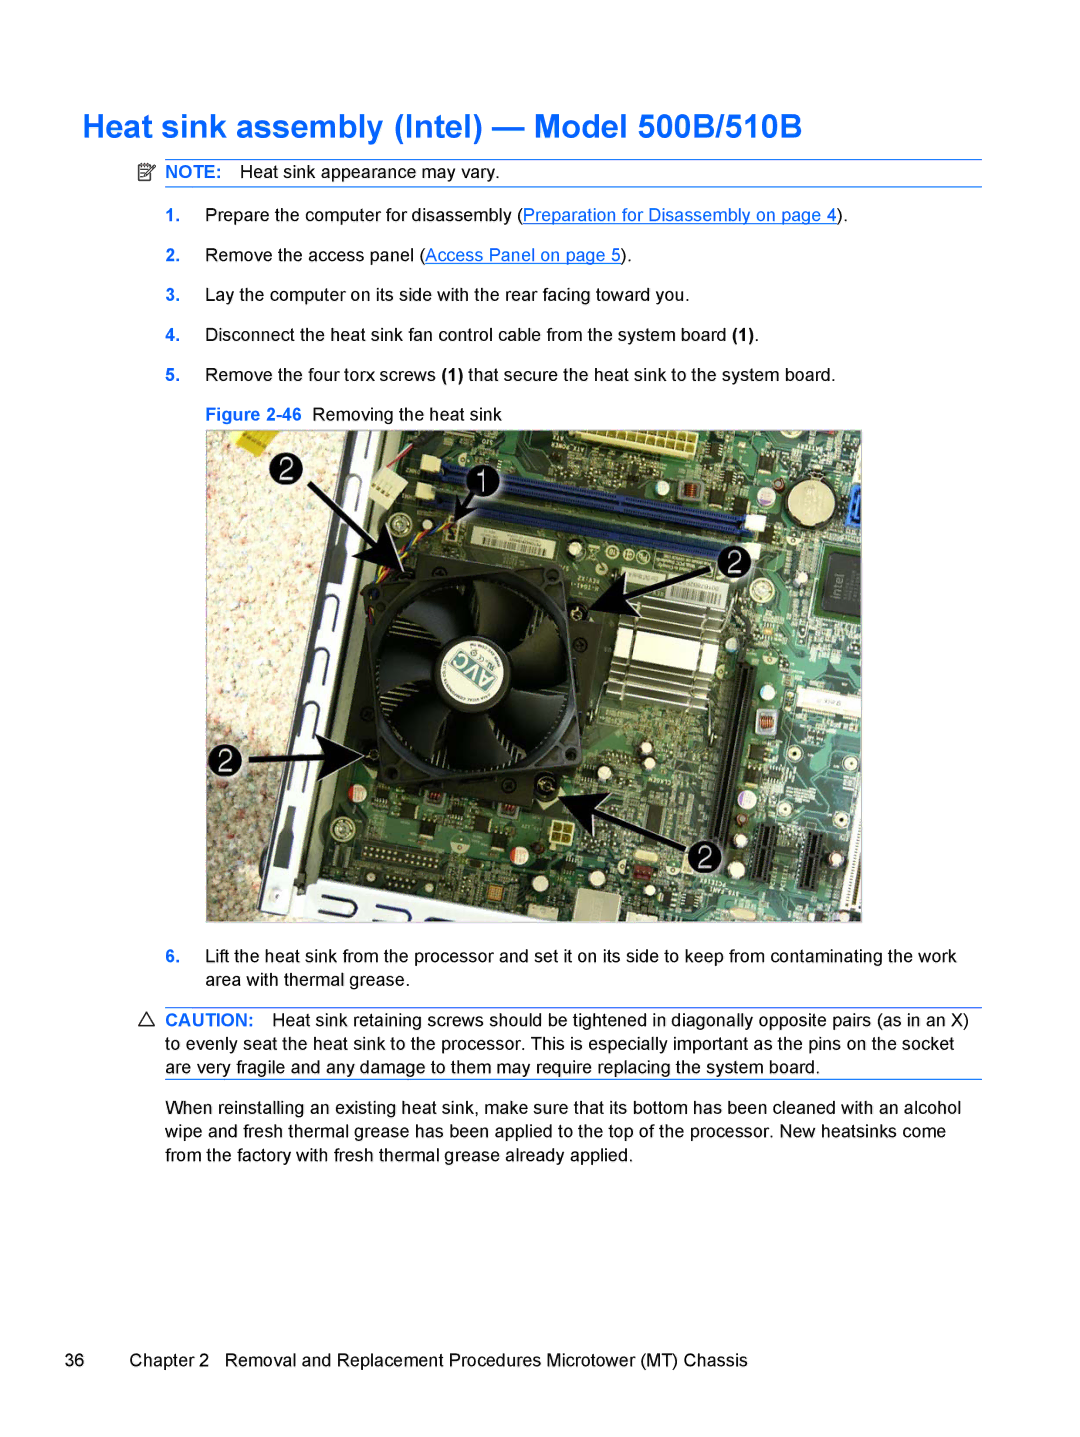
Heat sink assembly Intel Model 500B/510B
Heat sink assembly AMD Model 505B/515B
Processor Intel Model 500B/510B
Page
Processor AMD Model 505B/515B
Power Supply
Page
52Disconnecting the power cable Power Supply
Page
56Removing the power supply screws Power Supply
Page
59Power supply securing features
System Board
Battery
Type 1 Battery Holder
Type 2 Battery Holder
Type 3 Battery Holder
Page
Using Computer Setup F10 Utilities
Computer F10 Setup
Model 500B/510B Computer Setup F10 Utilities
Computer Setup-Main
Table A-1Computer Setup-Main
Computer Setup-Advanced
Table A-2Computer Setup-Advanced
Computer Setup-Power
Table A-3Computer Setup-Power
S5 Maximum Power
Savings
Computer Setup-Boot
Table A-4Computer Setup-Boot
Table A-5Computer Setup-Exit
Model 505B/515B Computer Setup F10 Utilities
Computer Setup-Exit
Table A-6Computer Setup-Main
Table A-7Computer Setup-Advanced
Other
Table A-8Computer Setup-Power
Password
Appendix a Computer F10 Setup
Table A-9Computer Setup-Boot
Screen Boot Device Priority
Priority CD-ROM Group Boot
Boot Priority Network Group Boot
Table A-10Computer Setup-Exit
Diagnostics
Interpreting Diagnostic Beep Codes
Table B-1Diagnostic Beep Codes
Beeps Diagnosis Recommended action
LED Codes
State LED Status
Reason Result
Accessing HP Insight Diagnostics
Testing Memory Modules
Defective
Post Error/Warning Messages
Improperly installed
Power Button/Power Button LED
Using the Setup Utility
Bios Updates
Clearing Cmos
Page
Troubleshooting Without Diagnostics
Safety and Comfort Before You Call for Technical Support
Helpful Hints
Solving General Problems
Computer date and time display is incorrect Cause
Solving Power Problems
Poor performance is experienced Cause Solution
Computer is beeping and will not start Cause
Computer will not turn on Cause
Solving Hard Drive Problems
Drive not found identified Cause Solution
Solving Media Card Reader Problems
Picture is broken up, rolls, jitters, or flashes Cause
Solving Display Problems
Blank screen no video Cause Solution
Solving Audio Problems
Solving Keyboard and Mouse Problems
Sound cuts in and out Cause
No sound Cause
Solving Network Problems
Diagnostics reports a failure Cause
Solving Memory Problems
Solving Memory Problems
Solving CD-ROM and DVD Problems
USB device is not recognized by the computer Cause
Solving Front Panel Component Problems
Headphone or microphone is not working Cause Solution
Connector Pin Assignments
Pin Power for CPU
Connector and Icon Pin Signal
Ethernet BNC
Pin Signal
Microphone
Headphone
Line-in Audio
Pin Power
Connector
Signal Pin
Monitor
X1, x4, x8, and x16 PCI Express Connector Pin a Signal
PCI Express
X1, x4, x8, and x16 PCI Express Connector Pin B Signal
GND PRSNT2# Rsvd
Routine Care and Disassembly Preparation
Electrostatic Discharge Information
Generating Static
Relative Humidity Event 55% 40% 10%
Static Shielding Protection Levels
Preventing Electrostatic Damage to Equipment
Personal Grounding Methods and Equipment
Method Voltage
Grounding the Work Area
Recommended Materials and Equipment
Operating Guidelines
General Cleaning Safety Precautions
Cleaning the Computer Case
Cleaning the Keyboard
Routine Care
Service Considerations
Cleaning the Monitor
Cleaning the Mouse
Power Supply Fan
Cables and Connectors
Tools and Software Requirements
Screws
Hard Drives
Lithium Coin Cell Battery
Serial ATA Sata Drive Guidelines and Features
Serial ATA Hard Drive Characteristics
Sata Hard Drives
Sata Hard Drive Cables
Smart ATA Drives
Hard Drive Capacities
General Requirements
Power Cord Set Requirements
Japanese Power Cord Requirements
Country-Specific Requirements
Country Accrediting Agency
Specifications
Table H-1Specifications
Acoustic noise
Symbols/Numerics
Index
Sata