HP Part Number BA322-90077 Published October Edition
Copyright 2007 Hewlett-Packard Development Company, L.P
Table of Contents
Authorization Files AGEN$INCLUDE Files
Installing the OpenVMS Operating System
113
149
196
189
189
191
255
203
241
247
281
267
269
271
Page
List of Figures
Page
Getting OpenVMS Started on Integrity Servers
List of Tables
Page
List of Examples
Page
Intended Audience
When to Use This Manual
Preface
About this document
Page
This manual is organized as follows
Document Organization
Glossary page 271 defines key terms used in this manual
Typographical Conventions
Following conventions are used in this manual
Related Information
Publishing History
HP Encourages Your Comments
How to Order Additional Documentation
Page
Key Terms
Getting Started
Definitions of Terms
Getting to Know Your Integrity Server
Entering Commands at Integrity Server Console Interfaces
Integrity Server Tools
Cell-Based Server Terminology
Virtual Connect VC on HP BladeSystem c-Class Enclosures
Hardware Components
Examining Software and Hardware Components
Getting OpenVMS Started on Integrity Servers
Checking Firmware Version
Software Components
OpenVMS for Integrity Servers Operating Environment DVD
Firmware on Integrity Server Systems
Creating a Firmware Update CD
Device-Naming Conventions
Updating Your Firmware from the Firmware Update CD
Using the Operating System Menu
Using the Install, Upgrade, or Reconfigure OpenVMS Option
Preserve Option
Initialize Option
HP I64VMS Availmanbase V8.3-1H1
Using the Display Layered Products Option
Using the Install or Upgrade Layered Products Option
Layered Product
HP I64VMS Tcpip
Using the Show Installed Products Option
Using the Reconfigure Installed Products Option
Using the Remove Installed Products Option
Using the Patches and Recovery Data Option
Using the Shutdown Option
Using the Execute DCL Option
49 . Perform
Making the Install/Upgrade/Backup Selection
Page
Mixed-Version Support in OpenVMS Cluster Systems
Preparing to Install in an OpenVMS Cluster Environment
Preinstallation Tasks for OpenVMS Cluster Environments
Review OpenVMS Cluster Information
Supported Migration Pairs
Warranted Cluster Support
OpenVMS Cluster Information You Need
Type of configuration
Beginning the Installation
Dismounting the Target System Disk Elsewhere in the Cluster
Installation Checklist
Installing the OpenVMS Operating System
Installation Tasks
Booting the OpenVMS Operating System Media
Booting from the Local Drive
Booting the OpenVMS I64 OE DVD
Booting Using HP SIM Provisioning
Booting Over the Network Using the InfoServer utility
Booting Using vMedia
Installing the OpenVMS Operating System onto a System Disk
Differences Between OpenVMS I64 and Alpha Installations
Responding to Prompts During the Installation
Scssystemid
Product KIT Type KIT Format
Respond to the Initialize or Preserve prompt as follows
ODS-5
Installing the OpenVMS Operating System onto a System Disk
You must enter a password for the System account
Following is an example of the display and a valid response
Installing the OpenVMS Operating System
Time
Indicates a menu
Procedure
Availability Manager base for OpenVMS I64 o Cdsa for OpenVMS
Installing the OpenVMS Operating System onto a System Disk
Following product has been selected
HP I64VMS
Example 3-1 Component Options and Suboptions
HP I64VMS Openvms V8.3-1H1 DISK$I64SYSVMS$COMMON
If you answered no in , the following message is displayed
Installing the OpenVMS Operating System onto a System Disk
Booting the OpenVMS I64 System Disk
Booting the New OpenVMS System Disk
Blk1 AcpiHWP0002,100/Pci10/ScsiPun0,Lun0
Next Steps
Prompts for OpenVMS Cluster Configurations
You can do this by entering the following command
Joining an OpenVMS Cluster
Running Autogen
Rebooting After Autogen
Logging In from a Workstation
Postinstallation Tasks
Logging In to the System Account
Logging In from a Character-Cell Terminal
Documentation to Review Before Upgrading Your System
Preupgrade Tasks
Preupgrade Checklist
Before Upgrading the OpenVMS Operating System
Earlier OpenVMS Version Documents
Upgrade Paths
Update License Requirements
Components You Choose Not to Install
Checking the Syscommon Directories
Saving Archived Files from Being Deleted by the Upgrade
Preparing the System Disk
Licenses and Layered Products
Checking the Size of the System Disk
Examining the System Disk
Ignore the following message
Logical Names for Relocated Authorization Files
Authorization Files
AGEN$INCLUDE Files
Verifying System Parameters
Ensuring You Have a Recent FEEDBACK.DAT File
Shadowing Environment
Backing Up the System Disk
Setting the Boot Device
Creating a Nonshadowed Target Disk
$ @SYS$SYSTEMSHUTDOWN
Finishing Preupgrade Tasks
Preupgrade Tasks for OpenVMS Cluster Environments
Preparing to Upgrade in an OpenVMS Cluster Environment
Preupgrade Checklist for OpenVMS Cluster Environments
Mixed-Version Support in an OpenVMS Cluster Environment
3shows the supported migration pairings
Supported Migration Pairing
For information about valid upgrade paths, see .3.1
Preparing Your System for a Concurrent Upgrade
Types of Upgrades
Concurrent Upgrade
How a Concurrent Upgrade Works
How a Rolling Upgrade Works
Rolling Upgrade
Log in locally to the System account
Preparing Your System for a Rolling Upgrade
IPC Ctrl/Z
Types of Upgrades
Page
Upgrade Checklist
Upgrade Tasks
Upgrading the OpenVMS Operating System
Shell fsn\efi\boot\bootia64.efi
Performing the Upgrade
Choosing Initialize or Preserve
Procedure displays the following information and prompts
Specifying the Target Disk
Selecting Reinstallation and Reconfiguration Options
Next the menu is redisplayed
Checking for Recovery Data
Specifying the On-Disk Structure Level
Specifying the Volume Label
Upgrading the OpenVMS Operating System
Performing the Upgrade
Updating Time Zone Information
Setting OpenVMS Cluster Membership Information
Upgrading Windowing, Networking, and Related Products
Removing Older Versions of Encrypt
Completing the Upgrade
Procedure next prompts you as follows
Choosing Descriptive Help Text
Saving Archived Files
Secure Delivery Validation
Selecting Product Component Options
Upgrading the OpenVMS Operating System
Component and Product Installation Confirmation Messages
Upgrade Creates and Validates Boot Options
Completing the Upgrade
Shutting Down the System
What to Do After Shutdown
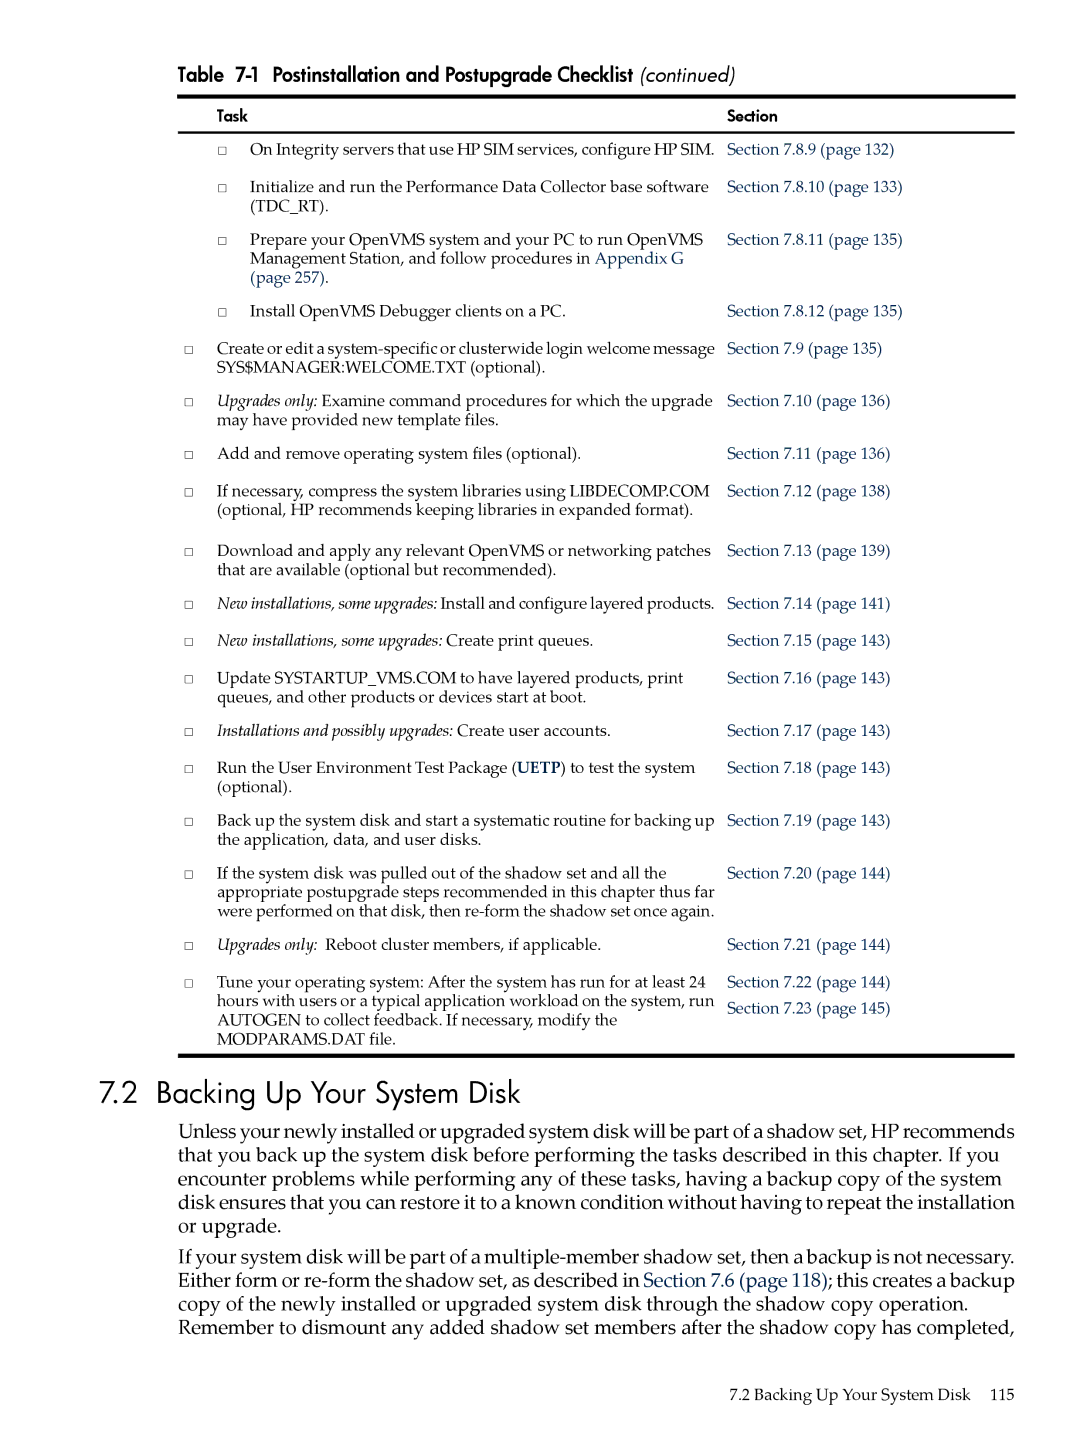
Postinstallation and Postupgrade Tasks
After Installing or Upgrading the OpenVMS Operating System
Shadowing
Postinstallation and Postupgrade Checklist
Tdcrt
Backing Up Your System Disk
Registering Your Licenses
$ @SYS$UPDATEVMSLICENSE
Forming the Shadow Set
Running Autogen to Set System Parameter Changes
Enter a command in the following format
Customizing the System New Installations, Some Upgrades
Example
Setting Up the Queue Manager and Default Queues
Creating Network Proxy Authorization Files
Configuring DECnet
Configuring a Multihead System Optional
Before
Initializing or Configuring Other Installed Components
Configuring HP TCP/IP Services for OpenVMS
Installing and Configuring Third-Party Networking Software
Following is an example of the output you might see
Initializing Cdsa Optional
Configuring the Availability Manager Base Software Optional
Configuring Kerberos Optional
Configuring SSL for OpenVMS Optional
Configure Wbem Services for OpenVMS Optional
$ RUN SYS$SYSROOTWBEMSERVICESWBEMSERVICES$CONFIG
Utility asks whether to start the CIMServer
Perform the recommended steps, as in the following example
Utility now asks you whether to start the CIMServer
Configure Wbem Providers for OpenVMS Optional
Configure the Pay per use Software Optional
Configure the Instant Capacity Software Optional
Configure HP SIM Optional
Startup File
User Privileges and Quotas
Compatibility with Prior Releases
To start the collector application, enter the TDC command
Running Tdcrt
Preparing to Use OpenVMS Management Station Optional
Creating a System-Specific Login Welcome Message Optional
Installing OpenVMS Debugger Clients on a PC Optional
Installation in OpenVMS Clusters
Adding and Removing Operating System Files Optional
Examining Your Command Procedures Upgrades Only
Adding and Removing Operating System Files Optional
After Installing or Upgrading the OpenVMS Operating System
Enter the command Passive ON, as in the following example
Installing Patches Optional but Recommended
FTP passive on
Page
HP OpenVMS System Managers Manual, Volume 1 Essentials
Alternative Procedure
Creating Accounts New Installations, Some Upgrades
Creating Print Queues New Installations, Some Upgrades
Testing the System with Uetp Optional
Rebooting Cluster Members Upgrades Only
Reforming the Shadow Set as Final Postupgrade Backup
Running Autogen to Tune the System
General Notes About Modifying System Parameters
Modifying System Parameters
System File Sizes
Modifying System Parameters After an Upgrade
OpenVMS Cluster Parameters
Modifying System Parameters
148
Http//docs.hp.com
Overview of Utilities and Console Options
Page
Configuration and Management Utilities on Cell-Based Servers
Page
Page
Using the EFI Boot Manager to Select the OpenVMS Console
Using the EFI Shell to Select the OpenVMS Console
Selecting Your OpenVMS Console on rx2600 Integrity Servers
Shellconconfig
Testing
Page
That the lines are almost identical except for the text
These four lines indicate any of the valid devices that
Port. Any line that has the notation Uart but not
Notation Pci is one of the system serial ports. Notice
Overview of Using EFI
General Notes About Using EFI
Example 2 First Moving to \efi\vms
Example 1 From Top Level
Shell cpuconfig
Setting Boot Options for Your System Disk
Adding a Boot Option and Setting Boot Flags
Enter the device name enter ? for a list of devices DKA0
Using EFI to Set Automatic Booting of Your System Disk
Displaying EFI Boot Entries and Mapped OpenVMS Devices
Saving and Restoring EFI Settings
Setting EFI Boot Option Countdown Timer Timeout
Writing a New Boot Block
$ DUMP/HEADER/BLOCK=END=0 SYS$SYSDEVICE000000GPT.SYS
Or more blocks. For example
Alpha and Equivalent Integrity Server System Boot Commands
Booting Operations
Booting the nPartition Hardware
Overview of Booting on a Cell-Based Server
Booting OpenVMS I64 on an nPartition
Booting the OpenVMS I64 OE DVD from the Local Drive
I64 system disk
Alternate Method of Using EFI to Boot the DVD
Shell reconnect -r Shell map -r
Boot
Booting Manually from the Local System Disk
Booting the OpenVMS I64 OE DVD from the InfoServer
Booting an Image of the OpenVMS I64 OE DVD Using vMedia
Booting from a Fibre Channel Device
Table A-2 Sysgen Commands Used in the Sysboot Procedure
Performing a Conversational Interactive Boot
Booting with the XDelta Utility Xdelta
Booting with Minimum Startup
Enter the following command to continue booting
At the Sysboot prompt, enter the following command
Booting from a Different Root Directory
Emergency Booting
Booting with Default System Parameters
Enter the following command at the Sysboot prompt
Booting Without Startup and Login Procedures
Example
Booting Without a User Authorization File
Halt and Shutdown Procedures
Emergency Shutdown with OPCCRASH.EXE
Orderly Shutdown
For Hardware Problems
Troubleshooting Procedures
If the System Does Not Boot
Detecting and Responding to System Problems
Troubleshooting Procedures
188
About the OpenVMS InfoServer Utility
Setting Up and Performing Network Booting
Section B.2
Table B-2 Procedure for Enabling InfoServer Network Booting
Determining the Local Network I/O Card to Be Used
Setting Up Your System as an InfoServer Client
Adding the Network Boot Option to the EFI Boot Manager
Verifying the Network I/O Device Is Bootable by EFI
Setting Up the InfoServer Server
Exit the utility by entering E at the prompt
Buffersize
@SYS$STARTUPESS$LADSTARTUP.COM
SYS$MANAGERSYSTARTUPVMS.COM
Setting Up the Bootp Boot Server and Tftp Server
$ CREATE/DIRECTORY TCPIP$TFTPROOTV831H1
$ CREATE/DIRECTORY TCPIP$TFTPROOTV831H1
Example B-1 Setting Up the Boot Server and Client
Booting OpenVMS I64 from the InfoServer
Booting with EFI lanboot select command
Booting with the EFI Boot Manager
Sample display follows
Troubleshooting InfoServer Boot Problems
Setting Up and Performing Network Booting
HP SIM Provisioning of OpenVMS
Using HP SIM and vMedia to Install and Upgrade OpenVMS
About HP SIM and Provisioning
Support of HP SIM provisioning requires the following
Prerequisites for HP SIM Provisioning
Setting Up InfoServer Support
$ CREATE/DIRECTORY TCPIP$TFTPROOTV831H1
Setting Up vMedia
Using HP SIM and vMedia to Install and Upgrade OpenVMS
HP SIM Provisioning of OpenVMS
Using HP SIM and vMedia to Install and Upgrade OpenVMS
HP SIM Provisioning of OpenVMS
Using HP SIM and vMedia to Install and Upgrade OpenVMS
HP SIM Provisioning of OpenVMS
Discovering and Identifying Your New Provisioning Client MPs
Installing the OpenVMS Provisioning Plug-in for HP SIM
HP SIM
Using HP SIM and vMedia to Install and Upgrade OpenVMS
Provisioning OpenVMS
Provisioning OpenVMS Through the InfoServer
HP SIM Provisioning of OpenVMS
Using HP SIM and vMedia to Install and Upgrade OpenVMS
HP SIM Provisioning of OpenVMS
Using HP SIM and vMedia to Install and Upgrade OpenVMS
HP SIM Provisioning of OpenVMS
Using HP SIM and vMedia to Install and Upgrade OpenVMS
HP SIM Provisioning of OpenVMS
Provisioning OpenVMS Through vMedia
HP SIM Provisioning of OpenVMS
Using HP SIM and vMedia to Install and Upgrade OpenVMS
Next
Using HP SIM and vMedia to Install and Upgrade OpenVMS
HP SIM Provisioning of OpenVMS
Using vMedia Independently of HP SIM
Prerequisites for Using vMedia to Install or Upgrade OpenVMS
Using vMedia to Install or Upgrade OpenVMS
Using vMedia Independently of HP SIM
Using HP SIM and vMedia to Install and Upgrade OpenVMS
Using vMedia Independently of HP SIM
Using HP SIM and vMedia to Install and Upgrade OpenVMS
Shell reconnect -r
Shell fs0\efi\boot\bootia64.efi
Checking the Firmware Version
Setting Up and Booting Fibre Channel Storage Devices
Configuring and Booting FC Boot Device
Obtaining the IPF Offline Diagnostics and Utilities
$$$ @SYS$MANAGERBOOTOPTIONS
Enter your choice E
FC SAN
$$$ @SYS$MANAGERBOOTOPTIONS
OpenVMS Cluster Caution
Suggested Procedures
Backing Up and Restoring the System Disk
Reasons for Backing Up the System Disk
Mounting Devices
Performing the System Disk Backup
Following sections describe how to back up the system disk
Getting Started
Example
Changing the Disk Volume Cluster Size
Logging Out, Shutting Down, and Rebooting
Restoring the System Disk
Performing the System Disk Restore
Preparing an Alternate System Disk
Using the Alternate System Disk
Page
254
HP I64VMS VMSI18N V8.3-1H1 DISK$I64SYSVMS$COMMON
Installing the OpenVMS Internationalization Data Kit
Installing the OpenVMS Internationalization Data Kit
Preparing to Use OpenVMS Management Station
Setting Up in a Mixed-Architecture Cluster Environment
Preparing Your OpenVMS System
Preparing to Use OpenVMS Management Station
Editing the System Files
Error Log Information
Starting the Server on Other Nodes
Updating the Printer and Storage Database
Name of the generated file is TNT$EMERGENCYMOUNT.COM
Add the following command line to the system shutdown file
Controlling the Printer and Storage Environment
Keeping Your Printer Environment Up to Date
What Are the Requirements for Running TNT$UTILITY.COM?
When Is the Database Updated?
You need the Sysnam privilege to run TNT$UTILITY.COM
Running Third-Party TCP/IP Stacks
Caching Storage Configuration Data
Preparing Your PC
Defining TCP/IP Nodes
After Installing the Client Software on Your PC
Removing OpenVMS Management Station
Getting Started with OpenVMS Management Station
266
Enter the following DCL command
Use the following commands to remove individual products
Removing the OpenVMS Operating System
MODPARAMS.DAT LMF$LICENSE.LDB RIGHTSLIST.DAT SYSUAF.DAT
Target-diskVMS$COMMON.SYSEXE
Alternative Method of Initialization
Alternative Ways to Initialize the System Disk
Removing the Diagnostic Partition File
Manager
Glossary
Dssi
EFI
Mcoe
MOP
DVD
SIM
Uetp
Wbem
280
Index
Dwmotifsupport
283
Initialize
ODS-2
Index
Pcsi
Index
289
TDC
Wbemcim