A

B

C

D

A

F


E

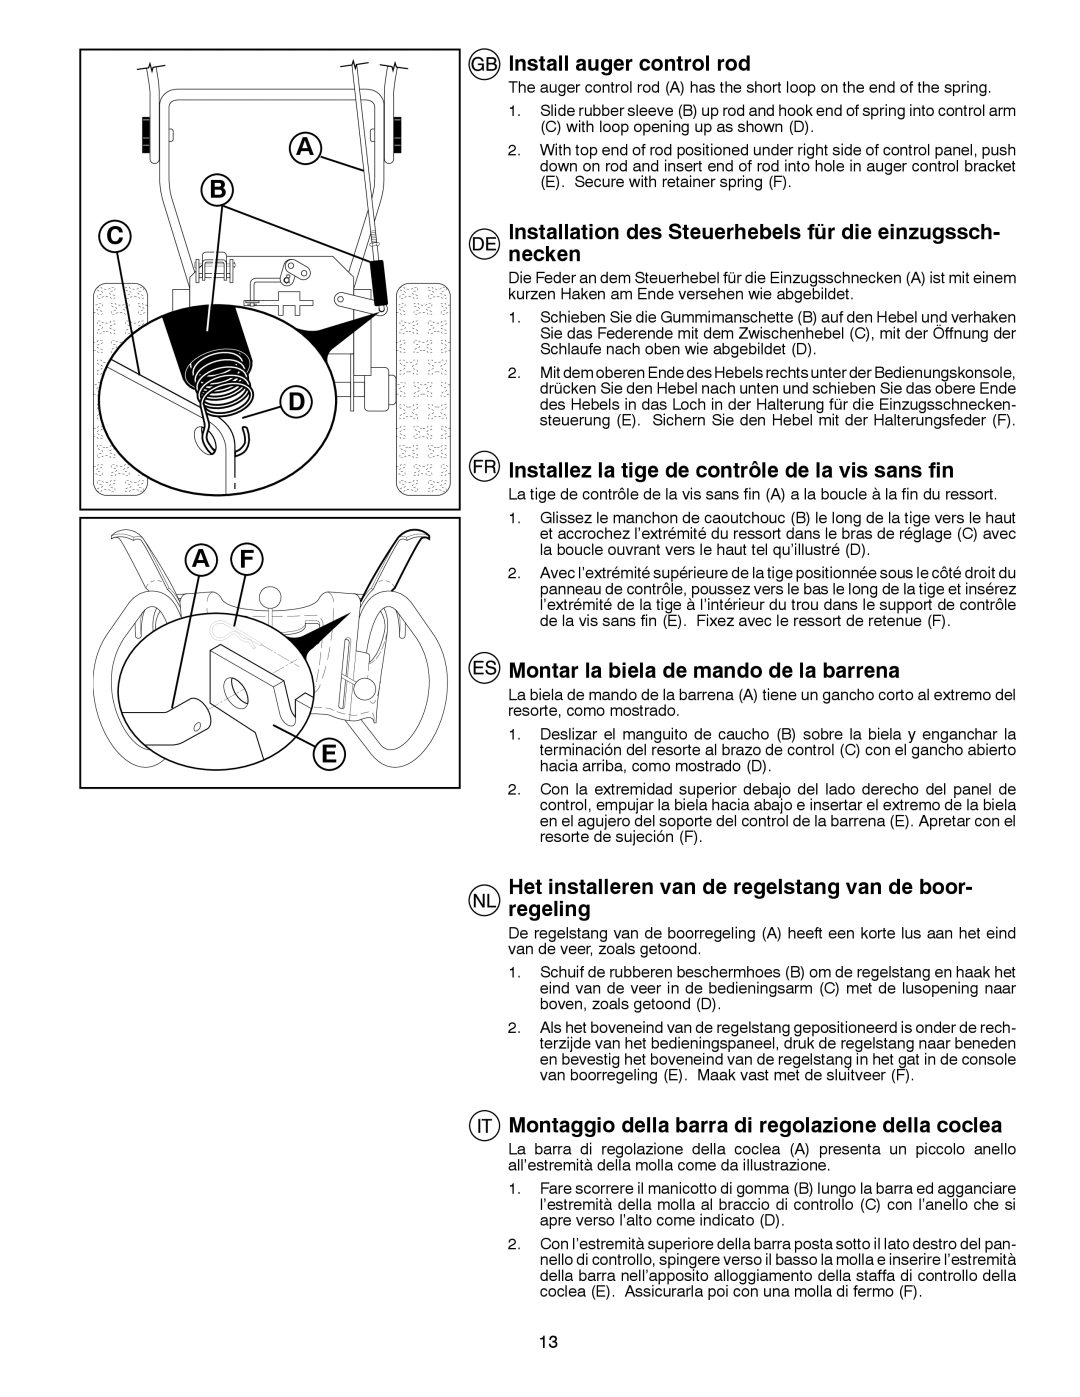
Install auger control rod

The auger control rod (A) has the short loop on the end of the spring.

1.Slide rubber sleeve (B) up rod and hook end of spring into control arm

(C)with loop opening up as shown (D).

2.With top end of rod positioned under right side of control panel, push down on rod and insert end of rod into hole in auger control bracket

(E).Secure with retainer spring (F).

Installation des Steuerhebels für die einzugssch- necken

Die Feder an dem Steuerhebel für die Einzugsschnecken (A) ist mit einem kurzen Haken am Ende versehen wie abgebildet.

1.Schieben Sie die Gummimanschette (B) auf den Hebel und verhaken Sie das Federende mit dem Zwischenhebel (C), mit der Öffnung der Schlaufe nach oben wie abgebildet (D).

2.Mit dem oberen Ende des Hebels rechts unter der Bedienungskonsole, drücken Sie den Hebel nach unten und schieben Sie das obere Ende des Hebels in das Loch in der Halterung für die Einzugsschnecken- steuerung (E). Sichern Sie den Hebel mit der Halterungsfeder (F).

Installez la tige de contrôle de la vis sans fin

La tige de contrôle de la vis sans fin (A) a la boucle à la fin du ressort.

1.Glissez le manchon de caoutchouc (B) le long de la tige vers le haut et accrochez l’extrémité du ressort dans le bras de réglage (C) avec la boucle ouvrant vers le haut tel qu’illustré (D).

2.Avec l’extrémité supérieure de la tige positionnée sous le côté droit du panneau de contrôle, poussez vers le bas le long de la tige et insérez l’extrémité de la tige à l’intérieur du trou dans le support de contrôle de la vis sans fin (E). Fixez avec le ressort de retenue (F).

Montar la biela de mando de la barrena

La biela de mando de la barrena (A) tiene un gancho corto al extremo del resorte, como mostrado.

1.Deslizar el manguito de caucho (B) sobre la biela y enganchar la terminación del resorte al brazo de control (C) con el gancho abierto hacia arriba, como mostrado (D).

2.Con la extremidad superior debajo del lado derecho del panel de control, empujar la biela hacia abajo e insertar el extremo de la biela en el agujero del soporte del control de la barrena (E). Apretar con el resorte de sujeción (F).

Het installeren van de regelstang van de boor- regeling

De regelstang van de boorregeling (A) heeft een korte lus aan het eind van de veer, zoals getoond.

1.Schuif de rubberen beschermhoes (B) om de regelstang en haak het eind van de veer in de bedieningsarm (C) met de lusopening naar boven, zoals getoond (D).

2.Als het boveneind van de regelstang gepositioneerd is onder de rech- terzijde van het bedieningspaneel, druk de regelstang naar beneden en bevestig het boveneind van de regelstang in het gat in de console van boorregeling (E). Maak vast met de sluitveer (F).

Montaggio della barra di regolazione della coclea

La barra di regolazione della coclea (A) presenta un piccolo anello all’estremità della molla come da illustrazione.

1.Fare scorrere il manicotto di gomma (B) lungo la barra ed agganciare l’estremità della molla al braccio di controllo (C) con l’anello che si apre verso l’alto come indicato (D).

2.Con l’estremità superiore della barra posta sotto il lato destro del pan- nello di controllo, spingere verso il basso la molla e inserire l’estremità della barra nell’apposito alloggiamento della staffa di controllo della coclea (E). Assicurarla poi con una molla di fermo (F).

13

Page 13
Image 13
Husqvarna 8024STE instruction manual Install auger control rod, Installation des Steuerhebels für die einzugssch- necken

8024STE specifications

The Husqvarna 8024STE is a standout snowblower that seamlessly blends power, efficiency, and user-friendly design, making it an excellent choice for homeowners and professionals alike. This robust machine is engineered to tackle heavy snowfall, providing a reliable solution in the coldest of winters.

At the heart of the Husqvarna 8024STE is a powerful 24-inch clearing width, allowing it to efficiently clear large areas in minimal time. With an impressive throwing distance of up to 50 feet, this snowblower ensures that snow is not only cleared but also thrown far enough to keep walkways and driveways clear of drifting snow.

One of the key features of the 8024STE is its innovative Husqvarna SnowKing engine. This engine is designed for performance, featuring high torque and an easy-start mechanism that allows users to get started without difficulty. It operates smoothly even in extreme conditions, ensuring that you can count on it when the weather turns harsh.

The snowblower's heavy-duty construction is designed to withstand demanding tasks. The auger and impeller are constructed from durable materials, providing enhanced durability and performance. The auger's design allows for efficient snow gathering and movement, while the high-capacity impeller ensures that snow is discharged effectively.

The 8024STE also boasts a range of user-friendly features, including a convenient electric start option. This allows for effortless starting in cold temperatures. The machine is equipped with large, rugged tires that provide excellent traction, allowing it to navigate through deep snow and icy conditions with ease.

Another noteworthy characteristic is its adjustable skid shoes, which allow for customizable height adjustments to suit different surfaces, whether you're clearing gravel or asphalt. The industrial-grade metal chute and deflector enable precise control over where you want the snow to go, further enhancing its usability.

In terms of ergonomics, the Husqvarna 8024STE features a comfortable control panel and heated hand grips, which make it easier to operate in frigid temperatures. The steering is designed for easy maneuverability, allowing operators to turn and navigate tight spaces efficiently.

With its combination of power, advanced features, and careful engineering, the Husqvarna 8024STE is designed to deliver reliable snow removal performance, helping to make winter maintenance more manageable for users. Whether for residential driveways or commercial lots, this snowblower stands out as a robust solution to winter's challenges.