Husqvarna 8024STE instruction manual Install discharge chute / chute rotater head

Models: 8024STE

1 60
Download 60 pages 50.22 Kb
Page 14
Image 14

A

G


F


C


D

B

E

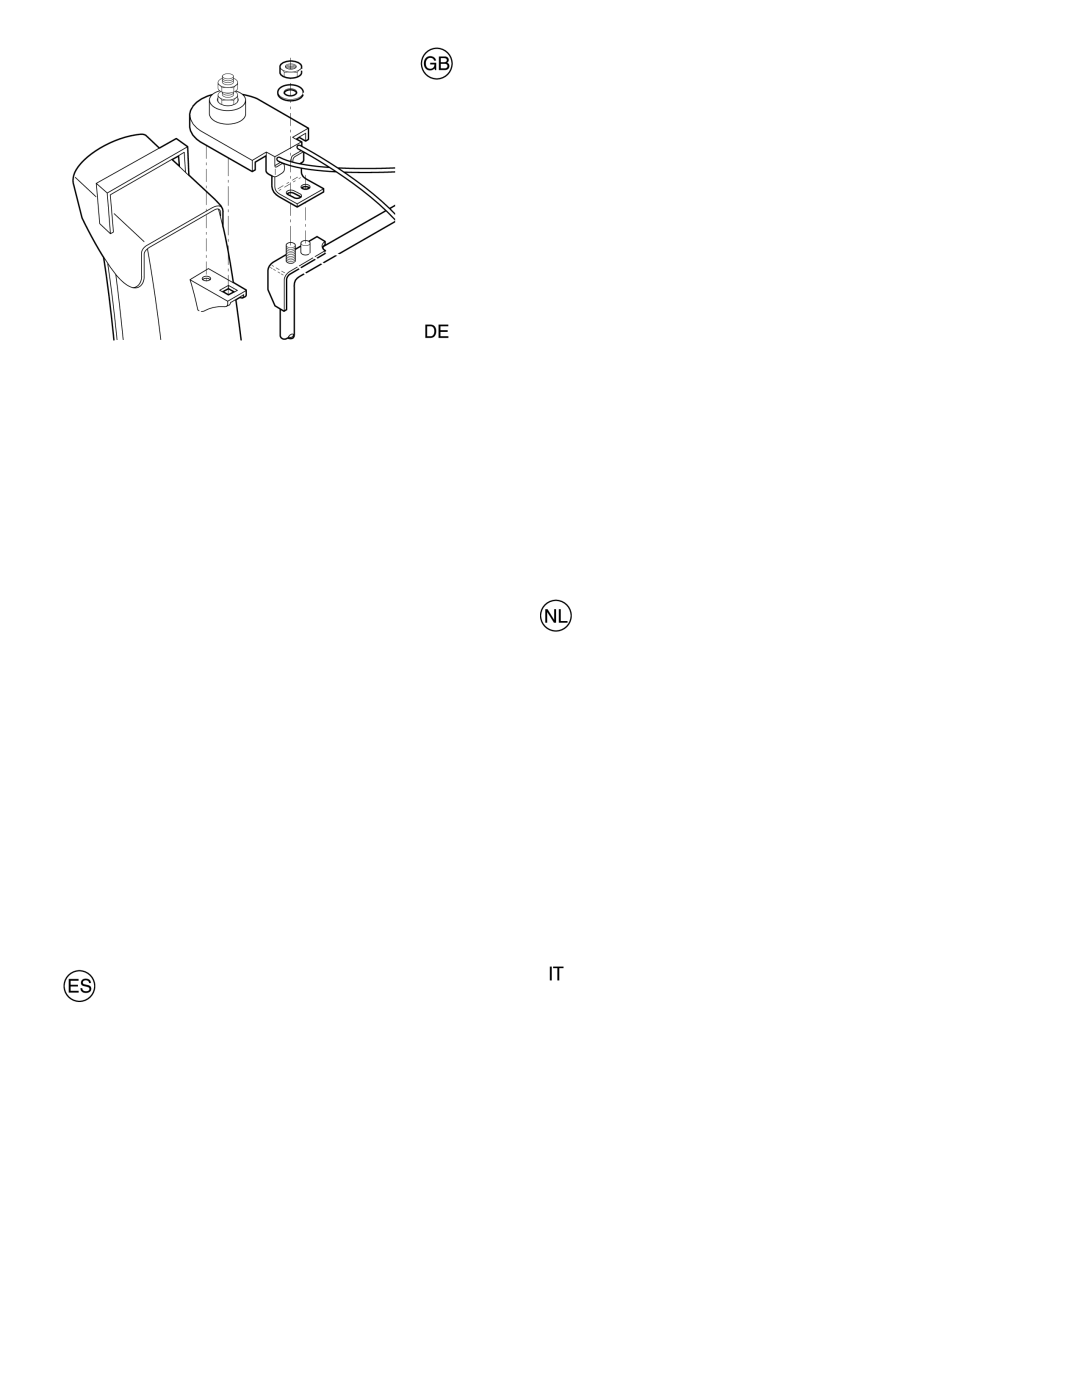
Install discharge chute / chute rotater head

NOTE: The multi-wrench provided in your parts bag may be used to install the chute rotater head.

1.Place discharge chute assembly on top of chute base with discharge opening toward front of snow thrower.

2.Position chute rotater head (A) over chute bracket (B). If necessary, rotate chute assembly to align square and pin on underside of chute rotater head with holes in chute bracket.

3.With chute rotater head and chute bracket aligned, position chute rotater head on pin (C) and threaded stud (D) of mounting bracket (E).

4.Install 3/8" washer (F) and lock nut (G) on threaded stud and tighten se- curely.

Installation der auswurfrinne / der drehvorrichtung für die auswurfrinne

HINWEIS: Der Kombischraubenschlüssel in der Zubehörtasche kann zur Instal- lation der Drehvorrichtung für die Auswurfrinne verwendet werden.

1.Setzen sie die Auswurfrinnenvorrichtung auf den dafür vorgesehenen Sockel auf, mit der Auswurföffnung nach der Vorderseite der Schneefräse gerichtet.

2.Setzen Sie die Drehvorrichtung für die Auswurfrinne (A) auf die Rinnenhalterung auf (B). Drehen Sie die Rinnenvorrichtung gegebenenfalls so lange, bis der viereckige und der runde Metallstift auf der Unterseite der Drehvorrichtung mit den entspre- chenden Löchern in der Rinnenhalterung in eine Linie gebracht sind.

3.Mit der Drehvorrichtung und der Rinnenhalterung in einer Linie, setzen Sie die Drehvorrichtung auf den Metallstift (C) und auf die Gewindestiftschraube an der Aufhängung (E) auf.

4.Setzen Sie die 3/8" Unterlegscheibe (F) und die Kontermutter (G) auf die Gewindestiftschraube auf und ziehen Sie sie fest an.

Installez la goulotte d’évacuation / tête rotative de la goulotte d’évacuation

REMARQUE: Les multiples clés fournies avec vos sacs à pièces peuvent être utilisées pour installer la tête rotative de la goulotte d’évacuation.

1.Placez l’assemblage de la goulotte d’évacuation sur la partie supérieure de la base d’évacuation avec la décharge ouverte vers le devant de la souffleuse.

2.Positionnez la tête rotative de la goulotte d’évacuation

(A)par-dessus le support d’évacuation (B). Si néces- saire, pivotez l’assemblage de la goulotte d’évacuation afin d’aligner le carré et l’axe sur le dessous de la tête rotative de la goulotte d’évacuation avec les trous dans le support de la goulotte d’évacuation.

3.Avec la tête rotative de la goulotte d’évacuation et le support d’évacuation alignés, positionner la tête rotative sur l’axe (C) et le goujon fileté (D) du support de montage

4.Installez de la rondelle 3/8" (F) et de l’écrou freiné (G) sur le goujon fileté et serrez solidement.

Montar el conducto de eyección / cabeza rotante del conducto

NOTA: La llave de apriete múltipla proporcionada en su bolsa de partes se puede utilizar para instalar la cabeza rotante del conducto

1.Colocar el grupo del conducto de eyección sobre la base del conducto con la abertura de eyección hacia el frente de la máquina quitanieves.

2.Posicionar la cabeza rotante del conducto (A) sobre el soporte del conducto (B). Si fuera necesario, girar el grupo del conducto para alinear la escuadra y la clavija debajo de la cabeza rotante del conducto con los agujeros en el soporte del conducto.

3.Con la cabeza rotante del conducto y el soporte del conducto alineados, posicionar la cabeza rotante del conducto sobre la clavija (C) y el perno con filete del soporte (D) de montaje (E).

4.Colocar una arandela (F) de 3/8" y una contratuerca (G) sobre el perno con filete y apretar firmemente.

Het installeren van de afvoertrechter / rotorkop

N.B.: De moersleutel in de onderdelenzakjes kan worden gebruikt voor de montage van de rotorkop van de afvoer- trechter.

1.Plaats de assemblage van de afvoertrechter op het bo- veneind van de trechterbasis met de afvoeropening naar de voorkant van de sneeuwruimer.

2.Plaats de rotorkop van de afvoertrechter (A) op de console van de afvoertrechter (B). Indien noodzakelijk, draai de afvoertrechter zo, dat hij in een rechte lijn ligt en pin de onderzijde van de rotorkop van de afvoertrechter vast met behulp van de gaten in de console van de afvoer- trechter.

3.Als de rotorkop en de console op een rechte lijn liggen, plaats dan de rotorkop op spie (C) en tapbout (D) van de montageconsole (E).

4.Plaat een 3/8"-borgschijfje (F) en borgmoer (G) om de tapbout en maak stevig vast.

Montaggio della bocca di scarico/ testa dispositivo di rotazione della bocca di scarico

NOTA: La chiave multipla fornita nella cassetta degli attrezzi può essere utilizzata per il montaggio della testa del dispositivo di rotazione della bocca di scarico.

1.Collocare il gruppo della bocca di scarico sopra la base della bocca con lo scarico aperto verso la parte anteriore dello spazzaneve.

2.Posizionare la testa del dispositivo di rotazione (A) sopra la staffa dello scarico (B). Se necessario, ruotare il gruppo di scarico per allineare il quadro e I perni della parte inferiore della testa con I fori della staffa di scarico.

3.Avendo allineato la testa del dispositivo di rotazione della bocca di scarico e la staffa, posizionare la testa sul perno (C) sulla vite prigioniera filettata (D) della staffa di montaggio (E).

4.Infilare una rondella da 3/8" (F) ed un dado di fissaggio

(G) sulla vite prigioniera filettata e stringere bene.

14

Page 14
Image 14
Husqvarna 8024STE Install discharge chute / chute rotater head, Het installeren van de afvoertrechter / rotorkop

8024STE specifications

The Husqvarna 8024STE is a standout snowblower that seamlessly blends power, efficiency, and user-friendly design, making it an excellent choice for homeowners and professionals alike. This robust machine is engineered to tackle heavy snowfall, providing a reliable solution in the coldest of winters.

At the heart of the Husqvarna 8024STE is a powerful 24-inch clearing width, allowing it to efficiently clear large areas in minimal time. With an impressive throwing distance of up to 50 feet, this snowblower ensures that snow is not only cleared but also thrown far enough to keep walkways and driveways clear of drifting snow.

One of the key features of the 8024STE is its innovative Husqvarna SnowKing engine. This engine is designed for performance, featuring high torque and an easy-start mechanism that allows users to get started without difficulty. It operates smoothly even in extreme conditions, ensuring that you can count on it when the weather turns harsh.

The snowblower's heavy-duty construction is designed to withstand demanding tasks. The auger and impeller are constructed from durable materials, providing enhanced durability and performance. The auger's design allows for efficient snow gathering and movement, while the high-capacity impeller ensures that snow is discharged effectively.

The 8024STE also boasts a range of user-friendly features, including a convenient electric start option. This allows for effortless starting in cold temperatures. The machine is equipped with large, rugged tires that provide excellent traction, allowing it to navigate through deep snow and icy conditions with ease.

Another noteworthy characteristic is its adjustable skid shoes, which allow for customizable height adjustments to suit different surfaces, whether you're clearing gravel or asphalt. The industrial-grade metal chute and deflector enable precise control over where you want the snow to go, further enhancing its usability.

In terms of ergonomics, the Husqvarna 8024STE features a comfortable control panel and heated hand grips, which make it easier to operate in frigid temperatures. The steering is designed for easy maneuverability, allowing operators to turn and navigate tight spaces efficiently.

With its combination of power, advanced features, and careful engineering, the Husqvarna 8024STE is designed to deliver reliable snow removal performance, helping to make winter maintenance more manageable for users. Whether for residential driveways or commercial lots, this snowblower stands out as a robust solution to winter's challenges.