E

G

F

C

D


A


B

A

D

Schuifbouten

Boorschuifbouten

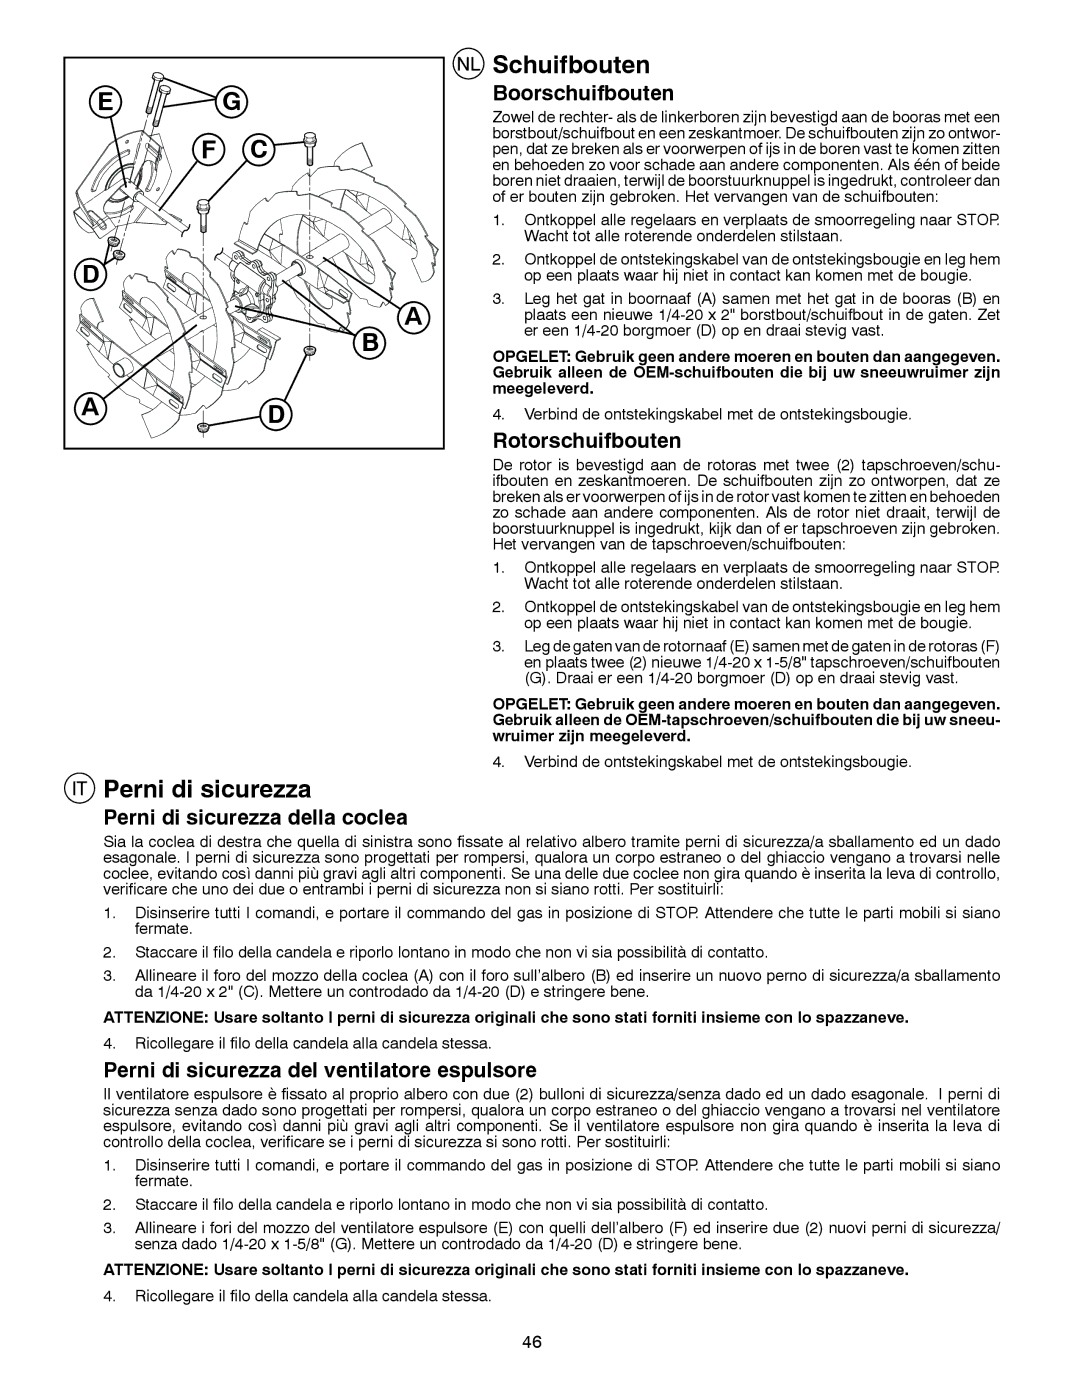
Zowel de rechter- als de linkerboren zijn bevestigd aan de booras met een borstbout/schuifbout en een zeskantmoer. De schuifbouten zijn zo ontwor- pen, dat ze breken als er voorwerpen of ijs in de boren vast te komen zitten en behoeden zo voor schade aan andere componenten. Als één of beide boren niet draaien, terwijl de boorstuurknuppel is ingedrukt, controleer dan of er bouten zijn gebroken. Het vervangen van de schuifbouten:

1.Ontkoppel alle regelaars en verplaats de smoorregeling naar STOP. Wacht tot alle roterende onderdelen stilstaan.

2.Ontkoppel de ontstekingskabel van de ontstekingsbougie en leg hem op een plaats waar hij niet in contact kan komen met de bougie.

3.Leg het gat in boornaaf (A) samen met het gat in de booras (B) en plaats een nieuwe 1/4-20 x 2" borstbout/schuifbout in de gaten. Zet er een 1/4-20 borgmoer (D) op en draai stevig vast.

OPGELET: Gebruik geen andere moeren en bouten dan aangegeven. Gebruik alleen de OEM-schuifbouten die bij uw sneeuwruimer zijn meegeleverd.

4.Verbind de ontstekingskabel met de ontstekingsbougie.

Rotorschuifbouten

De rotor is bevestigd aan de rotoras met twee (2) tapschroeven/schu- ifbouten en zeskantmoeren. De schuifbouten zijn zo ontworpen, dat ze breken als er voorwerpen of ijs in de rotor vast komen te zitten en behoeden zo schade aan andere componenten. Als de rotor niet draait, terwijl de boorstuurknuppel is ingedrukt, kijk dan of er tapschroeven zijn gebroken. Het vervangen van de tapschroeven/schuifbouten:

1.Ontkoppel alle regelaars en verplaats de smoorregeling naar STOP. Wacht tot alle roterende onderdelen stilstaan.

2.Ontkoppel de ontstekingskabel van de ontstekingsbougie en leg hem op een plaats waar hij niet in contact kan komen met de bougie.

3.Leg de gaten van de rotornaaf (E) samen met de gaten in de rotoras (F) en plaats twee (2) nieuwe 1/4-20 x 1-5/8" tapschroeven/schuifbouten

(G). Draai er een 1/4-20 borgmoer (D) op en draai stevig vast.

OPGELET: Gebruik geen andere moeren en bouten dan aangegeven. Gebruik alleen de OEM-tapschroeven/schuifbouten die bij uw sneeu- wruimer zijn meegeleverd.

4.Verbind de ontstekingskabel met de ontstekingsbougie.

Perni di sicurezza

Perni di sicurezza della coclea

Sia la coclea di destra che quella di sinistra sono fissate al relativo albero tramite perni di sicurezza/a sballamento ed un dado esagonale. I perni di sicurezza sono progettati per rompersi, qualora un corpo estraneo o del ghiaccio vengano a trovarsi nelle coclee, evitando così danni più gravi agli altri componenti. Se una delle due coclee non gira quando è inserita la leva di controllo, verificare che uno dei due o entrambi i perni di sicurezza non si siano rotti. Per sostituirli:

1.Disinserire tutti I comandi, e portare il commando del gas in posizione di STOP. Attendere che tutte le parti mobili si siano fermate.

2.Staccare il filo della candela e riporlo lontano in modo che non vi sia possibilità di contatto.

3.Allineare il foro del mozzo della coclea (A) con il foro sull’albero (B) ed inserire un nuovo perno di sicurezza/a sballamento da 1/4-20 x 2" (C). Mettere un controdado da 1/4-20 (D) e stringere bene.

ATTENZIONE: Usare soltanto I perni di sicurezza originali che sono stati forniti insieme con lo spazzaneve.

4.Ricollegare il filo della candela alla candela stessa.

Perni di sicurezza del ventilatore espulsore

Il ventilatore espulsore è fissato al proprio albero con due (2) bulloni di sicurezza/senza dado ed un dado esagonale. I perni di sicurezza senza dado sono progettati per rompersi, qualora un corpo estraneo o del ghiaccio vengano a trovarsi nel ventilatore espulsore, evitando così danni più gravi agli altri componenti. Se il ventilatore espulsore non gira quando è inserita la leva di controllo della coclea, verificare se i perni di sicurezza si sono rotti. Per sostituirli:

1.Disinserire tutti I comandi, e portare il commando del gas in posizione di STOP. Attendere che tutte le parti mobili si siano fermate.

2.Staccare il filo della candela e riporlo lontano in modo che non vi sia possibilità di contatto.

3.Allineare i fori del mozzo del ventilatore espulsore (E) con quelli dell’albero (F) ed inserire due (2) nuovi perni di sicurezza/ senza dado 1/4-20 x 1-5/8" (G). Mettere un controdado da 1/4-20 (D) e stringere bene.

ATTENZIONE: Usare soltanto I perni di sicurezza originali che sono stati forniti insieme con lo spazzaneve.

4.Ricollegare il filo della candela alla candela stessa.

46

Page 46
Image 46
Husqvarna 8024STE instruction manual Schuifbouten, Perni di sicurezza

8024STE specifications

The Husqvarna 8024STE is a standout snowblower that seamlessly blends power, efficiency, and user-friendly design, making it an excellent choice for homeowners and professionals alike. This robust machine is engineered to tackle heavy snowfall, providing a reliable solution in the coldest of winters.

At the heart of the Husqvarna 8024STE is a powerful 24-inch clearing width, allowing it to efficiently clear large areas in minimal time. With an impressive throwing distance of up to 50 feet, this snowblower ensures that snow is not only cleared but also thrown far enough to keep walkways and driveways clear of drifting snow.

One of the key features of the 8024STE is its innovative Husqvarna SnowKing engine. This engine is designed for performance, featuring high torque and an easy-start mechanism that allows users to get started without difficulty. It operates smoothly even in extreme conditions, ensuring that you can count on it when the weather turns harsh.

The snowblower's heavy-duty construction is designed to withstand demanding tasks. The auger and impeller are constructed from durable materials, providing enhanced durability and performance. The auger's design allows for efficient snow gathering and movement, while the high-capacity impeller ensures that snow is discharged effectively.

The 8024STE also boasts a range of user-friendly features, including a convenient electric start option. This allows for effortless starting in cold temperatures. The machine is equipped with large, rugged tires that provide excellent traction, allowing it to navigate through deep snow and icy conditions with ease.

Another noteworthy characteristic is its adjustable skid shoes, which allow for customizable height adjustments to suit different surfaces, whether you're clearing gravel or asphalt. The industrial-grade metal chute and deflector enable precise control over where you want the snow to go, further enhancing its usability.

In terms of ergonomics, the Husqvarna 8024STE features a comfortable control panel and heated hand grips, which make it easier to operate in frigid temperatures. The steering is designed for easy maneuverability, allowing operators to turn and navigate tight spaces efficiently.

With its combination of power, advanced features, and careful engineering, the Husqvarna 8024STE is designed to deliver reliable snow removal performance, helping to make winter maintenance more manageable for users. Whether for residential driveways or commercial lots, this snowblower stands out as a robust solution to winter's challenges.