Manuals
/
Icom
/
Marine Equipment
/
Marine Radio
Icom
IC-M503 Dimensions, 145.0 5 23⁄32˝, 109.4 110.0 4 11⁄32˝ 165.0 6 1⁄2˝ 31.4 53.0
Models:
IC-M503
1
28
50
50
Download
50 pages
43.93 Kb
25
26
27
28
29
30
31
32
Troubleshooting
Specs
Install
Scan resume timer
Channel Group Indicator pgs
Dimension
Maintenance
HM-134 supplied accessories
Adjusts the audio level. p
Setting tag channels
Page 28
Image 28
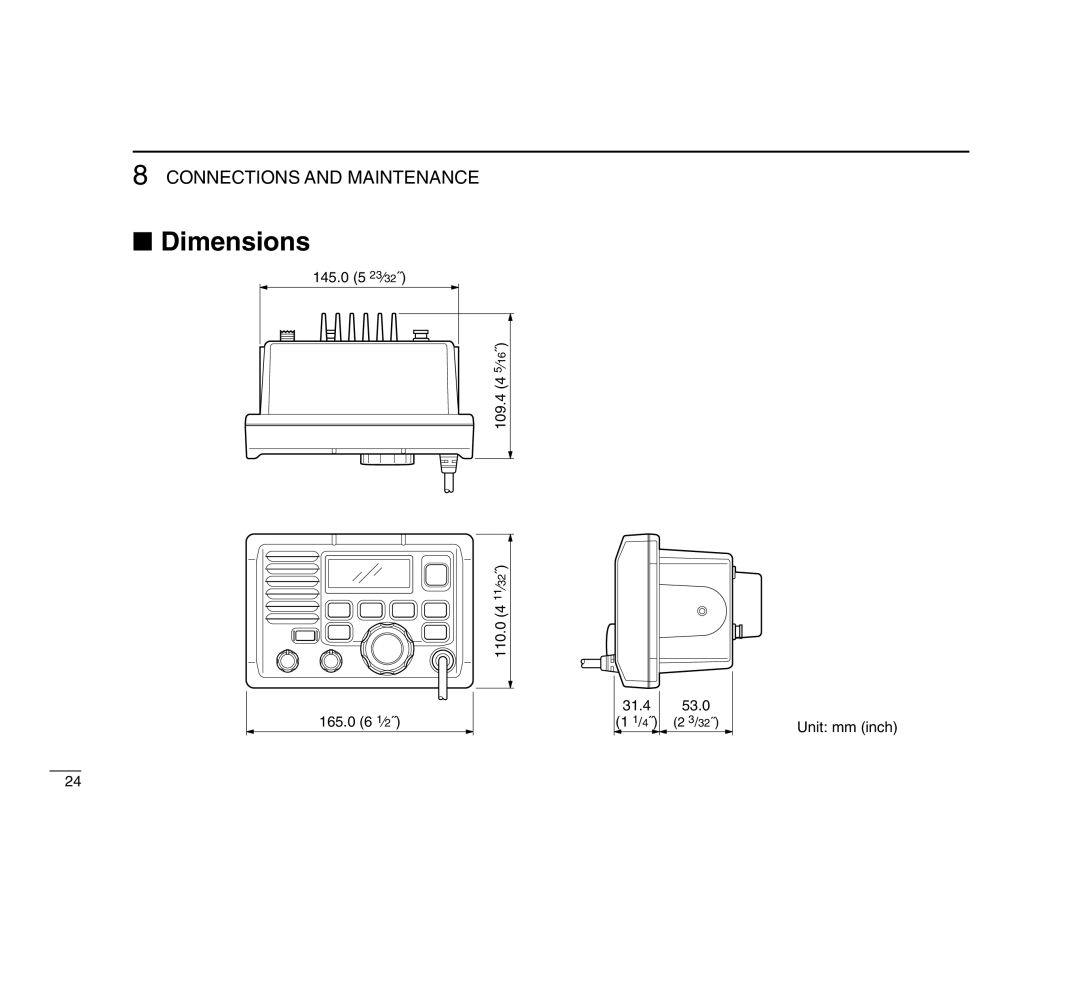
8
CONNECTIONS AND MAINTENANCE
■
Dimensions
145.0 (5
23
⁄
32
˝)
5
⁄ )˝
16
109.4 (4
110.0 (4
11
⁄
32
˝)
165.0 (6
1
⁄
2
˝)
31.4
(1
1
/
4
˝)
53.0
(2
3
/
32
˝)
Unit: mm (inch)
24
Page 27
Page 29
Page 28
Image 28
Page 27
Page 29
Contents
IM503
DS-100 #02 DSC Controller is required
Mayday Mayday Mayday
Channel 16 is automatically selected
Table of Contents
Page
Operating Rules
Priorities
Privacy
Radio Licenses
Volume Control VOL
Adjusts the audio level. p
Panel Description
Panel description
Panel Description
Function display
PTT Switch PTT
Channel UP/DOWN Switches Y/Z
Microphone
Push and hold to transmit release to receive. p
Basic Operation
Channel selection
Channel
ÏCall channel
Atis and DSC channels FRG version only
Basic Operation
Rotate the channel selector to select a channel
Receiving and transmitting
Call channel programming
Channel names
Rotate the channel selector to select the desired channel
Push Call to input and set the name
Set mode Scrambler code item
Optional voice scrambler operation
Activating the scrambler
Programming scrambler codes
DUALWATCH/TRI-WATCH
Description
Operation
DUALWATCH/TRI-WATCH Simulation
Scan Operations
Scan types
Priority Scan
Normal Scan
Setting tag channels
Starting a scan
Scan Operation
Clearing all tag channels in the selected channel group
Set mode programming
SET Mode
SET Mode Construction
Set mode items
Scan mode
Scan resume timer
Dual/tri watch
Internal speaker
LCD contrast
Scrambler code
Scrambler type
Intercom Operation
Intercom operation
Connections and Maintenance
Fuse replacement
Cleaning
Unpacking
Connections and Maintenance
Connections
Microphone hanger
Mounting the transceiver
Using the supplied mounting bracket
Overhead Mounting Mounting on Dashboard
Using the optional mounting bracket
Optional unit installation
Opening the transceiver case
Dimensions
145.0 5 23⁄32˝
109.4 110.0 4 11⁄32˝ 165.0 6 1⁄2˝ 31.4 53.0
Unit mm inch
Troubleshooting
Problem Possible Cause Solution
Channel List
International channels
Specifications
Specifications and Options
Options
Power Switch PWR pgs
PTT Switch PTT pgs
Channel 16/CALL Channel Switch 16C
HM-134 REMOTE-CONTROL Microphone
HM-134 REMOTE-CONTROL Microphone
Channel Group Indicator pgs
KEY Lock Indicator p
12HM-134 REMOTE-CONTROL Microphone
1EXTERNAL Speaker Jack
7WAIT Indicator
Call channel
S.A. and International channels
A. channels
International channels
Push H/L to select the output power, if necessary
Lock functions
Display backlighting
Monitor function
Activating the lock function
Push Y/Z to select the desired channel
Programming scramble codes
To turn the scrambler func Tion OFF, repeat step w
Dualwatch/Tri- watch operation
To cancel dualwatch/tri-watch, push Dial again
Push Dual to start dualwatch or tri-watch
Entering set mode
Transceiver’s functions
Microphone’s own functions
Beep tone Beep
Intercom beep function
Available characters
HM-134 Connections and Installation
HM-134 supplied accessories
Installation
Accessories included with the HM-134 Qty
13HM-134 Connections and Installation
Mm 3⁄ 32˝ x
HM-134 Connections and Installation
24 to 27 d mm 15⁄16 to 11⁄16˝
MB-75 Template
Cut here
149 57⁄8˝
R11 Mm 3⁄32˝
Installation Notes
Installation notes
0560
Intended Country of Use
GER FRA ESP
AUT NED POR DEN GBR BEL ITA FIN IRL LUX GRE SUI
Kamiminami, Hirano-ku, Osaka 547-0003 Japan
Frequency MHz Transmit Receive 01A
Top
Page
Image
Contents