BROILING

For best results, use a pan designed for broiling. For additional broiling tips, see “Cooking Made Simple” booklet.

SETTING THE CONTROLS FOR BROILING

1.Place the oven rack in the proper rack positon. (See chart.)

2.Press the Broil pad.

Indicator word BROIL will flash and three dashes will appear.

3.Press the appropriate number pad(s). The first number pad pressed will enter “Hi” broil.

The oven has a variable broil feature

which means that a lower broil tem- perature can be selected. To select a lower temperature, press the appro- priate number pads for the tempera- ture desired after “Hi” appears in the display.

Five seconds after entering “Hi” or a temperature, the broil element will come on and the indicator words BROIL and ON will remain in the display. (If a lower temperature is selected, the ON indicator word will cycle on and off with the element.)

4.Preheat five minutes until broil element is red. Cook food according to the following broiling chart. Oven door

MUST be left open at the broil stop position during cooking.

5. Press the Cancel to turn off oven when food is cooked.

NOTES:

If more that five seconds elapse be- tween pressing the Broil pad and num- ber pad, the oven is not set and the display will return to the previous dis- play.

“Hi” is used for most broiling. Use a lower broil temperature when broiling longer cooking foods or thin pieces of food. The lower temperature allows food to cook to the well done stage without excessive browning.

A cooling fan will automatically turn on during broiling. If it does not operate, contact an autho- rized servicer.

Expect broil times to increase and browning to be slightly lighter if appli- ance is installed on a 208 volt circuit.

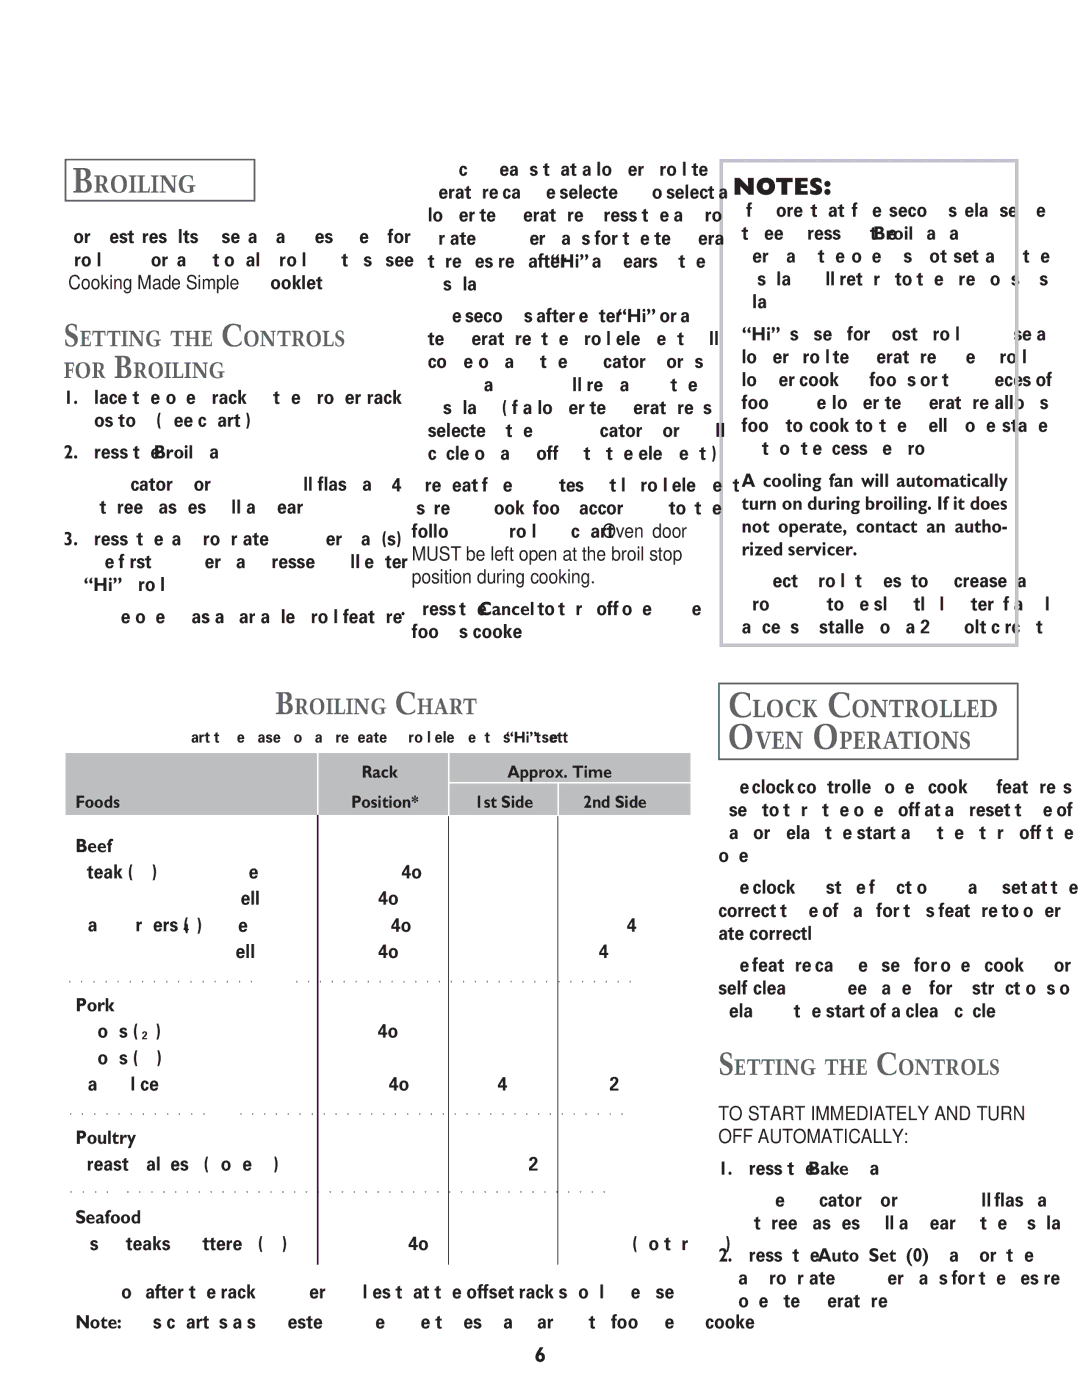
BROILING CHART

Chart time based on a preheated broil element using the “Hi” setting


Rack

Approx. Time

Foods

Position*

1st Side

2nd Side


CLOCK CONTROLLED OVEN OPERATIONS

The clock controlled oven cooking feature is used to turn the oven off at a preset time of day or delay the start and then turn off the

Beef


Steak (1"):

Medium

Well

Hamburgers (3/4"): Medium

Well

Pork

Chops (1/2")

Chops (1")

Ham Slice

Poultry

Breast Halves (Bone-in)

Seafood

Fish Steaks, Buttered (1")

4o

4o

4o

4o

4o

3

4o

3

4o

9min.

11 min.

5min.

6min.

7min.

10-11 min.

4min.

11-12 min.

8-10 min.

7min.

8min. 3-4 min. 4-5 min.

5-6 min.

9-10 min.

2-3 min.

9-11 min.

(no turning)

oven.

The clock must be functioning and set at the correct time of day for this feature to oper- ate correctly.

The feature can be used for oven cooking or self-cleaning. See page 8 for instructions on delaying the start of a clean cycle.

SETTING THE CONTROLS

TO START IMMEDIATELY AND TURN OFF AUTOMATICALLY:

1.

Press the Bake pad.


• The indicator word BAKE will flash and


three dashes will appear in the display.

2.

Press the Auto Set (0) pad or the


appropriate number pads for the desired

*An "o" after the rack number implies that the offset rack should be used.

Note: This chart is a suggested guide. The times may vary with food being cooked.

oven temperature.

6

Page 7
Image 7
Jenn-Air JJW8627, JJW8630, JJW8527, JJW8530, JMW8530, JMW8527 warranty Setting the Controls for Broiling, Broiling Chart

JMW8527, JMW8530, JJW8530, JJW8527, JJW8627 specifications

The Jenn-Air JJW8.527, JJW8627, JMW8.530, JJW8630, and JJW8530 are part of Jenn-Air's premium line of built-in wall ovens, blending advanced technology with unparalleled design to elevate culinary experiences. Known for their elegance and performance, these models boast a variety of features catering to both amateur cooks and professional chefs.

One of the standout features across these models is the Advanced Convection System, which utilizes a powerful fan and a heated element to circulate hot air evenly throughout the oven. This results in consistently baked goods and perfectly roasted meats, ensuring that every dish meets the highest culinary standards.

Another notable technology is the Precision Cooking with Dual-Fan Convection, which allows for precise temperature control and optimal cooking results. This feature is particularly beneficial for multi-rack cooking, as it ensures that dishes on different levels cook uniformly.

The wall ovens incorporate a sleek, user-friendly touch-screen interface that simplifies operation. With pre-programmed settings for various recipes, users can select their desired cooking method with just a few taps. Additionally, the Wi-Fi connectivity available in models like JJW8627 and JJW8530 allows users to control and monitor their cooking remotely via a smartphone app. This feature enables users to preheat the oven, set timers, and receive notifications, making meal preparation more convenient.

Another important aspect of these ovens is the Steam Assist cooking option found in the JMW8.530 and JJW8630 models. This technology introduces moisture to the cooking environment, which is ideal for baking bread and roasting poultry, enhancing flavors and textures.

Moreover, the sleek and stylish design of the Jenn-Air wall ovens is characterized by their seamless integration into any kitchen decor. They are available in various finishes, including stainless steel and black, ensuring that they complement modern and traditional kitchen aesthetics.

The interiors of these ovens are spacious, offering ample capacity for larger meals or multiple dishes, making them perfect for family gatherings or entertaining guests. Additionally, the self-cleaning option simplifies maintenance, utilizing high temperatures to burn off residues and deposits, leaving the oven clean with minimal effort from the user.

In summary, the Jenn-Air JJW8.527, JJW8627, JMW8.530, JJW8630, and JJW8530 wall ovens represent the pinnacle of cooking technology and design. Their combination of innovative cooking features, user-friendly technology, and elegant aesthetics make them a valuable addition to any kitchen, catering to diverse culinary needs while ensuring exceptional cooking results.