438335-UIM-B-0509

ADJUSTMENT OF MANIFOLD GAS PRESSURE & INPUT RATE

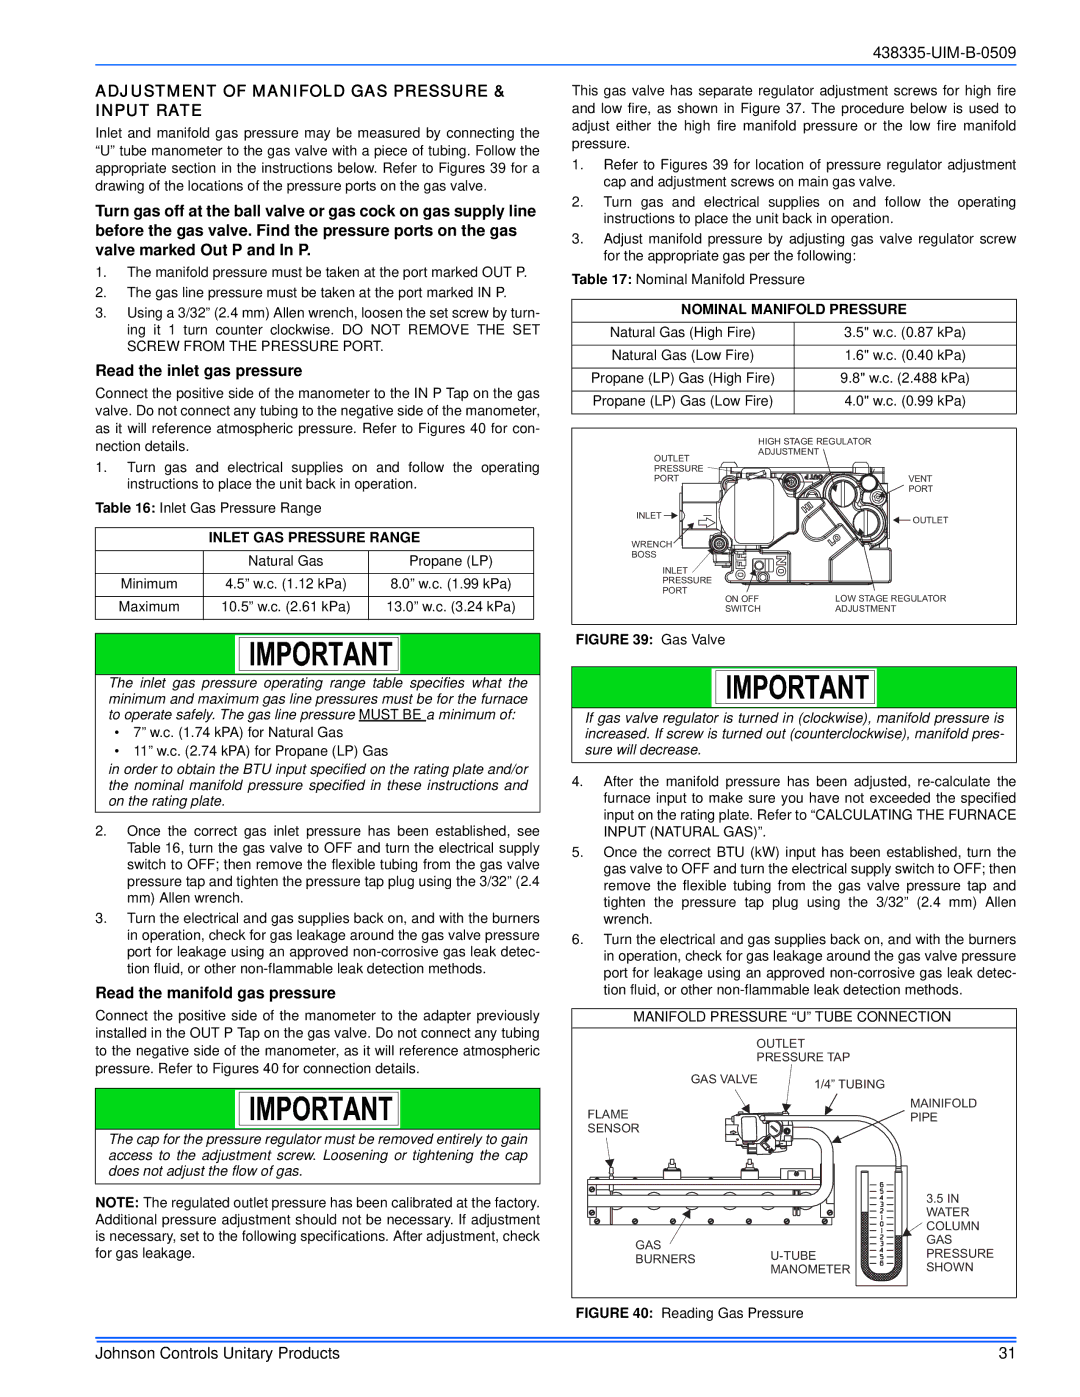
Inlet and manifold gas pressure may be measured by connecting the “U” tube manometer to the gas valve with a piece of tubing. Follow the appropriate section in the instructions below. Refer to Figures 39 for a drawing of the locations of the pressure ports on the gas valve.

Turn gas off at the ball valve or gas cock on gas supply line before the gas valve. Find the pressure ports on the gas valve marked Out P and In P.

1.The manifold pressure must be taken at the port marked OUT P.

2.The gas line pressure must be taken at the port marked IN P.

3.Using a 3/32” (2.4 mm) Allen wrench, loosen the set screw by turn- ing it 1 turn counter clockwise. DO NOT REMOVE THE SET SCREW FROM THE PRESSURE PORT.

Read the inlet gas pressure

Connect the positive side of the manometer to the IN P Tap on the gas valve. Do not connect any tubing to the negative side of the manometer, as it will reference atmospheric pressure. Refer to Figures 40 for con- nection details.

1.Turn gas and electrical supplies on and follow the operating instructions to place the unit back in operation.

Table 16: Inlet Gas Pressure Range

INLET GAS PRESSURE RANGE


Natural Gas


Propane (LP)


Minimum

4.5” w.c. (1.12 kPa)

8.0” w.c. (1.99 kPa)


Maximum

10.5” w.c. (2.61 kPa)

13.0” w.c. (3.24 kPa)


The inlet gas pressure operating range table specifies what the minimum and maximum gas line pressures must be for the furnace to operate safely. The gas line pressure MUST BE a minimum of:

7” w.c. (1.74 kPA) for Natural Gas

11” w.c. (2.74 kPA) for Propane (LP) Gas

in order to obtain the BTU input specified on the rating plate and/or the nominal manifold pressure specified in these instructions and on the rating plate.

2.Once the correct gas inlet pressure has been established, see Table 16, turn the gas valve to OFF and turn the electrical supply switch to OFF; then remove the flexible tubing from the gas valve pressure tap and tighten the pressure tap plug using the 3/32” (2.4 mm) Allen wrench.

3.Turn the electrical and gas supplies back on, and with the burners in operation, check for gas leakage around the gas valve pressure port for leakage using an approved non-corrosive gas leak detec- tion fluid, or other non-flammable leak detection methods.

Read the manifold gas pressure

Connect the positive side of the manometer to the adapter previously installed in the OUT P Tap on the gas valve. Do not connect any tubing to the negative side of the manometer, as it will reference atmospheric pressure. Refer to Figures 40 for connection details.

The cap for the pressure regulator must be removed entirely to gain access to the adjustment screw. Loosening or tightening the cap does not adjust the flow of gas.

NOTE: The regulated outlet pressure has been calibrated at the factory. Additional pressure adjustment should not be necessary. If adjustment is necessary, set to the following specifications. After adjustment, check for gas leakage.

This gas valve has separate regulator adjustment screws for high fire and low fire, as shown in Figure 37. The procedure below is used to adjust either the high fire manifold pressure or the low fire manifold pressure.

1.Refer to Figures 39 for location of pressure regulator adjustment cap and adjustment screws on main gas valve.

2.Turn gas and electrical supplies on and follow the operating instructions to place the unit back in operation.

3.Adjust manifold pressure by adjusting gas valve regulator screw for the appropriate gas per the following:

Table 17: Nominal Manifold Pressure

NOMINAL MANIFOLD PRESSURE

Natural Gas (High Fire)

3.5" w.c. (0.87 kPa)


Natural Gas (Low Fire)

1.6" w.c. (0.40 kPa)


Propane (LP) Gas (High Fire)

9.8" w.c. (2.488 kPa)


Propane (LP) Gas (Low Fire)

4.0" w.c. (0.99 kPa)


HIGH STAGE REGULATOR

ADJUSTMENT


OUTLET


PRESSURE


PORT

VENT


PORT

INLET

OUTLET


WRENCH


BOSS


INLET


PRESSURE


PORT

LOW STAGE REGULATOR

ON OFF

SWITCH

ADJUSTMENT

FIGURE 39: Gas Valve

If gas valve regulator is turned in (clockwise), manifold pressure is increased. If screw is turned out (counterclockwise), manifold pres- sure will decrease.

4.After the manifold pressure has been adjusted, re-calculate the furnace input to make sure you have not exceeded the specified input on the rating plate. Refer to “CALCULATING THE FURNACE INPUT (NATURAL GAS)”.

5.Once the correct BTU (kW) input has been established, turn the gas valve to OFF and turn the electrical supply switch to OFF; then remove the flexible tubing from the gas valve pressure tap and tighten the pressure tap plug using the 3/32” (2.4 mm) Allen wrench.

6.Turn the electrical and gas supplies back on, and with the burners in operation, check for gas leakage around the gas valve pressure port for leakage using an approved non-corrosive gas leak detec- tion fluid, or other non-flammable leak detection methods.

MANIFOLD PRESSURE “U” TUBE CONNECTION


OUTLET


PRESSURE TAP


GAS VALVE

1/4” TUBING


FLAME


MAINIFOLD


PIPE

SENSOR


3.5 IN


WATER


COLUMN

GAS


GAS


U-TUBE

PRESSURE

BURNERS


MANOMETER

SHOWN


FIGURE 40: Reading Gas Pressure

Johnson Controls Unitary Products

31

Page 31
Image 31
Johnson Controls TM9V MP installation manual Adjustment of Manifold GAS Pressure & Input Rate, Read the inlet gas pressure

TM9V MP specifications

The Johnson Controls TM9V MP is a cutting-edge variable capacity air conditioning system designed to provide optimal comfort and energy efficiency for residential and light commercial applications. This model is engineered with advanced technologies that cater to the needs of modern consumers who prioritize both performance and sustainability.

One of the standout features of the TM9V MP is its variable-speed compressor. Unlike traditional systems that operate at a fixed speed, this system can adjust its output based on the indoor temperature and humidity levels. This capability allows for precise temperature control and reduces energy consumption, ultimately leading to significant savings on utility bills. By maintaining a more consistent temperature, the TM9V MP enhances overall comfort in living spaces.

Another critical aspect of the TM9V MP is its integration of intelligent control technology. The system comes equipped with a user-friendly interface, which enables homeowners to easily monitor and adjust settings according to their preferences. Smart home integration is also a key feature, allowing for remote access and control through compatible smart devices. This ensures that users can manage their HVAC settings from anywhere, providing convenience and peace of mind.

The TM9V MP is also designed with high-efficiency ratings, often achieving SEER ratings above 18. This excellent performance not only complies with stringent energy efficiency regulations but also qualifies for various rebates and incentives in many regions, making it a financially attractive choice. The unit’s environmentally friendly refrigerant further emphasizes its commitment to sustainability.

In terms of construction and durability, the TM9V MP boasts a rugged design with high-quality components. Its enhanced sound insulation minimizes operational noise, making it suitable for residential settings where quiet operation is essential. The unit is also designed for easy installation and maintenance, which can further reduce lifecycle costs.

Overall, the Johnson Controls TM9V MP represents a blend of advanced engineering, energy efficiency, and user-friendly technology. Its variable speed compressor, smart controls, high-efficiency ratings, and durable construction make it a top choice for anyone seeking an HVAC solution that meets modern comfort and sustainability standards. With the TM9V MP, users can enjoy the benefits of a comfortable indoor environment while contributing to a greener future.