KD-SH9105
‡§√ËÕ߇≈Ëπ CD
Precautions
How to reset your unit
Contents
Illumination Navigation for easy operations
Location of the Buttons
Control panel
Remote controller
Return the battery holder
Installing the battery
Remove the battery holder
Place the battery
To drop the volume in a moment
Turning on the power
To turn off the power
Basic Operations
Demonstration
Canceling the display
Setting the clock
Meter
Selecting the level meter
Standard
Searching a station automatically Auto search
Radio Operations
Select the band FM1 3, AM Start searching a station
Press ¢ to search stations of higher frequencies
Select the band FM1 3, AM
Searching a station manually Manual search
Storing stations in memory
FM station automatic preset SSM
Receive
Select the FM band FM1 3 you want to store FM stations into
Selecting a preset station directly
Manual preset
Tune in to a station in this example, of 92.5 MHz
Press and hold the number button
Selecting a preset station using
Preset station list
Initial display pattern
Assigned station name is emphasized
Playing a disc
CD Operations
About MP3 and WMA discs
Open the control panel
Display indications when inserting an
Display indications when inserting an
Audio CD or a CD Text MP3 or a WMA disc
To stop play and eject the disc
To go to the next or previous tracks
What is ImageLink
To fast-forward or reverse the track
To go to a track quickly
How to go to the desired track quickly
To skip to the next or previous folder
Locating a folder on a disc
To go to a folder directly
Only on the remote controller
To select a folder and start playback
To select a track and start playback
Folder
You want to play Select the number 1 6 for the track
To play back tracks repeatedly Repeat Play
Selecting playback modes
Random Disc Random Off
Random Folder Random Disc Random Off
To play back only intros Intro Scan
Prohibiting disc ejection
Information shown on the display
By pressing Disp D, you can change
Display patterns change as follows
While playing an audio CD or a CD Text disc Initial display
Selecting the DSP modes
DSP Operations
Press SEL select once to show the DSP mode selection screen
To make further precise settings for the DSP modes
Adjust the DSP effect level-1, 2, or
As you rotate it, the car size
Select 4ch for the four
Press number button
Press SEL select repeatedly or wait for about 15 seconds
Available sound modes
To cancel the sound mode, select Flat
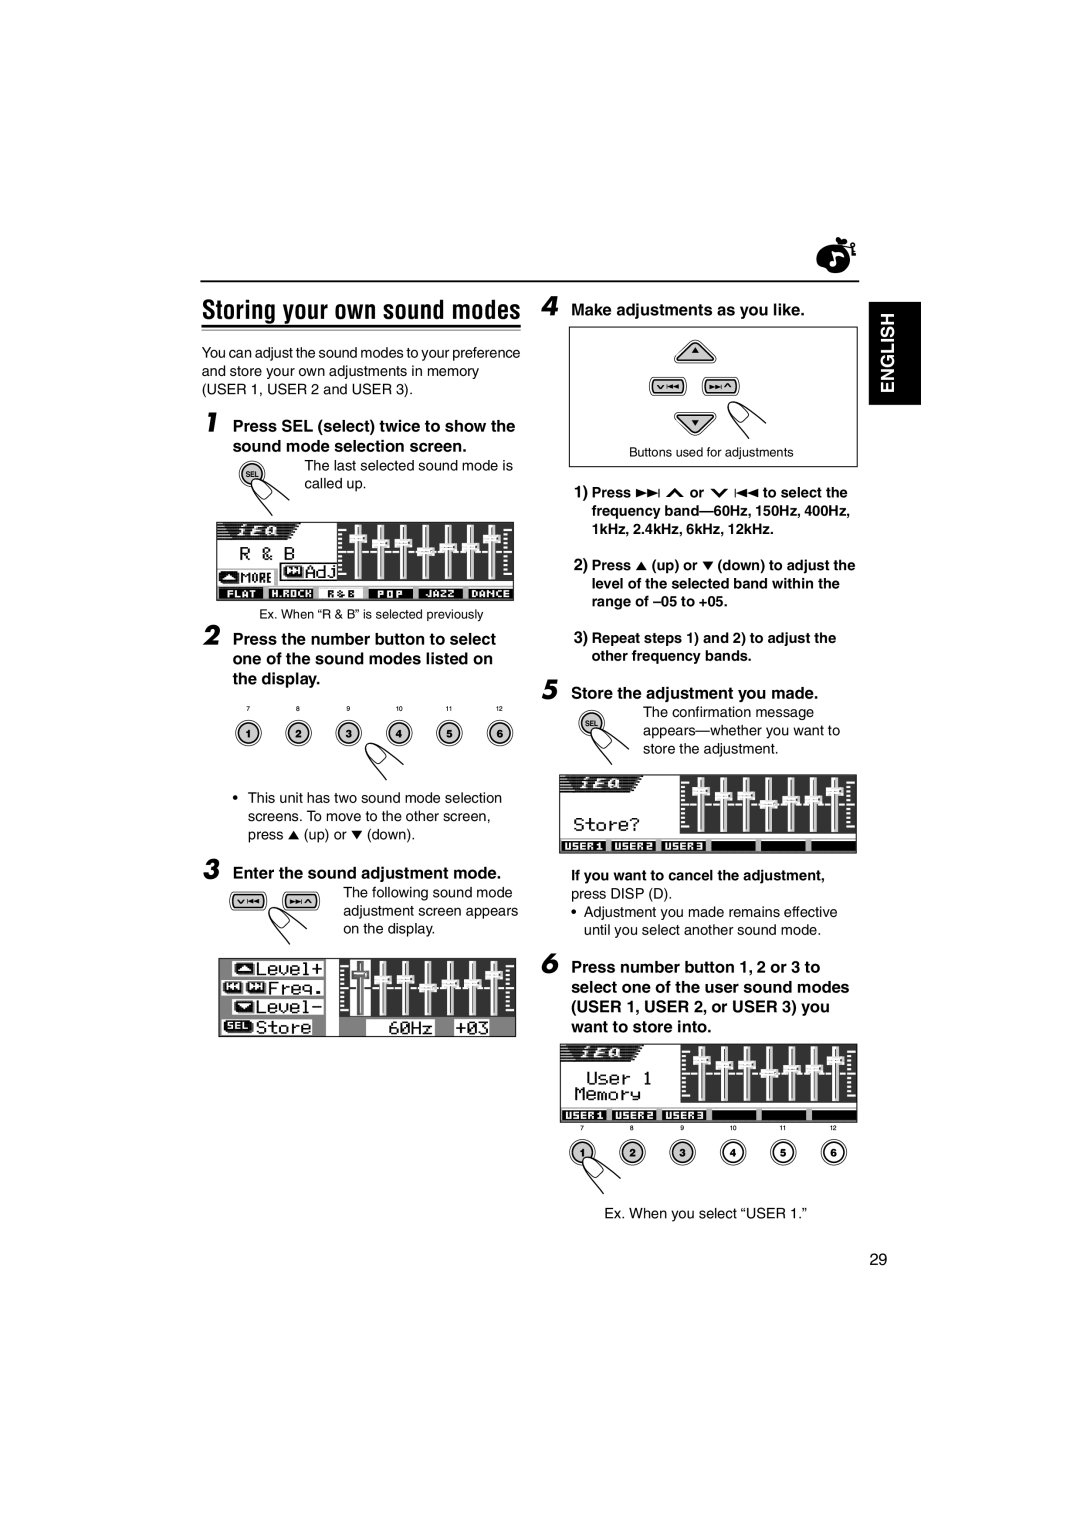
Equalizer Operations
If you want to cancel the adjustment
Store the adjustment you made
Enter the sound adjustment mode
Settings
Sound Adjustments
Adjust the level
Canceled Vol Adj Sub Out
BBE 1 BBE 2 BBE BBE Off Canceled
Show the BBE Digital adjustment screen
To adjust the input level of each source Vol Adj
Select the effect level
Graphic Displays
Install / Start the program
Import the images
Retouch and edit the images
Mode appears on
Press Mode M after the disc is detected
Downloading images and animations
Press number button 6 to show the download selection screen
Items for which you want to download
Select highlight one of the listed
File
File name
To delete all the stored files at a time
Deleting unwanted files
Select a file you want to download
If it is OK, press number button 1 to start downloading
To delete the stored files for Picture one by one
To delete the file stored PowerOn, PowerOff,
Source indication screen
Erasure
Setting
Setting or Ending ending screen
Graphics setting screen appears on the display
Select Opening opening screen
Select UserMovie, UserSlide, or UserPict
To select a still image for graphic display-User Picture
Select UserPict
Select a file you want
Adjust
Basic Procedure
Adjust the PSM item selected
Other Main Functions
Preferred Setting Mode PSM items
To show the graphics on the display- Graphics
To adjust the display contrast level Contrast
To select the source animation on the display-KeyIn CFM
To select the scroll mode-Scroll
To turn on/off the power amplifier switch- PowerAmp
To turn on/off the line input switch Line
To select the font on the display Font Type
To turn the tag display on or off-Tag
Press ¢ or 4 to select Dimmer Set the timer
Select From- To to set the timer for the dimmer mode
To erase the entered characters
Capital a z small Numbers, and symbols Select a character
Select a source you want to assign a name to
Sources Maximum number Characters
Adjust the angle to the position you want
Press and hold 0 until the angle adjustment screen appears
When using the remote controller
Changing the control panel angle
Unlock the control panel
Detaching the control panel
Attaching the control panel
CD Changer Operations
When the current disc is an audio CD or a CD Text disc
Playing discs
Select the CD automatic changer
To go to a particular disc directly
When the current disc is an MP3 disc
To change the display pattern
To go to the next track or the previous tracks
Press Mode M while playing
Following operations are only possible
When playing an MP3 disc using a JVC MP3
Either on the same or different hierarchy levels
Folder starts playing
Display can show only six names at a time
To select a disc using the disc lists
Select the number 1 6 for the disc you want to play
Play
Selecting playback modes
To play back tracks at random Random
Random Folder Random Disc Random Off Random All
Repeat Track Repeat Folder
Repeat Track Repeat Disc Repeat Off
External Component Operations
Playing an external component 3 Adjust the volume
Select the external component Line
For the DSP modes, see For the sound iEQ modes, see
Sound Preset equalizing values Mode
Sound modes preset frequency level settings
Additional Information
Available characters
Symptoms Causes Remedies
Troubleshooting
CD Changer Graphics MP3/WMA Playback
Handling discs
Maintenance
FM Tuner
Specifications
AM Tuner
Sensitivity 20 ∝V Selectivity 35 dB
Before mounting Press
Power cannot be turned on
Fuse blows
No sound from the speakers
8 Ω
CR2025
12V
Below, do not connect
Seriously damaged
When connecting an external amplifier to this
Connecting the leads
JVC Amplifier
External component
LV43462-002A
Off =
Canceling the demonstration
PSM
Guide to MP3/WMA
Enhanced-CD
Mixed-CD
Multiple session
An MP3/WMA disc requires a long readout time…?
MP3 files and WMA files Mixed-CD
KD-LH3105
Other files + CD-DA
Enhanced CD
Bit-rate
WMA playback
Joint stereo
ID3-Tag