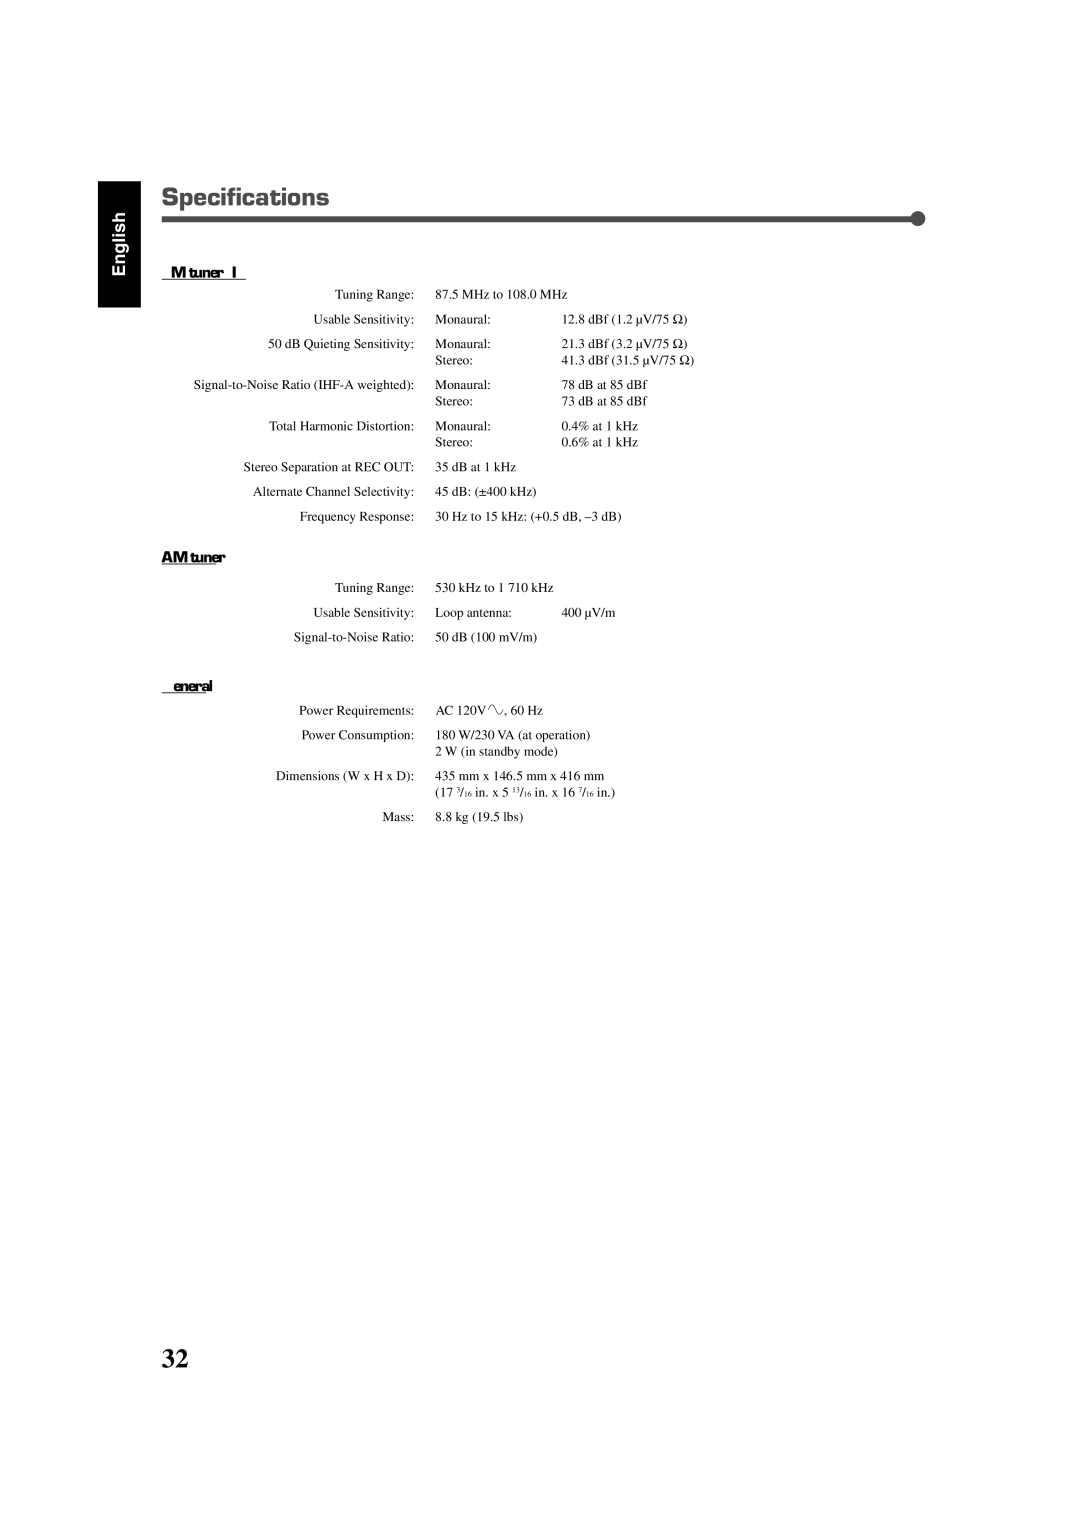
LVT0850-001A
RX-5020VBK / RX-5022VSL
AUDIO/VIDEO CONTROL RECEIVER
INSTRUCTIONS
For the main unit
Warnings, Cautions and Others
For Canada/pour Le Canada
For Canada/pour le Canada
COMPU LINK Remote Control System
Table of Contents
Basic Settings
Sound Adjustments
Front Panel
Remote Control
Parts Identification
Getting Started
Before Installation
Putting Batteries in the Remote Control
Checking the Supplied Accessories
FM antenna connection
Connecting the FM and AM Antennas
Getting Started
AM antenna connection
Connecting the front, center and rear speakers
Connecting the Speakers
Getting Started
Speaker layout diagram
Video Components
Connecting Audio/Video Components
Getting Started
Audio Components
Digital connections
Connecting the Power Cord
Plug the power cord into an AC outlet
Getting Started
To turn off the power into standby mode
Turning On the Power
Basic Operations
Selecting the Source to Play
From the remote control
Listening Only with Headphones
Adjusting the Volume
Basic Operations
Turning Off the Sounds
Turning Off the Power
with the Sleep Timer
Basic Operations
Selecting the Analog or Digital Input Mode
Basic Settings
Setting the Digital Input
DIGITAL IN Terminals
Before you start, remember
Basic Settings
Setting the Speaker Information Remote
Subwoofer information
Basic Settings
1 Press SETTING repeatedly until
Basic Settings
Adjusting the Subwoofer Output Level
Sound Adjustments
Attenuating the Input Signal
Adjusting the Front Speakers
To store the preset stations
Tuning in Stations Manually
Using Preset Tuning
Tuner Operations
Selecting the FM Reception Mode
Tuner Operations
Dolby Digital
Creating Realistic Sound Fields
Dolby Surround
Dolby Pro Logic
All Channel Stereo
Creating Realistic Sound Fields
Available Surround modes for each input signal
DAP Digital Acoustic Processor modes
Turning on or off the Surround modes
Creating Realistic Sound Fields
Turning on or off the Surround modes
Selecting the Surround modes
Creating Realistic Sound Fields
Using Dolby Pro Logic II, Dolby Digital
and DTS Digital Surround
From the remote control
3 Press SOUND
4 Turn on Panorama control or off
Creating Realistic Sound Fields
Using DAP Modes and All Channel Stereo
3Press the play 3 button on the CD player
COMPU LINK Remote Control System
2Press the record ¶ button and the pause
button on the cassette deck at the same time
Sound Adjustment
Operating JVC’s Audio/Video Components
Audio/Video Components
Operating Audio Components
CD recorder
Operating JVC’s Audio/Video Components
CD changer
Cassette deck
TV VOLUME +
Components
Operating Video Components
Operating JVCs Audio/ Video
Operating Other Manufacturers’ Video Equipment
Other Manufacturers Video Equipment
POSSIBLE CAUSE
Troubleshooting
PROBLEM
SOLUTION
Audio
Specifications
Output Power
Amplifier
General
Specifications
FM tuner IHF
AM tuner
Authorized Service Centers
Do not service the television yourself
Accessories
TOLL FREE
WHAT WE WILL DO
LIMITED WARRANTY
WHAT YOU MUST DO FOR WARRANTY SERVICE
WHAT IS NOT COVERED
VICTOR COMPANY OF JAPAN, LIMITED
1201NHMMDWJEIN
RECEPTEUR DE CONTROL AUDIO/VIDEO
RX-5020VBK / RX-5022VSL
AUDIO/VIDEO CONTROL RECEIVER
INSTRUCTIONS
For the main unit
Warnings, Cautions and Others
For Canada/pour Le Canada
For Canada/pour le Canada
Sound Adjustments
English
Table of Contents
Basic Settings
Front Panel
Remote Control
Parts Identification
English
General Precautions
Before Installation
Putting Batteries in the Remote Control
Checking the Supplied Accessories
AM antenna connection
Connecting the FM and AM Antennas
Getting Started
English
Connecting the subwoofer speaker
Connecting the Speakers
Speaker layout diagram
Connecting the front, center and rear speakers
Audio Components
Connecting Audio/Video Components
Getting Started
English
Digital connections
Connecting the Power Cord
Plug the power cord into an AC outlet
English
English
Turning On the Power
To turn off the power into standby mode
Basic Operations
To increase the volume, turn MASTER
Listening Only with Headphones
Adjusting the Volume
From the remote control
Signal and speaker indicators on the display
Turning Off the Power
with the Sleep Timer
Basic adjustment auto memory
The display changes to show the current setting
Basic Settings
Setting the Digital Input
From the remote control
Subwoofer information
Basic Settings
Setting the Speaker Information Remote
English
Register the sizes of all the connected speakers
English
English
Basic Settings
Adjusting the Subwoofer Output Level
Sound Adjustments
Attenuating the Input Signal
Adjusting the Front Speakers
Pressing FM/AM TUNING UP increases
Tuning in Stations Manually
Using Preset Tuning
To store the preset stations
Selecting the FM Reception Mode
English
Dolby Pro Logic
Creating Realistic Sound Fields
English
Dolby Surround
All Channel Stereo
Available Surround modes for each input signal
English
DAP Digital Acoustic Processor modes
Selecting the Surround modes
Creating Realistic Sound Fields
English
Turning on or off the Surround modes
and DTS Digital Surround
Using Dolby Pro Logic II, Dolby Digital
From the remote control
English
10to +10
Creating Realistic Sound Fields
English
4 Turn on Panorama control or off
2 Press SURROUND ON/OFF to
Using DAP Modes and All Channel Stereo
English
Automatic Source Selection
COMPU LINK Remote Control System
English
Synchronized Recording
Operating Audio Components
Sound Adjustment
Operating JVC’s Audio/Video Components
English
Cassette deck
Operating JVC’s Audio/Video Components
English
CD changer
DVD player
TV VOLUME +
English
Operating Video Components
Hitachi
Operating Other Manufacturers’ Video Equipment
English
Start playback
English
English
Troubleshooting
The power does not come on
Amplifier
Specifications
Output Power
English
AM tuner
Specifications
English
FM tuner IHF
VICTOR COMPANY OF JAPAN, LIMITED
EN, FR
J C 0102NHMMDWJEIN