3 CONNECTIONS
3-3 Connecting the Rear Panel Input/Output Terminal Connections
4 |
U model |
|
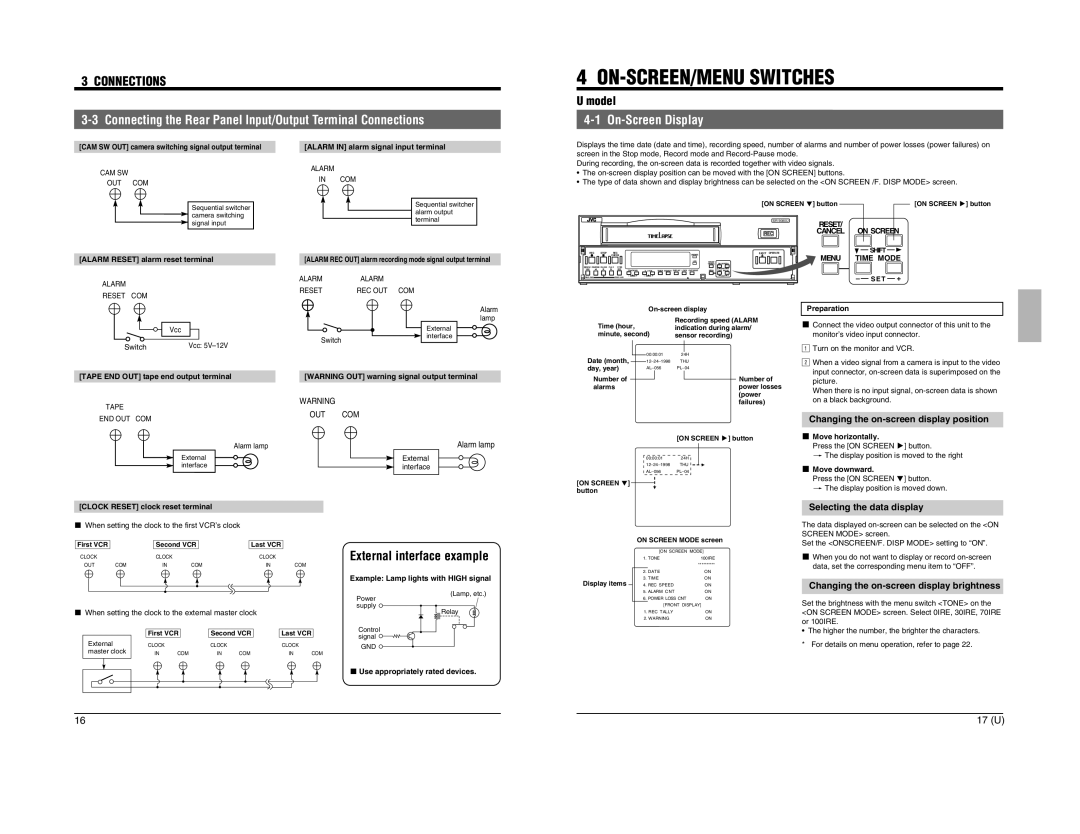
[CAM SW OUT] camera switching signal output terminal
CAM SW
OUT COM
Sequential switcher
![]() camera switching
camera switching
![]() signal input
signal input
[ALARM IN] alarm signal input terminal | |
ALARM |
|
IN | COM |
| Sequential switcher |
| alarm output |
| terminal |
Displays the time date (date and time), recording speed, number of alarms and number of power losses (power failures) on |
screen in the Stop mode, Record mode and |
During recording, the |
•The
•The type of data shown and display brightness can be selected on the <ON SCREEN /F. DISP MODE> screen.
[ON SCREEN 7] button | [ON SCREEN t] button | |
� |
|
|
RESET/ |
| |
| ON SCREEN | |
REC | CANCEL | |
|
| SHIFT |
[ALARM RESET] alarm reset terminal
[ALARM REC OUT] alarm recording mode signal output terminal | |
ALARM | ALARM |
REC | STOP | REC |
|
|
|
|
|
| CHECK |
|
|
| OPERATE |
|
|
|
|
|
| HDR |
REW REVERSE PAUSE | PLAY FF |
|
|
|
| |
|
| TRACKING | V. LOCK | TIMER SEARCH DISPLAY LOCK CNT RESET | ||
FIELD REV |
| FIELD ADV – | + | – | + |
|
RESET/ | ON SCREEN |
CANCEL | |
| SHIFT |
MENU | TIME MODE |
| – S E T + |
EJECT OPERATE |
MENU TIME MODE |
ALARM
RESET COM
Vcc
Switch
Vcc:
RESET | REC OUT COM |
| Alarm |
| lamp |
| External |
Switch | interface |
|
Time (hour, | Recording speed (ALARM |
indication during alarm/ | |
minute, second) | sensor recording) |
| |
| [MENU] |
00:00:01 | 24H |
Preparation
5 Connect the video output connector of this unit to the 1monitor’s video input connector.
2Turn on the monitor and VCR.
[TAPE END OUT] tape end output terminal
TAPE
END OUT COM
Alarm lamp
External interface
[WARNING OUT] warning signal output terminal | |
WARNING |
|
OUT | COM |
| Alarm lamp |
| External |
| interface |
Date (month, | THU | |
day, year) | ||
Number of |
| Number of |
alarms |
| power losses |
|
| (power |
|
| failures) |
|
| [ON SCREEN t] button |
|
| [MENU] |
| 00:00:01 | 24H |
| THU | |
| ||
[ON SCREEN 7] |
|
|
button |
|
|
When a video signal from a camera is input to the video input connector,
Changing the on-screen display position
5 Move horizontally. Press the [ON SCREEN t] button.
[The display position is moved to the right
5 Move downward. Press the [ON SCREEN 7] button.
[The display position is moved down.
[CLOCK RESET] clock reset terminal |
Selecting the data display
5 When setting the clock to the first VCR’s clock |
|
| ||||||
First VCR |
| Second VCR |
| Last VCR |
|
| ||
CLOCK |
| CLOCK |
|
|
| CLOCK |
|
|
OUT | COM | IN | COM |
| IN | COM |
| |
|
|
| ||||||
|
|
|
| |||||
5 When setting the clock to the external master clock |
|
| ||||||
|
| First VCR | Second VCR | Last VCR |
| |||
External |
| CLOCK |
|
| CLOCK |
| CLOCK |
|
master clock | IN | COM | IN | COM | IN | COM | ||
External interface example
Example: Lamp lights with HIGH signal
(Lamp, etc.) Power
supply ![]()
![]()
![]() Relay
Relay
Control signal ![]()
![]()
![]()
GND ![]()
Display items
ON SCREEN MODE screen | |
[ON SCREEN MODE] | |
1. TONE | 100IRE |
| ********** |
2. DATE | ON |
3. TIME | ON |
4. REC SPEED | ON |
5. ALARM CNT | ON |
6. POWER LOSS CNT | ON |
[FRONT DISPLAY] | |
1. REC TALLY | ON |
2. WARNING | ON |
The data displayed
5 When you do not want to display or record
Changing the on-screen display brightness
Set the brightness with the menu switch <TONE> on the <ON SCREEN MODE> screen. Select 0IRE, 30IRE, 70IRE or 100IRE.
•The higher the number, the brighter the characters.
* | For details on menu operation, refer to page 22. |
5 Use appropriately rated devices.
16 | 17 (U)17 |