1 INTRODUCTION
1-3 Precautions Video cassette
![]()
![]()
![]() Erasure prevention tab U model
Erasure prevention tab U model
Timelapse recording is performed over very long periods of time which means that a durable tape is required. When using VHS tapes, do not use tapes with recording times of more than 160 minutes (T-
•Only use video cassette bearing the ![]()
![]()
![]()
![]() mark.
mark.
•To prevent accidental erasure of a recorded tape, break the erasure prevention tab on the cassette. To use a cassette with a broken tab, place a piece of cellophane tape over the broken tab.
•Video cassettes cannot be used upside down.
•Leaving the tape in a partially wound condition for a long time may damage the tape. Rewind the tape to the beginning before storage.
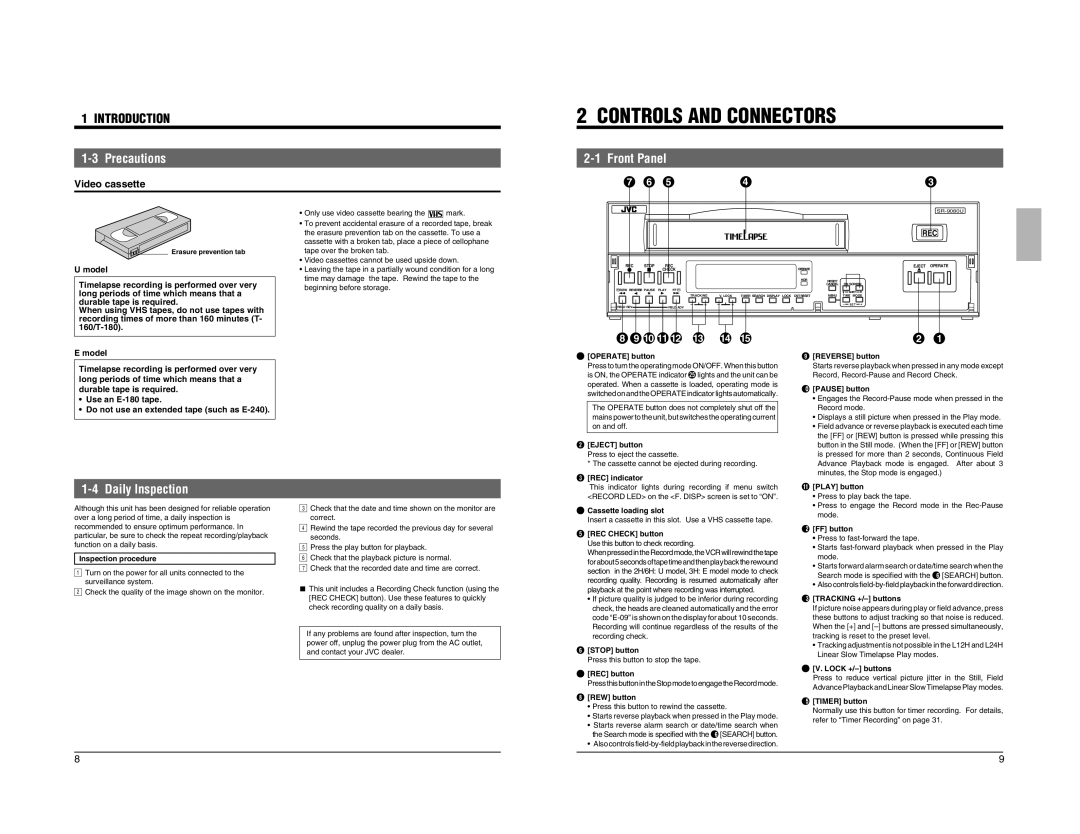
2 | CONTROLS AND CONNECTORS |
| |||
|
|
| |||
| 7 | 6 | 5 | 4 | 3 |
�
|
|
|
|
|
|
|
| REC |
REC | STOP | REC |
|
|
|
|
| EJECT OPERATE |
|
| CHECK |
|
|
| OPERATE |
|
|
|
|
|
|
|
| HDR | RESET/ | ON SCREEN |
|
|
|
|
|
|
| CANCEL | |
REW REVERSE PAUSE | PLAY FF |
|
|
|
|
| SHIFT | |
|
| TRACKING | V. LOCK | TIMER SEARCH DISPLAY LOCK CNT RESET | MENU | TIME MODE | ||
FIELD REV |
| – | + | – | + |
|
| – S E T + |
| FIELD ADV |
|
|
|
|
|
| |
E model
Timelapse recording is performed over very long periods of time which means that a durable tape is required.
•Use an
•Do not use an extended tape (such as
| 8 | 9 10 11 12 | 13 | 14 | 15 |
1 | [OPERATE] button |
|
|
| |
| Press to turn the operating mode ON/OFF. When this button | ||||
| is ON, the OPERATE indicator t lights and the unit can be | ||||
| operated. When a cassette is loaded, operating mode is | ||||
| switched on and the OPERATE indicator lights automatically. | ||||
| The OPERATE button does not completely shut off the | ||||
| mains power to the unit, but switches the operating current | ||||
| on and off. |
|
|
|
|
2 | [EJECT] button |
|
|
| |
| Press to eject the cassette. |
|
|
| |
| * The cassette cannot be ejected during recording. | ||||
3 | [REC] indicator |
|
|
| |
| 2 | 1 |
9 | [REVERSE] button |
|
| Starts reverse playback when pressed in any mode except | |
| Record, | |
0 | [PAUSE] button |
|
•Engages the
•Displays a still picture when pressed in the Play mode.
•Field advance or reverse playback is executed each time the [FF] or [REW] button is pressed while pressing this button in the Still mode. (When the [FF] or [REW] button is pressed for more than 2 seconds, Continuous Field Advance Playback mode is engaged. After about 3 minutes, the Stop mode is engaged.)
1-4 Daily Inspection
Although this unit has been designed for reliable operation over a long period of time, a daily inspection is recommended to ensure optimum performance. In particular, be sure to check the repeat recording/playback function on a daily basis.
1Inspection procedure
Turn on the power for all units connected to the 2surveillance system. Check the quality of the image shown on the monitor.
3Check that the date and time shown on the monitor are
4correct. Rewind the tape recorded the previous day for several 5seconds.
6Press the play button for playback.
7Check that the playback picture is normal. Check that the recorded date and time are correct.
5This unit includes a Recording Check function (using the [REC CHECK] button). Use these features to quickly check recording quality on a daily basis.
If any problems are found after inspection, turn the power off, unplug the power plug from the AC outlet, and contact your JVC dealer.
| This indicator lights during recording if menu switch |
| <RECORD LED> on the <F. DISP> screen is set to “ON”. |
4 Cassette loading slot | |
| Insert a cassette in this slot. Use a VHS cassette tape. |
5 | [REC CHECK] button |
| Use this button to check recording. |
| When pressedin theRecord mode,the VCRwill rewind the tape |
| for about 5 seconds of tape time and then play back the rewound |
| section in the 2H/6H: U model, 3H: E model mode to check |
| recording quality. Recording is resumed automatically after |
| playback at the point where recording was interrupted. |
•If picture quality is judged to be inferior during recording check, the heads are cleaned automatically and the error code
6 | [STOP] button |
| Press this button to stop the tape. |
7 | [REC] button |
| Press this button in the Stop mode to engage the Record mode. |
8 | [REW] button |
•Press this button to rewind the cassette.
•Starts reverse playback when pressed in the Play mode.
•Starts reverse alarm search or date/time search when
the Search mode is specified with the ^ [SEARCH] button.
•Also controls
! [PLAY] button • Press to play back the tape. • Press to engage the Record mode in the
@ [FF] button
•Press to
•Starts
•Starts forward alarm search or date/time search when the
Search mode is specified with the ^ [SEARCH] button.
•Also controls
# [TRACKING
$ | [V. LOCK |
| Press to reduce vertical picture jitter in the Still, Field |
| Advance Playback and Linear Slow Timelapse Play modes. |
% | [TIMER] button |
| Normally use this button for timer recording. For details, |
| refer to “Timer Recording” on page 31. |
8 | 9 |