2 CONTROLS AND CONNECTORS U model 2-1 Front Panel
24 | 25 | 26 |
�
|
|
|
|
| REC |
REC | STOP REC |
|
|
| EJECT OPERATE |
| CHECK | OPERATE |
|
|
|
|
| HDR | RESET/ | ON SCREEN | |
|
|
| CANCEL | ||
REW REVERSE PAUSE PLAY FF |
|
| SHIFT |
| |
|
|
|
|
| |
| TRACKING | V. LOCK TIMER SEARCH DISPLAY LOCK CNT RESET | MENU | TIME MODE | |
FIELD REV | – + | – + |
| – S E T | + |
FIELD ADV |
|
|
|
| |
|
| 16 17 18 19 | 20 21 | 22 | 23 |
2 CONTROLS AND CONNECTORS E model 2-1 Front Panel
24 | 25 |
�
|
|
|
|
| REC |
REC | STOP REC |
|
|
| EJECT OPERATE |
| CHECK | OPERATE |
|
|
|
|
|
| RESET/ | ON SCREEN | |
|
|
| CANCEL | ||
REW REVERSE PAUSE PLAY FF |
|
| SHIFT |
| |
| TRACKING | V. LOCK TIMER SEARCH DISPLAY LOCK CNT RESET | MENU | TIME MODE | |
FIELD REV | – + | – + |
| – S E T | + |
FIELD ADV |
|
|
|
| |
|
| 16 17 18 19 | 20 21 | 22 | 23 |
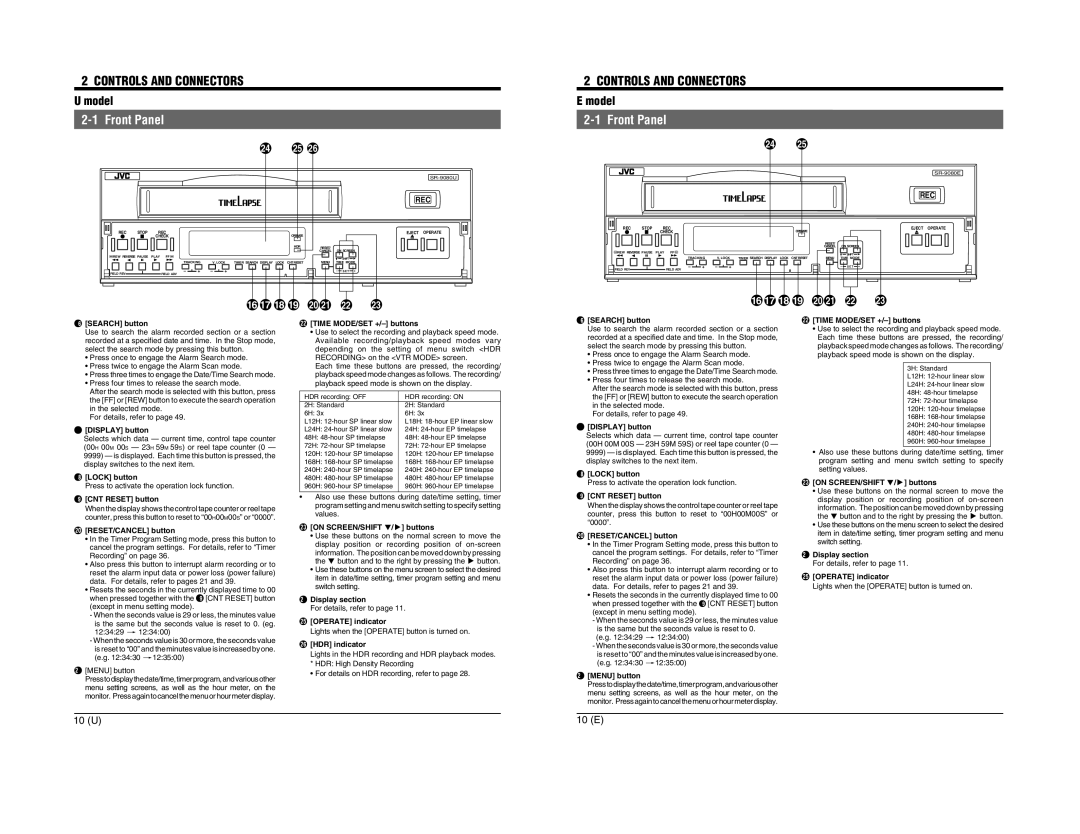
^ [SEARCH] button Use to search the alarm recorded section or a section recorded at a specified date and time. In the Stop mode, select the search mode by pressing this button.
•Press once to engage the Alarm Search mode.
•Press twice to engage the Alarm Scan mode.
•Press three times to engage the Date/Time Search mode.
•Press four times to release the search mode.
After the search mode is selected with this button, press the [FF] or [REW] button to execute the search operation in the selected mode.
For details, refer to page 49.
& [DISPLAY] button Selects which data — current time, control tape counter (00H 00M 00S — 23H 59M 59S) or reel tape counter (0 — 9999) — is displayed. Each time this button is pressed, the display switches to the next item.
* [LOCK] button Press to activate the operation lock function.
w [TIME MODE/SET +/–] buttons
•Use to select the recording and playback speed mode. Available recording/playback speed modes vary depending on the setting of menu switch <HDR RECORDING> on the <VTR MODE> screen.
Each time these buttons are pressed, the recording/ playback speed mode changes as follows. The recording/ playback speed mode is shown on the display.
HDR recording: OFF | HDR recording: ON |
2H: Standard | 2H: Standard |
6H: 3x | 6H: 3x |
L12H: | L18H: |
L24H: | 24H: |
48H: | 48H: |
72H: | 72H: |
120H: | 120H: |
168H: | 168H: |
240H: | 240H: |
480H: | 480H: |
960H: | 960H: |
^ [SEARCH] button Use to search the alarm recorded section or a section recorded at a specified date and time. In the Stop mode, select the search mode by pressing this button.
•Press once to engage the Alarm Search mode.
•Press twice to engage the Alarm Scan mode.
•Press three times to engage the Date/Time Search mode.
•Press four times to release the search mode.
After the search mode is selected with this button, press the [FF] or [REW] button to execute the search operation in the selected mode.
For details, refer to page 49.
& [DISPLAY] button Selects which data — current time, control tape counter (00H 00M 00S — 23H 59M 59S) or reel tape counter (0 — 9999) — is displayed. Each time this button is pressed, the display switches to the next item.
* [LOCK] button Press to activate the operation lock function.
w [TIME MODE/SET
•Use to select the recording and playback speed mode. Each time these buttons are pressed, the recording/ playback speed mode changes as follows. The recording/ playback speed mode is shown on the display.
3H: Standard L12H:
•Also use these buttons during date/time setting, timer program setting and menu switch setting to specify setting values.
e [ON SCREEN/SHIFT 7/t] buttons
• Use these buttons on the normal screen to move the |
(
)
q
[CNT RESET] button When the display shows the control tape counter or reel tape counter, press this button to reset to “00H00M00S” or “0000”.
[RESET/CANCEL] button
•In the Timer Program Setting mode, press this button to cancel the program settings. For details, refer to “Timer Recording” on page 36.
•Also press this button to interrupt alarm recording or to reset the alarm input data or power loss (power failure) data. For details, refer to pages 21 and 39.
•Resets the seconds in the currently displayed time to 00
when pressed together with the | ( [CNT RESET] button |
(except in menu setting mode). |
|
-When the seconds value is 29 or less, the minutes value is the same but the seconds value is reset to 0. (eg. 12:34:29 [ 12:34:00)
-When the seconds value is 30 or more, the seconds value is reset to “00” and the minutes value is increased by one. (e.g. 12:34:30 [12:35:00)
[MENU] button Presstodisplaythedate/time,timerprogram,andvariousother menu setting screens, as well as the hour meter, on the monitor. Press again to cancel the menu or hour meter display.
•Also use these buttons during date/time setting, timer program setting and menu switch setting to specify setting values.
e [ON SCREEN/SHIFT 7/t] buttons
•Use these buttons on the normal screen to move the display position or recording position of
•Use these buttons on the menu screen to select the desired item in date/time setting, timer program setting and menu switch setting.
r Display section For details, refer to page 11.
t [OPERATE] indicator Lights when the [OPERATE] button is turned on.
y [HDR] indicator Lights in the HDR recording and HDR playback modes. * HDR: High Density Recording
•For details on HDR recording, refer to page 28.
( [CNT RESET] button When the display shows the control tape counter or reel tape counter, press this button to reset to “00H00M00S” or “0000”.
) [RESET/CANCEL] button
•In the Timer Program Setting mode, press this button to cancel the program settings. For details, refer to “Timer Recording” on page 36.
•Also press this button to interrupt alarm recording or to reset the alarm input data or power loss (power failure) data. For details, refer to pages 21 and 39.
•Resets the seconds in the currently displayed time to 00 when pressed together with the ( [CNT RESET] button (except in menu setting mode).
-When the seconds value is 29 or less, the minutes value is the same but the seconds value is reset to 0.
(e.g. 12:34:29 [ 12:34:00)
-When the seconds value is 30 or more, the seconds value is reset to “00” and the minutes value is increased by one. (e.g. 12:34:30 [12:35:00)
q | [MENU] button |
| Presstodisplaythedate/time,timerprogram,andvariousother |
| menu setting screens, as well as the hour meter, on the |
| monitor. Press again to cancel the menu or hour meter display. |
display position or recording position of |
information. The position can be moved down by pressing |
the 7 button and to the right by pressing the t button. |
• Use these buttons on the menu screen to select the desired |
item in date/time setting, timer program setting and menu |
switch setting. |
r Display section For details, refer to page 11.
t [OPERATE] indicator Lights when the [OPERATE] button is turned on.
10 (U) | 10 (E) |