User’s Guide Network Scanner Operations
Energy Star
What is an Energy Star Product?
Introduction
OpenSSL Statement
Trademarks and registered trademarks
Original SSLeay License
Page
IP Address Setting
Contents
Auto-RX Check
DNS Setting Host Name
Subnet Mask Gateway Network Board Set
Mail Address
Checking the network connection Ping
Specifying e-mail server settings
User authentication and account track
Entering a domain name
Registering destinations
Scan to FTP
Scan to SMB
Searching the destination information from the server
Receiving Internet faxes
FAX Program Registration User mode
Items that can be specified using PageScope Web Connection
Using PageScope Web Connection
One-Touch Key Registration User mode
Specifying management settings
Specifying software switch settings machine functions
Specifying transmission report settings TX Settings
Checking the destinations registered in one-touch dial
Specifying SSL/TLS settings
Checking the transmission conditions TX Report
Checking the reception conditions RX Report
Product specifications 12-2
Troubleshooting 11-6
About this manual
Product name Notations in the manual
User’s Guide Box Operations
User’s Guides
Following User’s Guides have been prepared for this machine
User’s Guide Network Scanner Operations this manual
User’s Guide Facsimile Operations
To store an overlay image Store Overlay
Explanation of manual conventions
Reminder
Introduction 200/250/350
Features
Scan to E-Mail
Mail server Client computer Intranet Internet
Scan to FTP
Scan to SMB
Scan to HDD
Internet faxing
Mail server Client computer Internet fax terminal Intranet
PageScope Web Connection
Features 200/250/350
Setup
Connecting to a LAN
LED color Status Description
Setup Status of each LED is described below
Detail
Specifying the network settings
Machine Name Smtp Settings Smtp Server Address
Press the Utility/Counter key
Reminder
Touch Network Settings
Touch Admin
Touch Enter until the first screen appears 200/250/350
Setup Specify each network setting, and then touch Enter
Network Setting screen, touch Basic Settings Touch Dhcp
Basic Settings
Settings
Settings can be specified for the following
Touch Enter
Touch Subnet Mask
Subnet Mask
Gateway
Network Board Set
Setup Use the keypad to type in the IP address
Touch Enter 200/250/350
To specify the network board settings
DNS Setting
DNS Settings
Network Setting screen, touch DNS Settings
Host Name
DNS Server Address
Domain Name
Input DNS Server Address
To specify the machine name
Network Setting screen, touch Machine Name
Machine Name
Specify the name of this machine
Smtp Settings
Smtp Server Address
G H
Mail Address
Network Setting screen, touch Smtp Settings
Touch E-Mail Address
Smtp Authentication User Name
Smtp Authentication Password
POP3 Server Address
POP3 Settings
Enter POP3 Server Address
POP3 User Name
Setup Touch Enter
Type in the POP3 user name, and then touch Enter
Setup
Auto-RX Check
Network Setting screen, touch POP3 Settings
Touch Auto-RX Check
Priority Compress Level E-Mail Mode
Touch TX Size Max
TX Size Max
Touch TX Quality Max
TX Quality Max
Touch Coding Method
Coding Method
Select the encoding method, and then touch Enter
To specify the scan mode settings
Priority Compress Level Scan Mode
Ministrator mode on
Scanner Settings
Select on or OFF, and then touch Enter
Network Setting screen, touch Scanner Settings
Activity Report
Touch Activity Report
RX Doc. Header Print
Select the text insertion method, and then touch Enter
Mail Header Text
Touch Gateway TX
Gateway TX
Touch Subject Registration
Subject Registration
Select on or OFF for Page Division and Binary Division
Divide Settings
If Binary Division is set to ON, touch Binary Division Size
Setup Type in the data division size, and then touch Enter
Touch Ldap Search
Ldap Setting
Network Setting screen, touch Ldap Setting
Ldap Search
Yes No
Ldap server settings can be specified for the following
Ldap Server Setting
Specify the detailed Ldap server settings
To specify the Ldap server settings
Check the settings, and then touch Enter
Setup Touch Fwd, and then specify the settings
Search Default Setting
LDAP1LDAP2
IP Filtering
To specify IP filtering settings
Setup Touch Enable or Disable
To the network administrator
Specifying e-mail server settings
Registering a domain name
Touch User Setting
If the optional fax kit has been installed, touch FAX
Entering a domain name
Touch Enter until the initial screen appears 200/250/350
Touch Domain Name
Test
Using a registered domain name
Press the Start key Pinging is performed 200/250/350
Enter Administrator mode, and then touch Admin Touch Ping
Checking the network connection Ping
To check the network connection
Setup Check the results, and then touch Enter
If user authentication settings have been specified
User authentication and account track
User Name Test Password
If account track settings have been specified
Scan to E-Mail
Selecting a one-touch dial button
Specifying a destination with a one-touch dial button
IndexList
Press the Start key 200/250/350
Press the Fax/Scan key
Entering the number of a one-touch dial button
Dial button instead of touching the button
Position the document to be scanned
JobListMemoryFree 100%
Press the Start key
Touch Search
Searching for a one-touch dial button
#001 Osaka Search
Specifying chain dialing
Touch Direct Input
Entering an address
To enter an address
Position the document to be scanned Press the Fax/Scan key
Mail
Test@test.local
Press the Start key 200/250/350
Quality
Specifying the scanning quality and zoom ratio
Touch Quality & Reduction
To specify the scanning quality
Touch Density, and then touch the desired density setting
To specify the density settings
Density
Original Size Set
Letter
Description
Specifying additional functions
Specifying the transmission report printing conditions
To specify the transmission report printing conditions
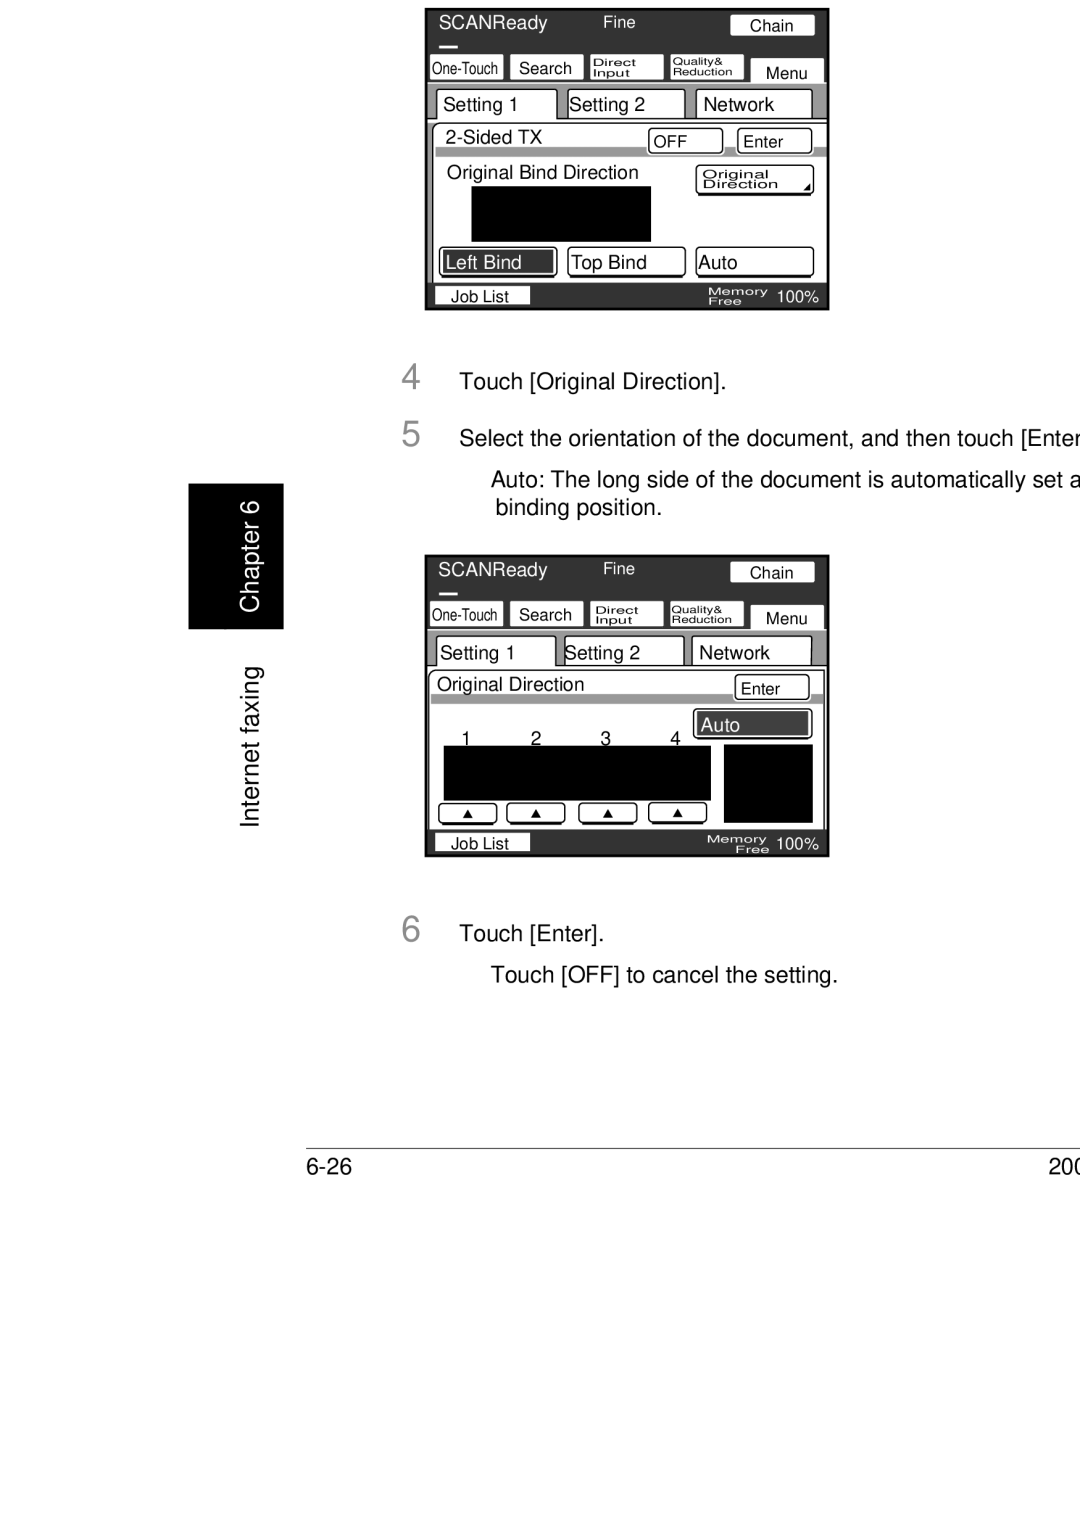
Specifying double-sided transmission
Specifying 2in1 transmission
Touch Enter Touch OFF to cancel the settings 200/250/350
Specifying priority transmission
Specifying timer transmission
Select the print position of the stamp, and then touch Enter
Specifying the stamp setting
Changing the subject
Specifying a reply address
Reply E-Mail Address OFF
Specifying a file name
Description Refer to
Other functions
Viewing a transmission report
If transmission could not be completed
Resending
Programming a one-touch dial button
Registering destinations
To program a one-touch dial button
Utility Counter
200/250/350
SMB FTP
Touch Enter until the initial screen appears
Changing or deleting a one-touch dial button
Touch the one-touch dial button to be copied
Copying a one-touch dial button
Touch One-Touch, then One-Touch Copy
Registering/deleting a secondary destination
Select the communication mode for the secondary destination
Destination Mode
To name an index
Naming an index
Touch the index button to be programmed
Touch Enter until the first screen appears
Scan to E-Mail Type in the index name, and then touch Enter
Registering mail programs
Quality Density Zoom Original Size Set
Chapter
To register a mail program
One-Touch
FAX Program Cancel Back
Touch Next Touch Transmission Setting
Dest Quality Menu
Changing/deleting a mail program
Scan to E-Mail 200/250/350
Scan to FTP
Fax/Scan
IndexList
Position the document to be scanned 200/250/350
Dial button instead the button
Scan to FTP Press the Fax/Scan key
JPN
Press the Start key
Touch the desired one-touch dial button 200/250/350
GSR
Press the Start key 200/250/350
Specifying the scanning quality and zoom ratio
To specify the scanning quality
To specify a density setting
Original Size Set
Input Direct Quality
To use the Stamp function, optional stamp unit must be
Specifying the transmission report printing conditions
Job List
Specifying 2in1 transmission
Touch Enter Touch OFF to cancel the settings 200/250/350
FTP
Specifying timer transmission
Specifying the stamp setting
Specifying the e-mail notification destination
Select E-Mail Notification Address From One-Touch keys
Job List
Result ED09C6
Resending
Address or host name
Chapter
Touch One-Touch
Com. mode Cancel
Select whether to use a proxy server, and then touch Next
Check the FTP server information, and then touch Enter
Scan to FTP Check the information to be registered
Changing or deleting a one-touch dial button
Copying a one-touch dial button
Scan to FTP 200/250/350
Scan to SMB
Fax/Scan
IndexList
# +
Scan to SMB Press the Fax/Scan key
Press the Start key 200/250/350
Searching for a one-touch dial button
#001 Osaka Search
Press the Start key
Specifying the scanning quality and zoom ratio
To specify the scanning quality
Density
Original Size Set
Direct Reduction Menu Input Quality
Specifying additional functions
Setting Description
Job List
Specifying 2in1 transmission
Touch Enter Touch OFF to cancel the setting
Detail
Specifying timer transmission
Specifying the stamp setting
Specifying the e-mail notification destination
Specifying a file name
Job List
Error code For details, refer to Network error list on
Resending
Windows Server 2003 cannot be specified
Programming one-touch dial button
Utility Counter
Touch One-Touch
SMB
Type in the login user name, and then touch Next
Check the destination information
Changing or deleting a one-touch dial button
Scan to SMB Chapter
Copying a one-touch dial button
Internet faxing
Selecting a one-touch button
Fax/Scan
IndexList
Press the Start key
Fax/Scan
Specified one-touch dial button is highlighted 200/250/350
Internet faxing Press the # key on the control panel
Press the Start key
Fax/Scan
#001 Osaka Search
Press the Start key
Internet faxing
Fax/Scan
Internet faxing Touch InternetFAX, Internet FAX, then Enter
Test@test.local
Direct
Specifying the scanning quality and zoom ratio
To specify the scanning quality
To specify a density settings
Original Size Set
Letter
Specifying additional functions
Specifying the transmission source setting
Chain
Check the printing conditions, and then touch Enter
Specifying 2in1 transmission
Touch Enter Touch OFF to cancel the setting 200/250/350
Specifying rotation transmission
Specifying priority transmission
Specifying the stamp setting
Changing the subject
Detail
Specifying a file name
Job List
If transmission could not be completed
Pear
Data the can be received
Settings for Internet faxing
Receiving Internet faxes
Receiving Internet faxes automatically
Touch User Management
Receiving Internet faxes manually
POP3 RX
Registering destinations
Lect Letter, Legal, or 11 ×
Utility Counter
Touch One-Touch
InternetFAX
Internet FAX Destination
#014
Copying a one-touch dial button
Com.Mode
Destination Mode Communication Mode Mail
Using an Ldap server
Basic Search and Detail Search
Searching the destination information from the server
Press the Fax/Scan key Touch Search
To search the destination information
Touch Ldap Search
Touch Start Search
Type in the keyword, and then touch Enter
Select the transmission method, and then touch Enter
On the Ldap Search screen, touch ON, and then touch Enter
Ultility/Counter
Enter the destination information, and then touch Set
#015
Using an Ldap server 200/250/350
Specifying settings using PageScope Web Connection
Scan tab User mode
Items that can be specified using PageScope Web Connection
Scan tab Administrator mode
TCP/IP
Network tab Administrator mode
Accessing PageScope Web Connection
Using PageScope Web Connection
Operating environment
If account track settings have been applied
If user authentication settings have been applied
To log off, click Log-out in the upper-left corner
Structure
Fax/Scan tab
Logging on to Administrator mode
Specifying settings using PageScope Web Connection Chapter
For Internet Explorer
Web browser cache
For Netscape
Following destination types can be registered here
One-Touch Key Registration User mode
One-Touch Name
Work Setting screen is set to YES
Word
When TX Internet FAX is selected
When TX PC SMB is selected
Specifying settings using PageScope Web Connection Chapter
Naming an index
Specifying settings using PageScope Web Connection Chapter
Registering a one-touch dial destination
Registering a secondary recipient
TX SIP-FAX
Specifying settings using PageScope Web Connection FAX G3
Specifying settings using PageScope Web Connection Chapter
Specifying settings using PageScope Web Connection Chapter
Changing the settings for a one-touch dial destination
Specifying settings using PageScope Web Connection Chapter
Deleting a one-touch dial destination
Specifying settings using PageScope Web Connection Chapter
SMB HDD
FAX Program Registration User mode
Click Apply
Registering fax programs
Be installed
Specifying settings using PageScope Web Connection Chapter
Specifying settings using PageScope Web Connection Chapter
Changing the settings of the fax program
Deleting a fax program
Specifying settings using PageScope Web Connection Chapter
To register domain names
Domain Name Registration User mode
Exporting data as files
Export/Import Administrator mode
Click Save 200/250/350
Importing files
Specifying settings using PageScope Web Connection Chapter
Specifying settings using PageScope Web Connection Chapter
To register transmission sources
TSI Registration
TX Settings Administrator mode
Com. Mode
Specifying the transmission settings
Specifying settings using PageScope Web Connection Chapter
RX Settings Administrator mode
Specifying the reception settings
Nary division Division by Size may not be available
Scan Setting Administrator mode
Specifying the scan settings
Specifying the address of the forwarding destination
TX Document Administrator mode
Specifying settings using PageScope Web Connection Chapter
RX Document Administrator mode
Specifying the processing of received documents at each line
Specifying settings using PageScope Web Connection Chapter
Specifying the processing of other received documents
Report Settings Administrator mode
Specifying the report output settings
DNS
14 TCP/IP Administrator mode
Specifying settings using PageScope Web Connection Chapter
Specifying the TCP/IP settings
Reminder
IP Filtering
Specifying settings using PageScope Web Connection Chapter
Specifying the Ldap settings
Ldap Administrator mode
Ldap Server Setting Administrator mode
Registering an Ldap server
Specifying settings using PageScope Web Connection Chapter
Deleting an Ldap server
Specify settings for the following
Mail/Internet FAX Administrator mode
Smtp
Subject/Text
Other
Specifying the POP3 settings
Reminder
Specifying the Smtp settings
Specifying the subject or text settings
Specifying other settings
Specifying the FTP settings
FTP Configuration Administrator mode
Reminder
Snmp
Specifying the Snmp setting
Select whether or not Snmp is used
21 SSL/TLS Administrator mode
When a certificate is created
Creating certificates
Specifying settings using PageScope Web Connection Chapter
Deleting certificates
Specifying settings using PageScope Web Connection Chapter
Specifying the SSL/TLS settings
Specifying settings using PageScope Web Connection Chapter
Ntlm
User Authentication Administrator mode
Specifying user authentication settings
Specifying management settings
Available parameters
Administrator Management
Specifying management settings
To register a transmission source name
Enter Administrator mode, and then touch Admin
Touch Initial Setting
Registering transmission source names
Type in the transmission source name, and then touch Enter
Touch TSI Registration
Specifying the Quality/Mode settings
Specifying transmission report settings TX Settings
Touch TX Settings
Specifying management settings Touch Quality/Mode
Quality/Mode
Touch Comm. Menu
Specifying Comm. Menu settings
Select TSI print position
Specifying management settings
Memory Lock Time
Touch RX Settings
Touch Memory Lock Time
Specifying management settings Touch Memory RX Time Setting
Touch Memory Lock Password
To specify the Memory Lock Password setting
Cancel Enter
To print manually
Select Memory Lock ON/OFF of RX Doc
Touch Report Settings
Specifying TX Report settings
Touch TX Report
Specify the settings, and then touch Enter
Specifying the Activity Report settings
Touch TX Document
Touch Document Management
Touch TX Forwarding
To specify the processing method for received documents
Specifying the processing of documents received on a port
Touch Network
Touch Port
Select processing of Received Doc
Forwarding Destination
Touch All Other Documents
To specify the processing of received documents
Memory RX
Software switch settings
Specifying software switch settings machine func- tions
0000 0001 252 1111 253 254 255
Touch Software SW
To specify a software switch setting
000 Bit Selection 00110000
Bit Description Setting Erence
Bit Description Setting Reference
Specifying settings for the image in the results report Mode
Specifying administrator forwarding settings mode
Blocking calls from callers that are not specified mode
Specifying Internet fax settings mode
Bit Description Status Refer Ence
Specifying Smtp transmission timeout settings mode
Specifying Smtp reception timeout settings mode
Specifying POP3 reception timeout settings mode
Specifying the default address input screen mode
Specifying DNS query timeout setting mode
Bit Setting 1 0 HEX C2
Specifying switching of the Smtp server mode
Bit Setting 1 1 HEX 0F
Specifying e-mail security functions mode
Specifying the Internet fax full mode function settings mode
Either bit 5, 4, or 3 of mode 380 is set to
Detail
Specifying management settings Chapter
Specifying the export file format mode
Not the use of LPD is
Specifying management settings Chapter
Bits 7 and 0 cannot be changed on the model for Europe
Specifying management settings Chapter
Specifying management settings Chapter
4, 3
Reminder
Touch SSL/TLS
Specifying SSL/TLS settings
TX/RX
Specifying management settings 200/250/350
Reports and lists
To print a transmission report
Checking the transmission conditions TX Report
Touch Reports 10-2 200/250/350
Contents of the report
HDD appears if the optional hard disk
Printing a reception activity report
Checking the reception conditions RX Report
10-5
RX Report
10-6 200/250/350
Printing the One-Touch List
10-8 200/250/350
Contents of the list
To print the mail program list
Printing the mail program list
Mail Program List
10-10 200/250/350
Touch Setting List Setting list is printed
Checking the function settings Setting List
Printing the setting list
Touch Admin Touch Print Lists
10-12 200/250/350
POP 3 password and network administrator password appear as
Scan function troubleshooting
11-2 200/250/350
When the following are displayed
Internet fax transmission/Scan to E-Mail
Network error list
Internet fax reception
11-4 200/250/350
Scan function troubleshooting
ED09CF
11-6 200/250/350
Troubleshooting
Other
11-8 200/250/350
Appendix
Scan to FTP specifications
Product specifications
Internet fax specifications
Scan to E-Mail specifications
Scan to SMB specifications
12-4 200/250/350
Entering text
12-5
12-6 200/250/350
Glossary
Http
12-7
J2RE
12-8 200/250/350
MIB
12-9
SMB
12-10 200/250/350
12-11
12.4
Other settings 8-69,8-72 8-37,8-39 Import 37,2-42
Ldap setting 44,8-4,8-64 8-28
8-78 FTP connection timeout
29,8-13 Network board setting 2-13
POP3 Settings 26,8-4,8-69
Passive mode setting
Password 28,8-14,8-16,8-65
56,9-2 POP3 password 26,2-29,8-69
29,8-43,9-6
User authentication
46,9-12
22,8-42
12-16 200/250/350
Http//konicaminolta.com